
barimpact
-
Posts
52 -
Joined
-
Last visited
Content Type
Profiles
Forums
Gallery
Everything posted by barimpact
-
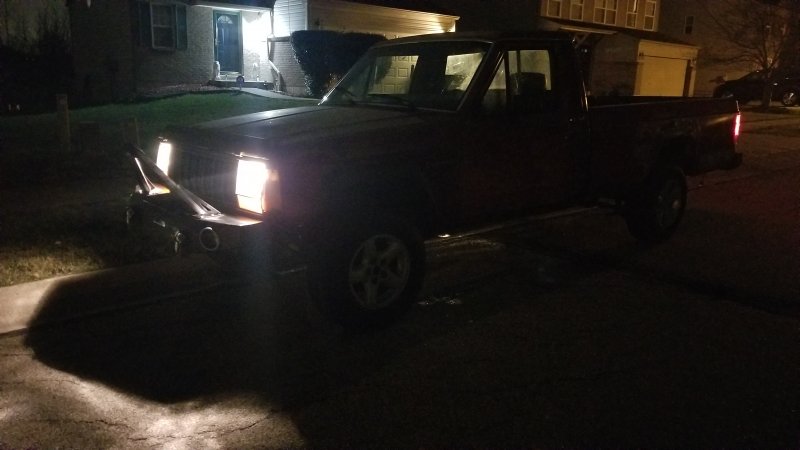
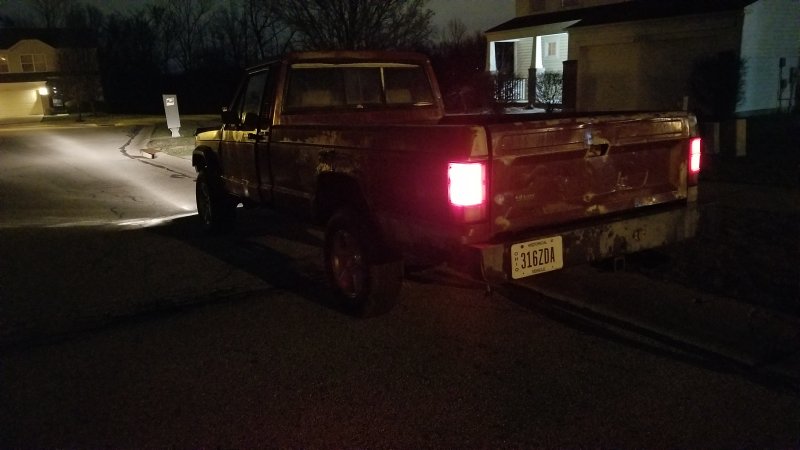
A few projects took priority, and the Comanche sat with a flat tire and a bad starter for a couple months. But today I took some time to get her back on the road. 3rd starter within a year, but I think I figured out the problem and got it sorted out. Progress towards the end goal though, I got all the lights working on the exterior except for the reverse lights (since they aren't huge priority I didn't look into them yet) and license plate lights (they were deleted with the custom rear bumper). Most of the lights weren't working due to a DIY hack job of the trailer light harness built into the rear bumper. But now I can finally legally drive at night!
-
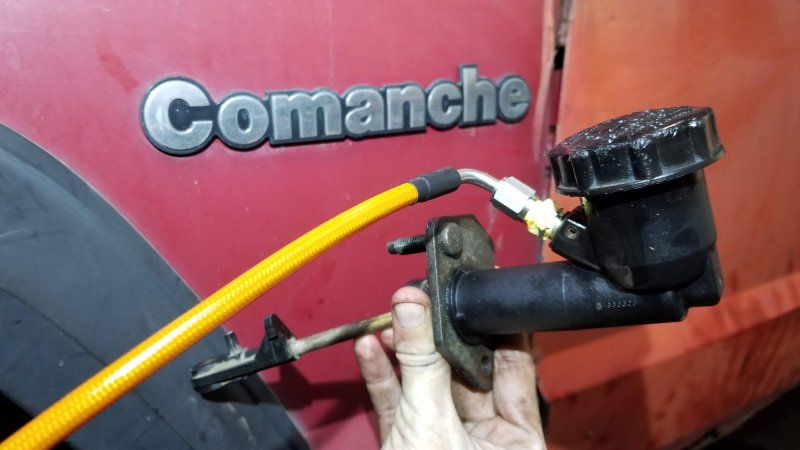
 Hey everyone, I have finished upgrading my plastic hydraulic clutch line to a stainless steel AN3 line. This is good for better clutch response, or more importantly, for those of you that break your plastic one (the same way I did ). I have a YouTube video of the procedure, linked at the end. I did this referencing terrawombat's write up, which was very helpful: Things you need: - 3AN (or -3AN depending on the site) braided stainless steel hose/line, minimum 50 inch length This should be straight at the bottom where it connects to the slave cylinder, and have a 90 degree bend at the top so that when it comes from the master cylinder, it clears the firewall correctly. If you get one less than 50 inches long, it can fit, but will be a tight fit, and you might as well do it right the first time! Here is the one that I bought: https://www.amazon.com/gp/product/B07ZQRB6R7/ref=ppx_yo_dt_b_asin_title_o03_s00?ie=UTF8&psc=1 - Master cylinder to 3AN adapter This piece is pretty simple and is exactly what it says it is. The one I purchased required drilling into the master cylinder, so purchase this one at your own risk! terrawombat found one that fit better. Link: https://www.amazon.com/gp/product/B002Q37CHS/ref=ppx_yo_dt_b_asin_title_o03_s00?ie=UTF8&psc=1 - 7/16-24 Inverted flare to 3AN adapter This is so you can attach the new 3AN braided line to the slave cylinder. This will thread right on. Link to the one I got: https://www.pegasusautoracing.com/productdetails.asp?RecID=24921 - Petroleum teflon tape Probably don't need this (like you don't need it in brake line fittings), but it gave me the extra confidence to not have any leaks in the system since this is aftermarket. Procedure 1) Drain the fluid First thing's first, make sure you are where you can drain the brake fluid from the clutch line. I personally just cut mine apart since it was already broken, and my "quick connect" piece was never going to come apart. However, you can simply open the bleeder valve at the slave cylinder and remove the cap from the master cylinder. While it's all open, pump the clutch pedal a couple times SLOWLY to make sure all the fluid is out (if you do it quickly the fluid will come out at a very high rate of speed and likely spill way beyond your catch can). When finished, snug up the bleeder valve and replace the cap on the master cylinder. 2) Remove the clutch line Like I mentioned above, I cut my clutch line at the bend right before the slave cylinder. You could also work apart the quick disconnect thing if you dare mess with that. But, since you're upgrading, my opinion is to cut it. It makes things a whole lot quicker. For now, leave the line attached to the master cylinder. 3) Remove the master cylinder For this, there are 2 nuts and a pin clip. One nut is on the firewall on the engine side, the other is on the firewall on the pedal side. The pin clip attaches the pedal itself to the rod on the master cylinder. To remove it, just pull the pin out of the pedal and push the rod off the pedal. These are all pretty easy to remove. Next, pull the master cylinder on the engine side towards the engine. It will be pressure fitted and will pop when it releases the clip from the firewall. Once this is out, remove this and the attached clutch line from the truck. 4) Disconnect the clutch line from the master cylinder To do this, grab a punch of some kind. There is a small pin in the master cylinder near where the clutch line attaches to the master cylinder. Use the punch and a hammer to remove this pin. You will have to hit pretty hard if you live in a rusty state as this pin will rust a little and expand. Be careful to have the master cylinder somewhere it is less likely to break; aka, don't just put it on the pavement and smack it with a hammer since it is plastic, too. When this is removed, the clutch line will just pull out of the master cylinder. 5) Attach the master cylinder to 3AN fitting Compare your 3AN fitting to the pressure fitting removed from the master cylinder. If you buy the one I linked above, you will have to drill out the master cylinder. If you go this route, TAKE IT SLOW AND DON'T RUIN THE MASTER CYLINDER. You just need to get the fitting in far enough to put the pin back into the master cylinder, and make sure the rubber o ring fits snug against the walls of the hole you drilled. Once the 3AN fitting is attached, put a very small amount of fluid in the master cylinder. Cover the hole in the fitting with your thumb and try to pump the master cylinder. If it is tough or hard to push, but easy when your finger is not over the hole, you have likely installed it correctly. 6) Attach the braided line to the 3AN fitting Wrap the master cylinder to 3AN fitting with a small amount of petroleum teflon tape. Next, tighten the 90 degree end of the braided line to the master cylinder fitting. Like brake lines, no need to death tighten this, just snug it up properly. 7) Reattach the master cylinder to the truck Press the master cylinder back into its hole in the firewall and tighten the nuts. Reattach the rod to the clutch pedal and install the pin. When attached, the master cylinder should be flush with the firewall, make sure it is not at a strange angle. 8) Route the braided line down to the slave cylinder As easy as it sounds, route the braided line behind the brake booster, down the doghouse, and to the slave cylinder. The next few steps are all to be performed from under the truck. 9) Remove the quick connect fitting Follow the plastic clutch line from the quick connect fitting towards the bell housing and you will find a threaded fitting similar to a brake line. Use wrenches to remove the quick connect. Be wary that brake fluid may still be in the system and can leak out at this point. 10) Attach the inverted flare 3AN fitting Using a small amount of petroleum teflon tape, attach the inverted flare fitting to the slave cylinder. Snug it down properly. 11) Attach the braided line to the inverted flare fitting Using a small amount of petroleum teflon tape, attach the new braided clutch line to the inverted flare fitting with a small amount of petroleum teflon tape. Snug it down properly. 12) Inspect the new system Before filling with fluid and bleeding the clutch, do a quick but thorough inspection of the new line to make sure it is fully attached and does not hit anything. If the line is too long, it could come dangerously close to the front driveshaft on 4x4 models or too close to the header/down pipe of the exhaust. Just make sure it won't be running into anything or hanging too low. 13) Bleed the clutch Grab a friend to bleed the clutch and make sure there are absolutely no leaks in the system. Check the master cylinder often as fluid will deplete from the small reservoir very quickly when filling the new empty line, and you don't want to have to start over many times. 14) Admire your work Take a drive and feel that the clutch is in great working order, and feel the difference in the response of the clutch and gear changes. Many say doing this upgrade makes for smoother shifts, but since I had a broken line and bought the truck as a non-driving project, I cannot say myself. YouTube Video I have made a video with a visual instructional on how I did my clutch line, seen here: I hope this is helpful! Let me know if you have questions.
 -
Hey everyone, I have recently swapped a 99 XJ 4.0L into my 91 MJ and because of all the confusion I found researching the topic, I decided to create a solid write up on this. My 99 engine still contains the new style intake manifold to maintain the better air flow. This will be mostly text here, but I have created a video for YouTube to show that this DOES in fact work like stock (link at the bottom for those that don't want to read all this). The first thing I'll say is this: the golden rule to the 4.0 swaps are that newer engines generally work perfect in the old style, but NOT the other way around! And the reason I say generally is because I cannot say every swap will be guaranteed to work. However, for the sake of this write up, I WILL ONLY BE DISCUSSING XJ TO XJ/MJ SWAPS. I recommend you do not throw ANYTHING away until the swap is completed. Having all the parts around may be a little cluttered, but you'll be very happy when you have the old parts to reference. Even better, I was able to keep the entire wrecked 99 XJ nearby through the whole process. DOING THE SWAP First off, the swap itself. If you are reading this, I assume you have the skills/confidence/knowledge to unbolt an engine, pull it out, and put another nearly identical engine in its place. This is about as bolt in as a swap like this could be. ELECTRONICS Just about every single plug/sensor there is in the 97-99 engine is DIFFERENT from the pre-97 engines, even though the sensor works almost the exact same. Here's a list of the sensors/electronics you need to KEEP FROM THE OLD STYLE ENGINE: -Oil pressure sensor -Coolant temperature sensor -Coil pack -Distributor -Idle air controller -Throttle position sensor -Intake temperature sensor -O2 sensors -Injectors -Crank position sensor -Alternator -Cruise control actuator There may be some I'm forgetting (as my MJ is a base model), but if it has a plug, keep the old style. Some things you do not need to swap over, like the starter, battery cables, etc. as they are nearly identical. As for the AC system, I do not know for sure, as my MJ came factory with no AC, but I imagine the plugs will be different and you may need an old style AC system. NON ELECTRICAL SYSTEMS There are some things when keeping the new style intake manifold you will need to keep from the old style, but some things it is often better to have the new style. Here are things you should consider with the year model listed beside it: -99 Power steering pump (the old style bolts on different) -99 Heater core hoses (I highly recommend a heater control valve delete) -91 Throttle body (to accommodate the old style sensors mentioned above) -91 Exhaust (to maintain proper O2 sensor locations) -99 Intake (of course) -99 AND 91 Vacuum lines & connectors (See below) -99 Vacuum canister (the smaller size is just nice to have with aftermarket bumpers, but not necessary) -99 Fan shroud (not required but nice to have the correct belt diagram) -91 Fuel system (rail, lines, regulator, etc) Most of the rest of these things are pretty self-explanatory as they are identical year to year, such as the air box and intake elbow and radiator, or because they came with the package, such as valve covers, anything else pulley driven, etc. VACUUM LINES It is important that you take as many vacuum lines as you can, but crucial that you have the vacuum line FROM THE ENGINE ALL THE WAY TO THE CANISTER. This line is easy to remove as it is very flexible. Take all the elbows, connectors, everything. Using the extra vacuum lines, it is possible to connect all the required items to the vacuum system, such as the brake booster, breathers, MAP sensor, intake temp sensor, fuel pressure regulator. Everything that was once connected to the old intake manifold should STILL BE CONNECTED TO THE NEW INTAKE MANIFOLD. Special pieces you may not think to grab are the small canister, as many elbows and plugs as you can carry (since you may come across rotten ones), and the T fitting threaded into the manifold near the power steering pump. MISC. ADVICE Here's what I'd do when doing the swap if I were to do it over again with my current knowledge: -New CPS while the engine is out (it bolts to the bell housing) -Replace the alternator while the engine is out -Do a complete maintenance checklist since you have to replace all the fluids anyways (for example, might as well get a new air filter and spark plugs too) -Address any known oil leaks (seals are cheap and no better time to do it) -Flush out the heater core (you may be surprised how dirty it is) -Clean and coat your floor pans if they haven't started to rust (northern states) -Check the condition of your brake lines with the engine out of the way MANUAL TRANSMISSION SPECIFIC If you have the AX-15 in your MJ, MEASURE YOUR PILOT TIP. if it is NOT a 3/4" tip, you will need a custom pilot bearing. THERE ARE NO AUTO PARTS STORE THAT OFFER THIS ON THE SHELF. I checked AutoZone, O'Reilly, Advanced Auto, Napa, Pep Boys, KOI, and even called around a few small time local stores. I ordered the adapter pilot BUSHING from Novak. This isn't a plug for them, just a product I found that works. MAKE SURE YOU GREASE THE BUSHING LIKE YOU WOULD IN ANY BUSHING STYLE ENGINE. Here are the sizes: -Pilot Tip: --88 to early 92 19/32" Diameter --Late 92+ 3/4" Diameter -4.0L Crank Bore: --Pre 92 1-1/16" Crank --92+ 1" Crank You cannot make the mistake of running without one of these on your manual transmission. It will create a ton of premature wear and ruin the transmission. You must also be careful to notice that if the engine is pulled from an automatic, it will NOT have a pilot bearing, as the torque converter doesn't require one. This is about all the information I can think up right now. If you have any questions or think I made a mistake let me know and I will explain how I came to each conclusion above. PLEASE REMEMBER, THIS IS FOR CHEROKEE AND COMANCHE ENGINES ONLY. I AM NOT DISCUSSING BRINGING IN ENGINES FROM WRANGLERS OR GRAND CHEROKEES. I’m sure that you can but be careful that you ONLY use engines with distributor systems. NOT COIL PACKS. Lastly, I have made a YouTube video pointing out and showing many things I have discussed here, but more importantly, visuals of everything and proof that it works like it would from the factory. Here’s the link:
-
Sorry for the blunt and obvious copy paste but it's a good draft and I didn't want to change it up much lol
-
Hey everyone, I have recently swapped a 99 XJ 4.0L into my 91 MJ and because of all the confusion I found researching the topic, I decided to create a solid write up on this. My 99 engine still contains the new style intake manifold to maintain the better air flow. This will be mostly text here, but I have created a video for YouTube to show that this DOES in fact work like stock. The first thing I'll say is this: the golden rule to the 4.0 swaps are that newer engines generally work perfect in the old style, but NOT the other way around! And the reason I say generally is because I cannot say every swap will be guaranteed to work. However, for the sake of this write up, I WILL ONLY BE DISCUSSING XJ TO XJ/MJ SWAPS. I recommend you do not throw ANYTHING away until the swap is completed. Having all the parts around may be a little cluttered, but you'll be very happy when you have the old parts to reference. DOING THE SWAP First off, the swap itself. If you are reading this, I assume you have the skills/confidence/knowledge to unbolt an engine, pull it out, and put another nearly identical engine in its place. This is about as bolt in as a swap like this could be. ELECTRONICS Just about every single plug/sensor there is in the 97-99 engine is DIFFERENT from the pre-97 engines, even though the sensor works almost the exact same. Here's a list of the sensors/electronics you need to KEEP FROM THE OLD STYLE ENGINE: -Oil pressure sensor -Coolant temperature sensor -Coil pack -Distributor -Idle air controller -Throttle position sensor -Intake temperature sensor -O2 sensors -Injectors -Crank position sensor -Alternator -Cruise control actuator There may be some I'm forgetting (as my MJ is a base model), but if it has a plug, keep the old style. Some things you do not need to swap over, like the starter, battery cables, etc. as they are nearly identical. As for the AC system, I do not know for sure, as my MJ came factory with no AC, but I imagine the plugs will be different and you may need an old style AC system. NON ELECTRICAL SYSTEMS There are some things when keeping the new style intake manifold you will need to keep from the old style, but some things it is often better to have the new style. Here are things you should consider with the year model listed beside it: -99 Power steering pump (the old style bolts on different) -99 Heater core hoses (I highly recommend a heater control valve delete) -91 Throttle body (to accommodate the old style sensors mentioned above) -91 Exhaust (to maintain proper O2 sensor locations) -99 Intake (of course) -99 AND 91 Vacuum lines & connectors (See below) -99 Vacuum canister (the smaller size is just nice to have with aftermarket bumpers, but not necessary) -99 Fan shroud (not required but nice to have the correct belt diagram) -91 Fuel system (rail, lines, regulator, etc) Most of the rest of these things are pretty self-explanatory as they are identical year to year, such as the air box and intake elbow and radiator, or because they came with the package, such as valve covers, anything else pulley driven, etc. VACUUM LINES It is important that you take as many vacuum lines as you can, but crucial that you have the vacuum line FROM THE ENGINE ALL THE WAY TO THE CANISTER. This line is easy to remove as it is very flexible. Take all the elbows, connectors, everything. Using the extra vacuum lines, it is possible to connect all the required items to the vacuum system, such as the brake booster, breathers, MAP sensor, intake temp sensor, fuel pressure regulator. Everything that was once connected to the old intake manifold should STILL BE CONNECTED TO THE NEW INTAKE MANIFOLD. Special pieces you may not think to grab are the small canister, as many elbows and plugs as you can carry (since you may come across rotten ones), and the T fitting threaded into the manifold near the power steering pump. MISC. ADVICE Here's what I'd do when doing the swap if I were to do it over again with my current knowledge: -New CPS while the engine is out (it bolts to the bell housing) -Replace the alternator while the engine is out -Do a complete maintenance checklist since you have to replace all the fluids anyways (for example, might as well get a new air filter and spark plugs too) -Address any known oil leaks (seals are cheap and no better time to do it) -Flush out the heater core (you may be surprised how dirty it is) -Clean and coat your floor pans if they haven't started to rust (northern states) -Check the condition of your brake lines with the engine out of the way MANUAL TRANSMISSION SPECIFIC If you have the AX-15 in your XJ/MJ from before 93, MEASURE YOUR PILOT TIP. if it is NOT a 3/4" tip, you will need a custom pilot bearing. THERE ARE NO AUTO PARTS STORE THAT OFFER THIS ON THE SHELF. I checked AutoZone, O'Reilly, Advanced Auto, Napa, Pep Boys, KOI, and even called around a few small time local stores. I ordered the adapter pilot BUSHING from Novak. This isn't a plug for them, just a product I found that works. Here are the sizes: -Pilot Tip: --88 to early 92 19/32" Diameter --Late 92+ 3/4" Diameter -4.0L Crank Bore: --Pre 92 1-1/16" Crank --92+ 1" Crank You cannot make the mistake of running without one of these on your manual transmission. It will create a ton of premature wear and ruin the transmission. You must also be careful to notice that if the engine is pulled from an automatic, it will NOT have a pilot bearing, as the torque converter doesn't require one. This is about all the information I can think up right now. If you have any questions or think I made a mistake let me know and I will explain how I came to each conclusion above. PLEASE REMEMBER, THIS IS FOR CHEROKEE AND COMANCHE ENGINES ONLY. I AM NOT DISCUSSING BRINGING IN ENGINES FROM WRANGLERS OR GRAND CHEROKEES. I’m sure that you can but be careful that you ONLY use engines with distributor systems. NOT COIL PACKS. Lastly, I have made a YouTube video pointing out and showing many things I have discussed here, but more importantly, visuals of everything and proof that it works like it would from the factory. Here’s the link:
-
Little bit of an update today, the truck is running awesome. I gave it about 1/4 tank of 91 octane and it really seemed to clear up all the hiccups. It's firing right up even after sitting outside all week. In the next week or two I'll really go through the truck and show all the little things I had to do to get the swap completed. Once I get her cleaned up and a matching set of wheels I'll get more pictures!
-
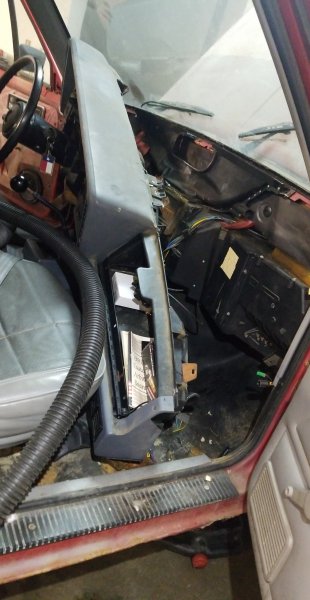
Today I had the pleasure of replacing the heater core that broke when I was doing the swap. The copper seized to the coolant lines, and when the line came off it ripped part of the fitting with it, which created a leak. Got a new one from Amazon and it seems to work great, blows nice hot air and doesn't leak a drop! Taking the dash all the way apart also gave me the rare opportunity to vacuum out all the bugs, dust, and rodent remains from the years of sitting, and it does smell a lot less musty now.
-
For those interested, I've got the video uploaded for my stainless clutch line conversion! Here's a quick link to the video: And here's a link to the original thread I used to help get me started on mine:
-
I'm coming close to having the swap to where I would say is a success. The truck starts and runs and moves on its own power, but stumbles and hesitates. First step of course, check for engine codes, even though the engine light was not illuminated. These older systems aren't as quick to turn the light on like the new ones are. After doing this I got 5 codes: 12 - Battery/ECU disconnected in the last 50 cycles 13 - No change in manifold pressure from start to run 33 - A/C clutch circuit open/shorted 35 - Cooling fan circuit open/shorted 55 - ECU finished telling you codes Since my truck doesn't have A/C and didn't come with the electric fan when I bought it, 33&35 were no surprise. 12 of course because I have only started it 4 or 5 times since the swap. Here's the website where you can find an easy to read and well organized list of engine codes: https://www.fixjeeps.com/jeep-check-engine-codes.html For code 13, an easy check is to disconnect the vacuum line going to the sensor and see if there's any change in the way it runs. Mine had no change, so the sensor was definitely bad. I also checked a few other things. I reset the distributor using the timing mark on the crank pulley, used a multimeter to check the TPS (it was bad, so I have to replace this too). And while I'm at it, went ahead and bought an IAC. They aren't expensive so I'll just start fresh on sensors with the 'new' engine. I've also got to replace a leaky heater core, and some extremely rusty brake lines that don't hold pressure to the rear.
-
Thanks! All the wiring in the truck is factory, I'm currently working through some diagnostics to get the truck running like a top. I'm keeping the original interior, the only thing I'm taking from the 99 is the Engine. Yes, my YouTube channel is Backyard Builder, the one with 1800ish subs (thanks in advance for +1!). I'll be uploading video of the clutch line in the next day or two, and the info on the 99 engine swap in the next week or so hopefully.
-
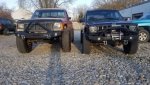
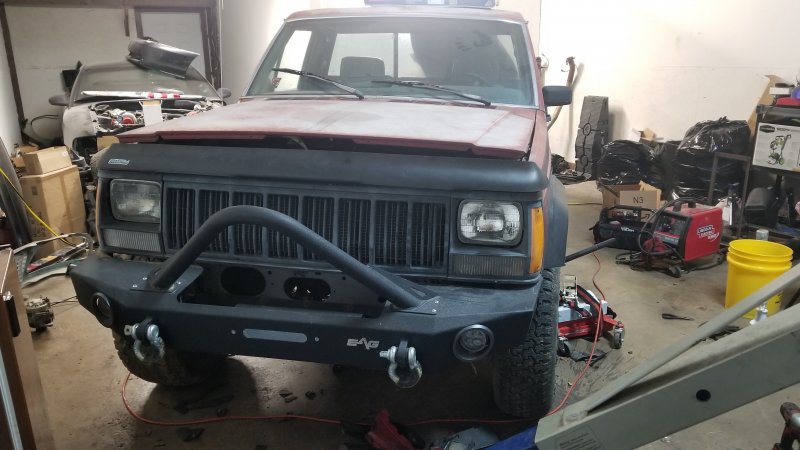
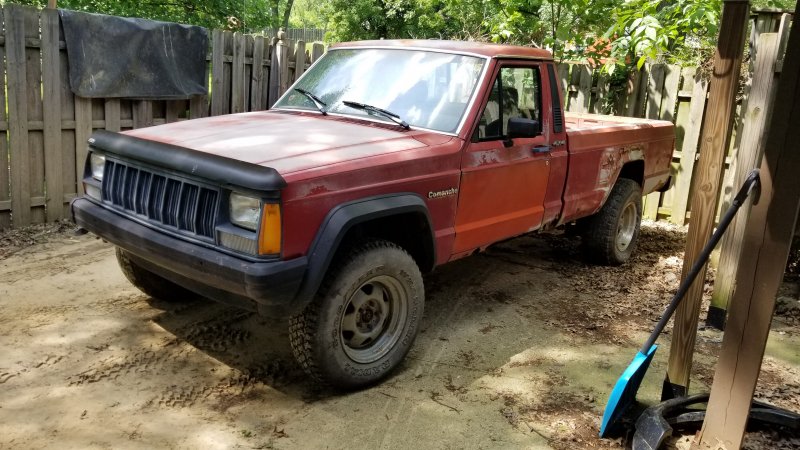
The guy I bought the truck from built his own rear bumper out of 1/4" steel (aka invincible) and I threw on the front stinger winch bumper from one of my old XJ builds. I'd love to restore and make the truck look new, but it's too far gone from the original state to really make this one all original, so it'll have a mild build. On these old style fenders you have to trim straight back directly beneath the headlight to get the bumper to fit correctly, which isn't a big deal to me. The bumper isn't leveled and tightened up yet (much easier to mount a winch with it tilted forward slightly) but you can get the idea of how it sits. I've also started replacing my broken clutch line with stainless steel braided, and I'll be making a video on how to do this as well. There are already a couple very good write ups on how this is done, but I know sometimes it is much easier to see it done than read about it.
-
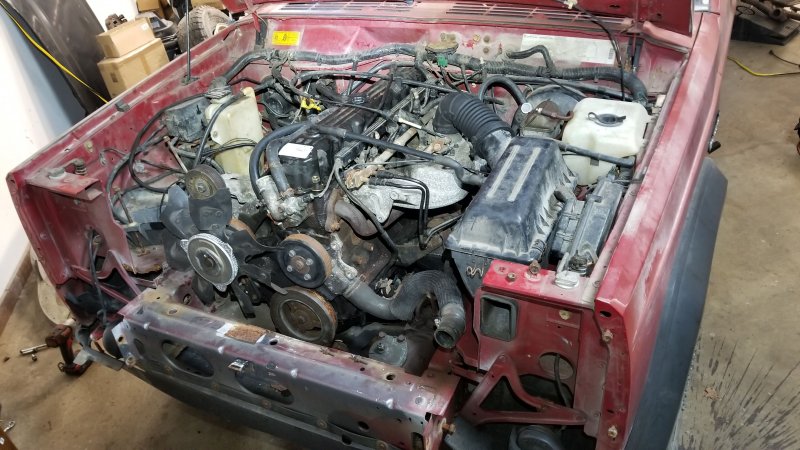
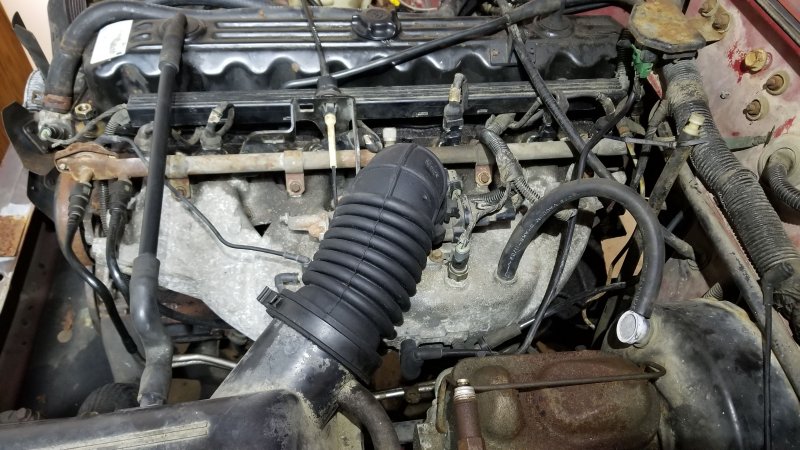
Fast forward 4 months, I've moved into a small warehouse space and finally have the engine into the truck. Here's some of the important things I found: CPS For those that don't know, there is a CPS mounted to the top of the bell housing. If you're doing this swap, change out the old nasty sensor! New ones are very cheap and you'll never be able to get to it this easily again. Fuel Rail Easy, just use the fuel rail from the old engine. Bolts right up, don't have to change the lines, everything's good. If you're worried about the difference in fuel pressure, you can remove the vacuum line from the fuel pressure regulator and bring it up a few pounds. Pilot Bearing I purchased the pilot bushing from Novak Conversions. It was kind of expensive at $30ish after shipping (depending on what shipping you choose) but it fit PERFECT. I know a lot of people said that it did not fit their application, but it fit mine perfect, no headache. I made sure to grease it up good, but as far as making a 91 AX15 fit into a 99 4.0, it was a dead ringer. Intake Manifold It is much simpler to use the intake manifold from the old engine, but I wanted to keep the newer high flow manifold on mine, so I made it work. There are a few vacuum lines you have to move around, you have to take the sensors/fittings from the old one and thread them into the new one, and I took the vacuum line that runs from the canister to the manifold (and the newer smaller canister) and it all works out pretty good. I will be making a YouTube video explaining in great detail the things I had to change to make this new manifold work. This will be much easier than trying to explain it here. For now, I've included a simple picture to show how it looks. Cooling System My Comanche did not come with an electric fan, so I took the one off the Cherokee. I also took the heater control valve out of the truck and just used the coolant lines from the Cherokee to bypass it. Good mod to do to prevent the heater core from clogging when you aren't using it. General Electrical Plugs All the sensors and things are pretty much the same from the 99 to the 91, but all the plugs are different! I pretty much took every single electrical plug in item and swapped it with the identical item from the old engine. The list includes the intake temp sensor, O2 sensor, injectors, alternator, distributor, ignition coil, EVERYTHING. Don't get rid of the old engine until you fire the new one and make sure everything is running correctly.
-
With the engine swap decision in mind, I picked up a 99 XJ for another $400. It was 130k miles, freshly rear ended HARD and totaled. Rust free. in the process of pulling the engine, I parted out some of the other stuff and of course made the money back on it, so free engine. I made sure to hook it up to a fuel pump and start it before I took it, and it ran like new. No CEL or anything. When pulling the engine, everything came apart fairly easily, even those dreadful E12 bolts on the top of the bell housings. The main things I knew I'd have to look out for in the swap were these: - Things that were slightly different year to year (intake manifold, alternator, fuel rail, etc) - Pilot bearing (I'll get into this in more detail later) Otherwise, 4.0 to 4.0, fairly straight forward as far as engine swaps go.

-
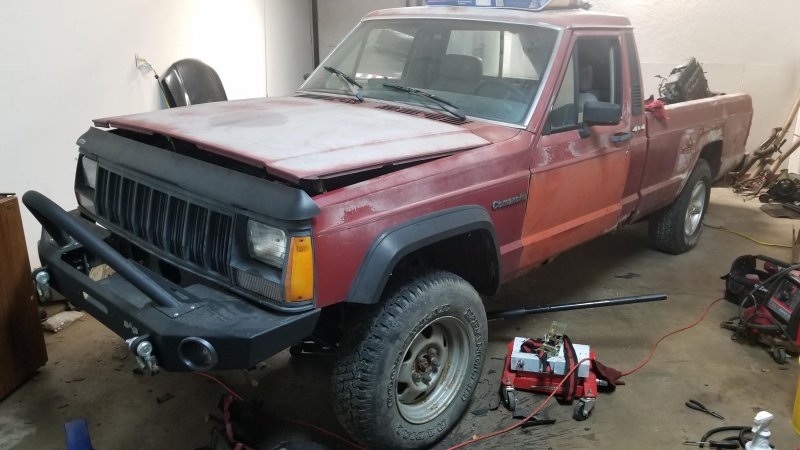
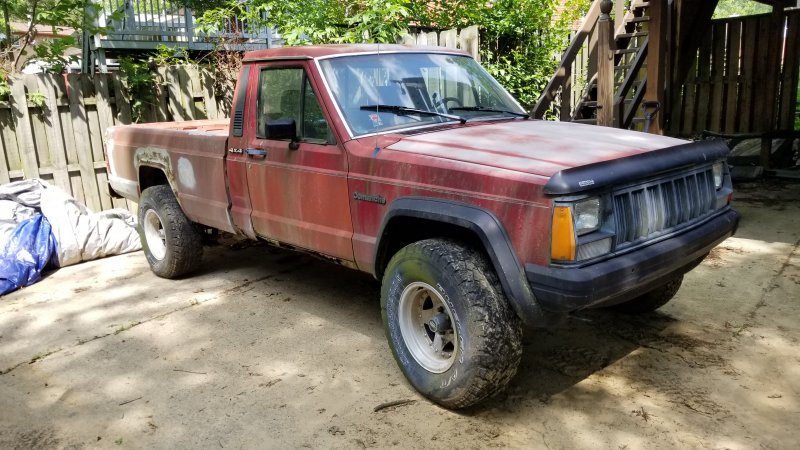
Hey everyone, I've finally got some progress on my Comanche and since I've gotten a lot of info from this site and should be doing some pretty unique things to the truck, I've decided to start a build thread. First off, my truck is a 4.0 4x4 5 speed, and an Ohio truck so it's fairly rusty, but I picked it up for a mere $400. It came with 2 complete sets of wheels, zero good tires, and an extra AX15 (internal slave). It did not run. I replaced the starter, a couple injectors with some I had laying around from a few XJs I've had, some spark plugs, and then she fired! Unfortunately, the engine held zero oil pressure (checked with a mechanical gauge, engine was victim to a Fram filter) and had a LOT of blow by and oil burning in the exhaust, along with a seized alternator. With all this in mind, I decided to swap a new(ish) 4.0 into the truck.
-
Superduty MJ
barimpact replied to dustyinthedirt's topic in MJ Hardcore Tech: Epic Journeys to Greatness
Nobody will be able to find it, the whole back end is camo! -
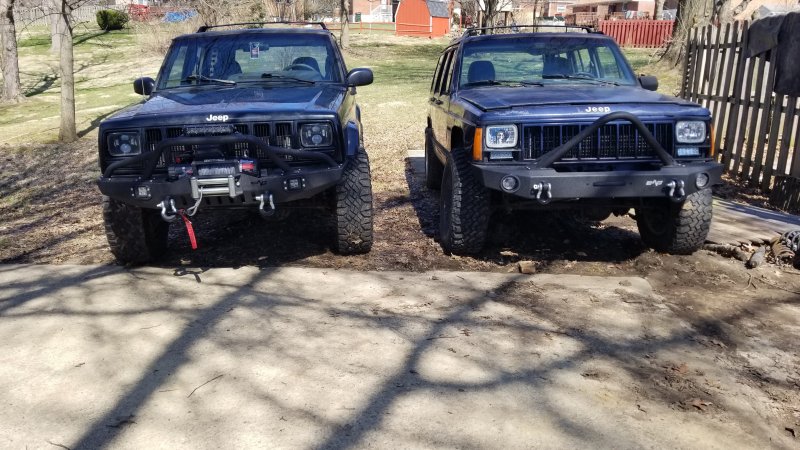
Critique: I like it Suggestion: Build it! It looks similar to what I have on one of my XJs, but cleaner. But think of it like this: if you're thinking up something similar to a popular product, you're doing something right
-
89 No Crank Electrical Mystery
barimpact replied to barimpact's topic in MJ Tech: Modification and Repairs
I haven't been able to work on the truck - been moving all my mechanic stuff to a new "shop" but I should be able to get back to it soon. I'll definitely update here when I get the starter swapped with a working one and check wiring. -
If this is the case, it may be as simple as switching some wires around on the sending unit. The piece of the sending unit that reads the fuel level is basically a slide potentiometer, which is a variable resistor that acts as a voltage divider. Here's a fairly simple diagram of one from a quick Google search: As the float goes up and down in the tank, it moves the slide (top piece in the picture) up and down the length of the potentiometer, which changes the number labeled 7.5V DC by changing the resistance of this path. The closer the slider is to the zero resistance path, the closer it is to giving the gauge the full 12V reading (per this picture - actual voltage numbers might be different). So, without moving the slider, if you switch the battery positive and negative leads, the power must move through the opposite path, which in this picture, would theoretically switch the 7.5V DC to reading 4.5V DC, provided this is a linear resistor. Long story short, if you switch the positive and negative leads on the ends of the float resistor from the power source, it should make it read correctly.
-
I'd guess just the years. It makes no sense to make 2 totally different ways to read the fuel level from the manufacturing perspective. You'd have to make too many specialized parts where they weren't needed. As far as reading backwards....You may be able to reverse it. Before explaining my thought process, are you 100% sure it reads backwards, or does the gauge just always read full? Just want to make sure.
-
Yes the earlier models run 31 psi at idle I believe, but it's also the fuel pressure regulator that makes this pressure. If you take the vaccuum hose off the regulator, the pressure jumps up to about 39 psi. I think theoretically, you could get a comanche 4.0 pump and use the 96 XJ fuel rail and regulator and I think it should work.
-
I've never done the swap, so take this more as suggestions rather than hard facts. Hopefully someone will be able to confirm my suspicions. With that said, my first thought is that if you're using a 96 engine, ecu, wiring, etc, just keep using the 96 fuel rail. Second, among other things, the harness for the sending unit for the 92 MJ is different than the harness on the 96 XJ (the XJ harness has an extra 2 wires I believe). The connection point for the wires on the fuel pump itself is also different between the two (the 92 MJ just has 2 studs and nuts where the wires connect, the 96 XJ has a female harness connector directly on the pump). However, this pump is also a 2 wire design, and I've seen some online that come with the male harness and a few inches of wire so you can splice it if needed. You may be able to get this pump and splice the wires to the MJ sending unit. There's a little more discussion in this thread I'm pasting below, where someone mentions having adapted the XJ sending unit to fit the MJ, but mentioned that you can't let it get to 1/4 tank or it will be sucking air. They also have a picture of the difference between sending units. Hope this helps.
-
Here's a picture of the downpipe on my 2000 XJ. The header is different, but the general shape is similar. See how it kinda hugs the motor up top to avoid the front driveshaft. Hope this helps a little, but again, pictures are hard.
-
The shop is in Piqua, OH, just north of Dayton.
-
89 No Crank Electrical Mystery
barimpact replied to barimpact's topic in MJ Tech: Modification and Repairs
I did a quick glance but did not look hard. I'll have to check more closely. Not having it in neutral got me the first time lol I thought of this too, but I have heard it run on starter fluid, so it's not grinding or locking up. Thanks! I have a friend with a rebuilt starter laying around so I will check on the wires and throw this in just to try it. The only part that still puzzles me is that the dash reads 9V with the key to run and the battery still showed 12.8V with the multimeter during the same test (before cranking over). Thanks for the input everyone. -
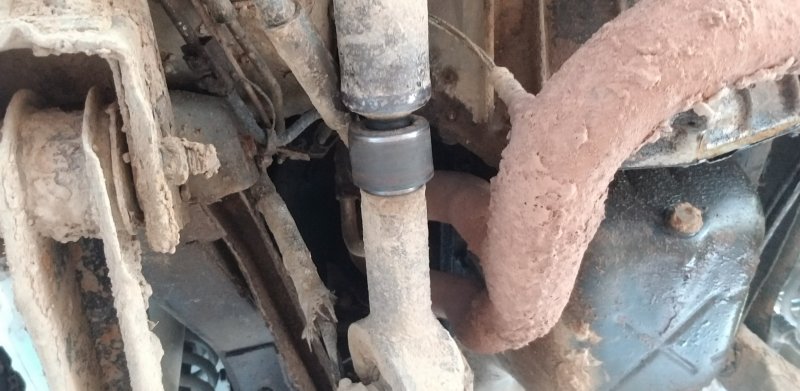
This is the piece I do believe is bent. If it were me, I'd go look under a Cherokee that's still put together just to see if the angles are roughly the same. I can upload a picture of mine after work, but it may be hard to tell in pictures. If you go exhaust shop, an established mom and pop shop is the way I'd go. I had a trusted shop near me do some custom piping for my muffler delete on my 2015 Ram and it only cost me $15 for parts and labor. In and out in about 45 minutes.