

darkenfire
-
Posts
22 -
Joined
-
Last visited
Content Type
Profiles
Forums
Gallery
Everything posted by darkenfire
-
Hello, I would like a pretty much complete black interior in good to great shape. I wouldn't need door panels or seats ... I was thinking of painting my tan stuff and may still do that ... but just throwing it out there
-
Tips Putting Pitman Arm Back On
darkenfire replied to darkenfire's topic in MJ Tech: Modification and Repairs
Maybe flush was a bad word to use, but I'm sure it should be up higher than this. -
Tips Putting Pitman Arm Back On
darkenfire replied to darkenfire's topic in MJ Tech: Modification and Repairs
Yeah, they're lined up. So no one else has had problems with these? You guys' have just gone on real easy? -
So I can't get my pitman arm flush with my new (to me) steering box. It won't hammer flush,and when putting the nut on to try and tighten it and force it up, I got the nut so tight it won't budge with a long pipe on my wrench and the pitman arm is still a ways away from being up where it should. I had to use a puller to get the arm off the old box ... are they tapered or something? Why can't I get it flush?! .... anyone have any tips?
-
Gas Gauge Reading E When Full
darkenfire replied to Dmac0312's topic in MJ Tech: Modification and Repairs
I know they switched polarity in the gauges in 1991. I have an 89 tank and sender and a 96 gauge cluster, so mine reads full when empty and vice versa. You did put the same sender back in,right? Maybe you somehow hooked the wires up backwards when reinstalling it? If it was that easy, I'd go switch mine so it was right ... -
Holy crap you guys are making me appreciate my Comanche so much more! Drove about 20 minutes for it, trailered it home ... paid $700 for it... Didn't run, but had an engine ready for it ... rust free rockers and wheel wells ...
-
Title says it all - are those dummy axles worth anything or should I just scrap it? I have one from doing the 4wd conversion.
-
The seat wasn't the cause of the window falling out. For one, that seat isn't bolting in or anything, that's why it looks like its up against that window. When I sit on it, it rocks forward. It's not bolted in because I haven't figure out how to yet, I just placed it in there so I had something to sit on to move the truck around now that it's running. Haven't driven it on the road more than a mile or two since disassembly and having the new engine running. Also, when I pulled on the window very lightly, this happened: and one more small tug got it out completely. I think if I had driven it for a week or so it would have fallen out completely on its own. The metal all around it is rusty, and the paint and metal the sealant stuff is stuck to is peeling off, so the window really wasn't sticking to much. The window is out and cleaned up now, still need to clean up the cab area, then i'll slap it back in following that thread someone linked to. The reason I said about having someone else do it is because I always heard you wanted a pro to do it to make sure it was water-tight and long lasting. Some of you guys doing it yourself has given me the confidence to do it myself, though. Thanks for the tips!
-
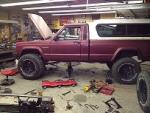
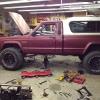
Got the Comanche together enough to take it for its first spin, and was surprised how loud it was. Then I realized with no headliner or carpet or firewall padding, perhaps it wasn't too crazy. Get it home, and notice this: anyone have a similar thing happen? Whats the deal? I guess i'll have one of those windsheild van services come out and seal this up or is there a way to do it myself?
-
Extremely Rusted Floor, Suggestions Please!
darkenfire replied to darkenfire's topic in MJ Tech: Modification and Repairs
Passenger Side: decided to patch up those other two small holes instead of leaving it to the por 15 as you guys suggested And the big hole: Next step is por-15'ing -
First Time Owner And First Time Poster.
darkenfire replied to Dracokain's topic in MJ Tech: Modification and Repairs
disconnectedness - awesome word -
I am about to do this myself, already have the doors and stuff. Mine have heated power mirrors as well to add to the confusion, haha. When I do it I can take pictures and stuff and make it easy for you to follow along (put 12v here, ground this, etc.) and post it back here. Or perhaps make a DIY thread if there isn't one already. It may be a few weeks, but I'll do that if it'll help you.
-
Extremely Rusted Floor, Suggestions Please!
darkenfire replied to darkenfire's topic in MJ Tech: Modification and Repairs
Just thought I'd update ... thanks for everyone's suggestions!! Here is the driver side as it sits now. I don't currently have pictures of the passenger side, but I can post some then. I decided to patch all those little holes, too. Its all done and ready for the por-15! The light grey metal is this floor pan: http://c2cfabrication.com/store/product_info.php?products_id=72&osCsid=1c358ef5od8o8d73qpg4avhuv5 It fit really well and was only $44.99. Obviously I had to trim the bottom half because I didn't need the whole thing. The dark grey is a cut from my donor XJ. That worked out really well because I needed the bracket that's behind there for my 4WD conversion anyway, haha. The brownish section is sheet metal bent to mimic the top rail section on the passenger side. Hopefully it provides more support than just slapping the pan on top of the bottom half of the rail. Comanche is almost done! It's running and the lift is all done, as soon as I get the rear shaft back from the shop (Had them take nine inches off of the 2WD shaft to accomandate new 4.0 HO, AW4, NP231, SOA, 2" blocks and new spring perches which give about an inch) I can drive it! -
That is definitely the best way to do it. I just got done putting my '95 cherokee HO in my comanche, though, and I mickey moused it a bit. Much easier, haha. here's what I did: (talking about the cherokee fuel lines here) Pulled the lines off the engine Right at the engine its soft line, then it turns into hard line, and turns back into soft line near the tank. Next the tranny the hard line is really straight and runs along the frame rail, I cut there using a tube cutter. Just cut wherever you think you'll have the most access. Flare the ends where you cut it with a flaring tool since the hard line is now flared, you can get soft fuel line by the foot from the auto parts store, and hose clamp it on right behind the flare without worries run soft line from your cut to the comanche fuel filter (replace it while you're at it) for the in line, and the whole way to the comanche tank for the return line. My comanche tank and pump are running the HO just fine. zip tie everything in place ... voila
-
Starter Relay Wire Quick Dumb Question
darkenfire replied to darkenfire's topic in MJ Tech: Modification and Repairs
My problem was that I didn't have a neutral safety switch plugged into the 89 harness at all, as I'm using the 95 for all of the drivetrain. So, I did have it labeled before I pulled the 89 engine and trans but wasn't getting 12v there after since the 89 wasn't seeing the NSS. -
I have an 89 comanche, putting a 95 HO in ... So I thought I had the starter relay wire marked ... or that it would be obvious or something, but .... none of the wires in that area are testing 12v when the key is held in start ... So can someone with a renix tell me what color it is, what it looks like, where it comes from, etc., etc. (Maybe even a pic?) If there is a connecter for it I may have disconected it there, so perhaps a description (or pic ;) ) of that ... I should have just unscrewed it from the starter and let it hang, but I think I either cut or disconnected it thinking I would splice the one coming from the 95 starter in ...
-
Extremely Rusted Floor, Suggestions Please!
darkenfire replied to darkenfire's topic in MJ Tech: Modification and Repairs
I think I am done grinding and cutting, here is what I have now. So, my plan is to order and weld in a floor pan on the driver side, weld in a piece of sheet metal for that spot on the passenger side, then por15 the whole thing. My question is, are those holes in the last three pictures too big for por15? Should I cut them out and weld in a little piece of metal? Or will por15 take care of all that? -
A little of the bracket, a little of the block. It's only a little bigger, not a ton. I bolted the bottom bolt in, not the top so it would swing down, then if you swing it up you can see how far you are from getting the holes to line up. Grind where you see it hitting until the holes line up. I've had it in for a year+, no problems. I have a huge system, 4 amped 6x9's, 2 amped subs, that's why I needed the upgrade, as didn't want a coil. It's the 136 amp Denso, part #56027913. You can get it off any Grand Cherokee with a 5.2L or 5.9L engine at the junkyard. I don't know how your junk yard works, but mine I actually called and gave them the part number and they had it waiting for me.
-
Extremely Rusted Floor, Suggestions Please!
darkenfire replied to darkenfire's topic in MJ Tech: Modification and Repairs
wow, your build thread actually made me appreciate what I have -
I am running an 136 amp Grand Cherokee alternator. It took a little grinding to make it fit. Once it's in, bypass the fuse box and take an 8 guage wire or so straight to the battery. It's the same connection electrically, it's only going to that box for the fuse, then straight to the battery. I installed a 150 amp inline fuse on mine. Mine was also on an engine stand when I did it, it's going to be a major pain in the @$$ to grind with it in. There isn't a terrible amount of grinding, though. I can get the part number off my alternator if you're interested.
-
Extremely Rusted Floor, Suggestions Please!
darkenfire replied to darkenfire's topic in MJ Tech: Modification and Repairs
Thanks for the suggestions. Sounds like the consensus is to hack and replace, which is what I was thinking anyway. Thanks for the suggestion to take a lot of extra floor from the XJ, 87warrior, I will hack that thing up good. Mountainman and sugarfoot, I do want to keep it a very long time so, yeah, going to do it the right way and have my friend do the welding. Indeed. If I don't put carpet back in after I fix this, is it still necessary? If water leaks in but nothing is trapping it against the metal, it should be ok, right? I'm not sure how easy it will be to track down the leak or replace the stripping. On another thread guys on this forum were saying not to herculine the inside, but is there another type of floor covering that will waterproof it? I will update this thread with progress pictures if you guys are interested. -
I bought an 88 Comanche a few weeks ago and I am swapping everything from my XJ into it (entire drivetrain, lift, axles, etc.) I knew the floor had some rust but when I pulled the carpet I found this: Which is suprising because the rest of the Comanche is extremely solid, besides the driver side door, there is literally no rust anywhere else. The black square on the passenger side is a patch someone welded in at some point. The driver side had some sheet metal self-tapped in. So, my question is: Should I por15 it or, since I have a donor XJ at the ready, cut that guy to pieces and weld those pieces into the comanche (I have a friend who is very good at welding)? Is my case too bad for por15? If I do por15 do I cut out all rust everywhere or just sand and wire brush it or just use their cleaners and then put it right on the rust? How much will I need? Any tips, suggestions, links, stories, etc. would be very greatly appreciated!