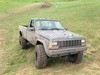
skerriltj Posted May 14, 2013 Posted May 14, 2013 Say hello to Frankie. He's a 1989 Comanche Pioneer 4cyl 4wd manual long box. He's pretty rusty and is in need of love. I plan on doing up a restoration/wheeling rig. Warning.......this will be a slow build but it's gonna be a lot of fun. Hoping to be wheeling it mid summer at the latest. Everything is stock so far and he is in running condition....barely. As of yet, I have removed the running boards and rear bumper. Just picked up a 6.5" lift from Rough Country with SOA in the rear to install at the end of the month.
huricane4 Posted May 14, 2013 Posted May 14, 2013 "Hoping to be wheeling it mid summer at the latest" Not what i call a Slow build :) Like the bed cover and bench seat, looking forward for the next update
MereAnatomy Posted May 14, 2013 Posted May 14, 2013 Welcome to the insanity, I'm going to guess you should probably order some replacement floorboards now if you're talking this summer... Body looks good and straight, best of luck!
skerriltj Posted June 22, 2013 Author Posted June 22, 2013 Day 1 of lift.....finally! Too lazy and tired to really do much of a write up now but here's some teaser pics. Tomorrow is gonna be a early and long day but it's coming along decently considering the rust.
skerriltj Posted May 16, 2014 Author Posted May 16, 2014 After much warning from others, I pre-soaked the nuts and bolts for about 2 weeks with Fluid Film and PB Blaster in preparation for installation of a Rough Country 6.5” lift....I own a very rusty beast! I jacked up the entire vehicle and put it on 4 axle stands. I then removed the front and rear tires.
skerriltj Posted May 16, 2014 Author Posted May 16, 2014 Front: I removed both callipers and hung them with a ratchet strap to ensure the brake lines were not overextended. I then removed the driver and passenger brake pads and rotors. I removed the stock shocks by unbolting the upper shock bolts from under the hood. To remove the upper drivers side bolt, I removed the washer fluid reservoir and set it to the side to get to bolt. I then removed the sway bar links (driver and passenger side) and the track bar. I then removed the coil clip on the drivers side and removed the coil spring and then repeated the procedure for the passenger side. Next came the removal of the driver and passenger lower control arms. Installed the RC coil springs and ensured the lower coil wrap was seated in the lower spring cup and then reinstalled the coil clips. To prep the control arms, I installed the bushings and the ball in joint on the control arms. I adjusted the upper control arms to 15.5” from center to center and the lower control arms to 16.5” from center to center. I installed the RC upper control arms. I then moved onto the RC passenger side lower control arm first. To install the RC drivers side lower control arms I had to use 3 coil compressors, a ratchet strap on the axle to the frame, floor jack to move the axle, and then a bottle jack and pry bar to pop it in! Note to self: with a 6.5” lift, buy a long arm kit! Getting the last control arm in was a pain. The coils were very stiff and the axle kept wrapping and contorting. The control arms are also hitting the axle bracket and I will most likely need to trim the brackets.
skerriltj Posted May 16, 2014 Author Posted May 16, 2014 I removed the stock pitman arm and installed the RC drop pitman arm. I then installed the RC adjustable track bar and then the RC shocks. I then reattached the washer fluid reservoir. I installed the brake line extension bracket and the new Certified rotors (#5108) and brake pads (#MX203) for drivers and passenger sides and attached the callipers. Rear: I put the floor jack under the axle to keep it from falling. I removed the passenger side shock and attempted removal of the drivers side shock....busted the upper bolt head off! Tried to grind, drill, and hammer out with no success so to be continued....mwahahaha. I removed the factory u-bolts from the drivers and passenger side. I then attempted to remove the brake line and failed miserably and broke the line that attached to the axle and piece connected to the axle...the rust got the better of me there. I then removed the broken stock leaf springs. Both sides were rust welded to the mounts but were easily fixed with some muscle and a hammer! I then removed both stock shackles. I was then able to remove the axle from underneath the truck and grind off the old mounts on the bottom of the axle. I took the axle to a friend who welded new mounts to the top of the axle for the SOA conversion. I installed the RC lifted shackle and new stock leafs. I put the axle back on the truck with the axle under the leaf springs and installed the 2 ¾” diameter u-bolts. I replaced the brake line that attached to the axle and also bought and replaced another brake line (one that was braided with 2 male ends) which lengthened my lines so I did not need to install the extension bracket.
skerriltj Posted May 16, 2014 Author Posted May 16, 2014 While checking out my rear brakes I noticed the passenger wheel cylinder had blown up all over....well after looking at all my brake issues it made sense why I really had no brakes. I replaced the wheel cylinder (#W17507) and drum brakes (#H7064) on the passenger side. I also replaced the drum brakes on the drivers side while I was at it. Also, since I had the rear driveshaft out, I replaced the u-joint (#Moog 369). I then installed the passenger side RC shock. Lift completed!!!
Lowly Posted May 16, 2014 Posted May 16, 2014 This truck is ID to mine before the lift! Cool! What are the tires you got on it?
skerriltj Posted July 30, 2014 Author Posted July 30, 2014 Instead of putting those crummy stock rubber and wheels back on, I put Dick Cepek Crushers (33x12.5x15) with Allied steel beadlocks (15x10x4.5 with 3.75” backspacing). Now the lift was complete, to do those minor adjustments. I straightened out my steering wheel and did an alignment....the old fashioned way of course! The air filter was pretty disgusting and hadn’t been changed in awhile so I swapped to a K&N air filter.
skerriltj Posted July 30, 2014 Author Posted July 30, 2014 Zip tied up the rear load sensing brake valve(??) as the plastic piece that attaches to my differential broke anyways and now it's too short anyways. It’s not all that important in a trail rig from my understanding. Please correct me if i’m wrong! If it was to be a true trail rig my beast needed tow points of course. I spoke with a welder friend and he created some fantastic front and rear tow points for me. The front tow points were made using the original stock brackets and metal pieces welded on. The rear hitch was created using a hitch with metal welded to it. All 3 points were then bolted to the frame of the truck after some minor drilling into the MJ. And they work fantastic!
skerriltj Posted July 30, 2014 Author Posted July 30, 2014 November 2013 After I put all that expensive fun stuff on the manche, I decided I should probably fix that little issue of being able to start the beast without a key. After ripping out all relevant steering components and breaking a small white plastic piece (not sure what that is or what it's for....any ideas??) while trying to get a screw out, I was finally able to replace the tumbler (#US107L).
skerriltj Posted July 30, 2014 Author Posted July 30, 2014 December 2013 I figured it was due time for an oil change as the oil was pretty black. I changed the oil using synthetic 10w30. I had to use a Fram High Mileage oil filter (#HM3985) (odometer was sitting at ~207,000kms) because for some reason Fram doesn’t make a synthetic filter for comanches. Now onto the even more exciting stuff....eliminating the CAD system!!! When I bought the MJ, the 4wd was not engaging...I know...you’re all shocked....ha. So what to do with such a $#!&ty system? Rip it out completely and enjoy the moment of strengthening your jeep. I will say thank you to Bleepin Jeep and all his witty help on the YouTube vid. So on to the infamous 2 to 1 axle shaft conversion and goodbye vacuum actuator.... I jacked up the front end and removed all the same stuff just previously removed months ago....I know I know....why was I not thinking and do it all at once. First build...give a gal a break! Enough babbling and onto the good stuff! Okay...having removed the wheels, callipers, brake pads, and rotors, I was left with a garage queen once again. One lesson learned....control arms are a fantastic place to set your callipers (well when you got em connected). I started with the passenger side as I figured it’d be the most interesting. I removed the axle hub, bearing assembly, and disc brake splash shield. I then removed the outer axle shaft. Moving onto the driver’s side...I removed the axle hub, bearing assembly, disc break splash shield, and the axle shaft. Next, I removed the diff cover...gently that is...to ensure the gear oil didn’t go everywhere and was successful!! I removed the retaining clip in the diff that holds the passenger inner axle shaft.

Recommended Posts
Create an account or sign in to comment
You need to be a member in order to leave a comment
Create an account
Sign up for a new account in our community. It's easy!
Register a new accountSign in
Already have an account? Sign in here.
Sign In Now