


taddraughn
-
Posts
26 -
Joined
-
Last visited
Content Type
Profiles
Forums
Gallery
Everything posted by taddraughn
-
Taddraughn's 1989 Comanche Progress Thread
taddraughn replied to taddraughn's topic in Member Projects: Your Comanches
Long time no post, but finally getting back to work on this thing after not having time for it for several months with tons of life stuff, home projects, and work travel getting in the way. Engine is basically done so next order of business is to get the engine bay prepped and get the welding on the passenger floor done. -
Taddraughn's 1989 Comanche Progress Thread
taddraughn replied to taddraughn's topic in Member Projects: Your Comanches
Got my new crank in, and fortunately it looks great! Again, shoutout to Clegg's customer service. They were super responsive and quick to make things right. Unfortunately my efforts this weekend have been re-directed to home renovation efforts. Had to remove popcorn from our master, rip off all the trim, skim the whole ceiling, etc. etc. but basically means no time for the jeep this weekend. And no time this week either as I'll be in Vegas for a trade show :/ -
Taddraughn's 1989 Comanche Progress Thread
taddraughn replied to taddraughn's topic in Member Projects: Your Comanches
I'll take a look. Thanks for the recommendation. I saw a youtube video and looked like you just have to swap a couple brackets over and then weld in some tabs near the top of the dash. Didn't look too bad from my computer chair -
Taddraughn's 1989 Comanche Progress Thread
taddraughn replied to taddraughn's topic in Member Projects: Your Comanches
When you say HO swap, does that mean just the HO head and newer intake but retaining the Renix? Luckily for me and maybe not so lucky for my neighbors, I have no one stopping me from cutting up an XJ in my yard :) -
Taddraughn's 1989 Comanche Progress Thread
taddraughn replied to taddraughn's topic in Member Projects: Your Comanches
Engine bay almost all the way stripped down now. After a just a little de greasing I found there is some color under there lol! Also have the interior almost completely stripped now too save for one of the seatbelt bolts that someone stripped out. I'm actually starting to lean towards just buying an XJ so that I can swap in the interior and heater box etc. from a 97+. Thinking the advantages here are having a good R134A AC system, OBD2, and more modern interior. So much of my interior is completely shot I'm pretty sure it's cheaper just to buy an entire XJ than piece it together with good used parts from ebay. Like just a set of seats on ebay is 500+ dollars.. I wasn't really itching to get away from Renix, but a wholesale swap seems like the only way to go. Most cars around are auto though.. would much rather find one that's already a manual so it's basically got everything I need for the Comanche. Although I could probably make this work swapping the interior and harness from an auto car and then just sourcing the manual separately. Let me know what you guys think or if you have any leads a manual 97+ that has a good condition interior -
Taddraughn's 1989 Comanche Progress Thread
taddraughn replied to taddraughn's topic in Member Projects: Your Comanches
Just a little update about the crank. Cleggs is working with me to swap it for another. Really happy with their customer service and how quickly they're rectifying this for me. Should be able to get the piston rings gapped this weekend and that'll be about all I'm able to do while I wait on the new crank to come in. -
Taddraughn's 1989 Comanche Progress Thread
taddraughn replied to taddraughn's topic in Member Projects: Your Comanches
Was feeling like Christmas until I opened the box the crank was in.. Guy at Cleggs was super fast to respond and is going to check on the stock he has to see if the others look the same or are better. Really would have expected these to be coated in a wax or something but this one is definitely just bare. I could chuck it up in my lathe and polish it, but I paid for one in good condition... -
Taddraughn's 1989 Comanche Progress Thread
taddraughn replied to taddraughn's topic in Member Projects: Your Comanches
Thanks for the info guys. I had seen they claimed it was only compatible with the certain year intakes. I figure I'm good with the banks exhaust since they claim any aftermarket exhaust will work. For the intake I'll see how my Renix one fits up. If for any reason that won't work I was just planning to use the later year intake they claim is required and then adapt the throttle body to the later intake somehow as seems like that changed and I assume I need to keep the TB if i'm sticking with the Renix ECU? As for the exhaust I was thinking about just running a wideband and then using my REM to convert to narrowband and feed that to the ECU. -
Taddraughn's 1989 Comanche Progress Thread
taddraughn replied to taddraughn's topic in Member Projects: Your Comanches
Got some paint on the engine block. Also started to strip the engine bay so I can clean it up I'm thinking about having the truck painted or paint it myself despite my hatred of bodywork. If there's anything I hate more than bodywork it's maybe only paying someone to do something I'm capable of doing myself. -
Taddraughn's 1989 Comanche Progress Thread
taddraughn replied to taddraughn's topic in Member Projects: Your Comanches
Block is back from the machine shop. Got sealed power pistons in .040 over size assembled on my rods and some hastings rings I need to gap and install. Ordered a bunch of stuff from cleggs including an edelbrock performer head, banks exhaust, and some ARP hardware. Will take some photos as I prep and paint the block, get the new expansion plugs in, etc. -
Taddraughn's 1989 Comanche Progress Thread
taddraughn replied to taddraughn's topic in Member Projects: Your Comanches
Dropped off the block and rods/pistons at the machine shop. They said "give us a couple days" lol. So who knows I may be getting this engine back together in the next couple weeks. I thought about stroking it but decided just to keep it stock and go with Sealed Power replacement pistons for whatever oversize the shop determines is necessary. Will measure the crank this week and see if I could polish it and use .001 bearings to make up the difference. Not sure yet what I'll do with the head and cam. Thinking about just getting an edelbrock head for it or maybe a rebuilt one from clearwater. -
Taddraughn's 1989 Comanche Progress Thread
taddraughn replied to taddraughn's topic in Member Projects: Your Comanches
Got back from my work trip and tore the engine apart yesterday. #6 appears to have been running hot or lean maybe... That was the cylinder that I think maybe wasn't firing when I ran it briefly to move the truck. Spark plug looked brand new when I removed it. Anyway, pulled the pistons out. Pretty good ridge at the top, but pistons are original size, so should be no problem to get it to clean up. I do have a cheap bore gauge but figured I'll just take it to the machine shop and let them tell me how much it needs to clean up/what pistons to order. The block was so filthy I decided just to pressure wash it. Normally wouldn't spray a bunch of water on a raw cast iron block but dried it off immediately and then used about 1.5 cans of WD40 on it before blowing it off again and wiping it with WD. With the core plugs out I was able to clean up the water jackets really well. Got a lot of rusty bits out of there.. Machine shop can clean it up the rest of the way. Interestingly I found some a letter by each cylinder. Not sure if this is something the factory did for some reason related to the bore size? Anyway.. block is loaded up in my wife's Crosstrek and ready to go to the machine shop. Crank looks okay, but probably could use a polish. Need to mic it and see if it's still in spec or would still be in spec after a polish. If it needs grinding I'll probably just buy a new crank as it might be cheaper than having it ground. Cam looks meh.. has a chip in the first lobe that I don't like. Was thinking about switching to a hydraulic roller cam that newcomer is offering but with all the stuff you need to make it work it gets expensive... -
Taddraughn's 1989 Comanche Progress Thread
taddraughn replied to taddraughn's topic in Member Projects: Your Comanches
Thanks for your input. Leaning towards just going ahead with the AX15 swap as long as I can find the correct crossmember somewhere -
Taddraughn's 1989 Comanche Progress Thread
taddraughn replied to taddraughn's topic in Member Projects: Your Comanches
Thanks for the link and the additional info. Probably will keep it close to stock so maybe it's fine to leave the ba10. But it's also very tempting since like you say no sense in pulling it again later when it's already out now! Did manage to get the engine out and on the stand before leaving for the airport today. Excited to tear into it when I'm back and see what I've won lol. -
Taddraughn's 1989 Comanche Progress Thread
taddraughn replied to taddraughn's topic in Member Projects: Your Comanches
Did manage to pull the trans last weekend. Not sure when they switched transmissions, but this one is a BA10. Is it worth swapping over to an AX15? This morning I took out the header panel out and went ahead and disconnected everything else from the engine so it's ready to pull. Just need to borrow my friends hoist and engine stand again. Have to travel for work this week so hopefully next weekend I can get the engine out of it and determine the path forward for it. -
Taddraughn's 1989 Comanche Progress Thread
taddraughn replied to taddraughn's topic in Member Projects: Your Comanches
Back from vacation and ready to start tearing this thing apart some more. This afternoon I finished pulling the front axle out of the car. Things are coming apart pretty easily, thankfully. Tomorrow I'll probably go head and pull the transfer case and transmission out. A friend of mine is going to loan me his engine hoist and stand for the 3rd time lol. So hopefully next couple weeks I can start to get the engine bay cleaned up with everything out of the way and get the block and head over to the machine shop. Might just buy a new or re-man head for it but will wait and see what things look like when I take it apart. -
Taddraughn's 1989 Comanche Progress Thread
taddraughn replied to taddraughn's topic in Member Projects: Your Comanches
Okay so did manage to pull the pan today. Ended up just about disconnecting the front axle to get it to clear. Also used a little jack to move the axle down a bit more for clearance. Looks like someone halfheartedly cleaned the pan at some point. The bottom is super sludgy though Hard to tell in this photo, but I noticed that the rods are stamped 1-6 on the rod and cap. do they come like that from factory or does that mean someone has been there before? Got a look at the portions of the cylinder walls I could see and don't see any visible cross hatching, but do see some vertical scoring. I also pulled the plugs and see #6 was not firing at all; plug looked brand new. So I think at this point I'll just pull it for a rebuild. -
Taddraughn's 1989 Comanche Progress Thread
taddraughn replied to taddraughn's topic in Member Projects: Your Comanches
I'm just North of 42 off of Cornwallis, so not far at all! Looks like you've been doing excellent work on yours, I need to swing by sometime and see what they're supposed to look like! lol. Back from vacation and starting to peel back the layers on this thing. I'm not sure I will be able to resist the urge to tear it all the way down but we'll see lol. It's clear the work done previously was mostly hack jobs. Think I'll pull the pan today and maybe check how the bearings look/feel. The entire underside is so covered in oil. Not sure if the RMS is to blame or the VC but doesn't hurt to replace it and gives me a chance to check things out. Tempted just to pull the head off too with the POs description of the car being driven overheated at one point before it was parked and given how cheap they are. That will really give me a chance to check things out. -
Taddraughn's 1989 Comanche Progress Thread
taddraughn replied to taddraughn's topic in Member Projects: Your Comanches
Thanks for the heads up! Good to know ahead of time it might need a little massaging to work. -
Taddraughn's 1989 Comanche Progress Thread
taddraughn replied to taddraughn's topic in Member Projects: Your Comanches
Oh interesting. I can understand using the same harness but just leaving a connector unsealed seems like a weird choice. Maybe it only melted due to proximity to exhaust if it wasn't used for anything. I'll probably swap to the new style header or get one of the banks ones. I can just weld in the EGR bung to keep that or maybe just delete the EGR altogether. Yeah not knowing the history of the truck I'm not sure if the exhaust is still leaking or if the soot was before the welds the noise was something else? In any case I will replace the manifold and see if the noise persists. If it does I'll just yank the engine and go through it. -
Taddraughn's 1989 Comanche Progress Thread
taddraughn replied to taddraughn's topic in Member Projects: Your Comanches
Couldn't resist tearing into it a little before heading out for my vacation... With the valve cover off it really doesn't look too bad. One thing i did notice is that the bolts came out really easy and some seemed quite loose.. Pulled off the intake and exhaust manifolds. Clearly some kind of leak was or is happening near the rear of the engine. and some of the worst welds I think I've maybe ever seen... Looks like someone snaked a mig torch in with everything assembled and just hoped for the best LOL Also noticed this connector that wasn't hooked up to anything is severely melted.. Not sure what it is supposed to be for. Have a feeling I'll be remediating quite a bit of wiring on this project :) -
Taddraughn's 1989 Comanche Progress Thread
taddraughn replied to taddraughn's topic in Member Projects: Your Comanches
Just saw underneath your post numbers it has your location listed as Clayton! I'm in south Garner and only around 12 minutes from downtown Clayton. -
Taddraughn's 1989 Comanche Progress Thread
taddraughn replied to taddraughn's topic in Member Projects: Your Comanches
Thanks for the suggestions! I'll start with pulling the valve cover and taking a look and maybe try the liqui moly stuff and see if that frees things up. I posted in the 89 sub-forum yesterday to get mine added to the registry! Interested to see where it was originally sold -
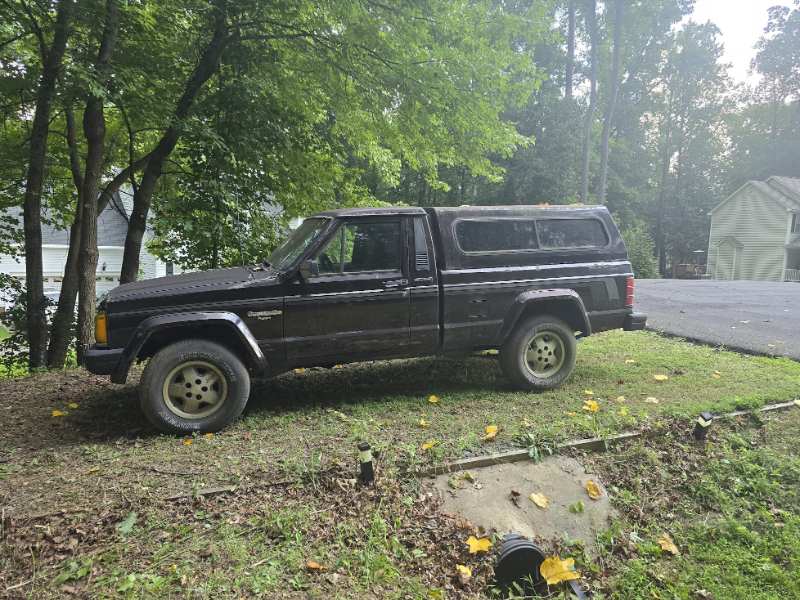
1J7FJ36L4KL427741 1989 Comanche Pioneer Deep Vivid Red Metallic Paint 4.0L w/ 5 Speed Manual Currently located in Garner, NC Seems to have been parked since 2018 or so and think the owner had it since 2012 according to the title.
-
Taddraughn's 1989 Comanche Progress Thread
taddraughn replied to taddraughn's topic in Member Projects: Your Comanches
It seems to be very original and just one little rust hole in the passenger floorboard that I missed in my initial check because it was behind the foam piece that comes down the firewall. Water either ran into that corner or was held there by the foam but shouldn't be a big deal to weld up just one little spot. Everywhere else was surprisingly solid so not much welding to do. I'll pull the manifolds and have a look at them. Would be great if it's an exhaust leak or lifter as that means I'll get to drive it a bit before an engine rebuild. But fine by me if I do need to rebuild the engine. Parts seem so cheap for these things but my basis is my last two project (Lancia and Audi parts are expensive ) Thanks! The Lancia is a ton of fun and very happy to have it back on the road now. I restored it back in 2018. It was super rusty and required a lot of metal work. Back then I didn't mess with the engine other than having the head re-done. Eventually lost a cylinder and I told myself the new engine i built for it would not be carb'd. Took forever but very unique set up on a car that's already somewhat rare stateside. Registry a guy keeps has around 400 or so in the US so it always gets lots of attention because no one knows what it is lol.