brucecooner
-
Posts
240 -
Joined
-
Last visited
Content Type
Profiles
Forums
Gallery
Everything posted by brucecooner
-
I need to change the diff oil in both ends. The original manuals call for 80W-140 in the rear for heavy duty or towing applications. Sure, I figure I'll go with that, or something close in the rear (Dana44). I might tow something, someday. Was going to stick with 90 in the front. Thing is, it's easy to find 75W-140. As far as cold weather performance, we don't have cold weather here in Phoenix. Does the difference between 75W or 80W have any other impact? Some posts say all 75 is synthetic, synthetics will cause your seals to leak blah blah blah... Will either diff even notice or care if it gets one versus the other? I know mine has limited slip, I guess I'll just roll with whatever friction modifiers they put in there. Won't make much difference since mine's not leaving the driveway anytime soon anyway.
-
I had to study up on wikipedia, I was thinking of the second gen Liberty. I've heard some of those had a retractable soft roof that was prone to leaking. Your Gen1 looks very nice with the flat hood. It gives off that "small but capable offroader" vibe like the old school Samurai or Amigo, the kind of thing they don't sell anymore. I'm sure experiences vary, but I've avoided direct injection engines so far. From what I understand Toyota's dual mode injection engines should last since they get to clean the valves from time to time(?).
-
Yeah, I fuss and swear because I wanna be out on the road, but at the end of the day it's just an old piece of machinery that needs maintenance. Nothing more, nothing less. Libertys eh? Those are rare, can't remember the last time I saw one. Didn't they have the sliding fabric roof? And despite my tirade I was out there again this evening in the driveway, hood up hunched over the intake manifold. I gotta say when the parts are easy to pull and work with (like, not brakes) it's kind of relaxing to mess around with. Sure wish I could drive it though. I pulled the throttle body off and it wasn't exactly thickly coated below the butterfly, but there was probably about 30 years of carbon in the innards. I took the TPS and IAC off and cleaned the throttle body up with some fuel system cleaner. The IAC was coated in soot, so I did spray some cleaner into it around the needle, and the first few squirts came back out black. That may or may not be a bad sign for the IAC, I may need a new one now. I'm hoping I'm smart enough to test the TPS once I've procured a new gasket and put the TB back on. If it comes down to new sensors, can anyone recommend sources for getting actually good stuff?
-
brake reservoir sediment (red mud, rust, ???)
brucecooner replied to brucecooner's topic in MJ Tech: Modification and Repairs
Oh, bringing this thing home is the most masochistic thing I've ever done by far. I was never into stamps either, but it's probably a smarter hobby. Noted! I'll have to give this a shot when I figure the OTHER NEW problem out (idling like a freight train). -
I didn't name this piece of crap the Heartbreaker for nothing. Earlier today I called the Eternal Brake Job "still crappy but good enough" and drove it around in the afternoon heat. Despite the brakes still being where they were six months ago it drove JUST FINE. It idled fine, it shifted fine, it ran nearly perfectly. I parked it so I could go and celebrate Mother's Day with the wife and kids, thinking I'd take The Heartbreaker back out this evening and put some fresh gas in it and put a few miles on it. So in the cool evening breeze I did some cleanup work from the Eternal Brake Job. I secured a loose line under the hood, put the brake line hold down bracket back on the rear axle, wrestled the drum plugs back in (ugh), tightened a few bolts. I was actually, happy about owning it for the first time in literal months. Things were looking up. I was excited that I was fixing to just, drive it around. Then when think I might just <expletive> DRIVE MY JEEP A FEW MILES, I start it and lo and behold it has decided, the very first time I start it to just drive it around, without thinking about the booster or the brakes or anything else, maybe I might enjoy a few miles of driving my Jeep, it has decided that it will idle at ALMOST THREE THOUSAND RPM. I turn it off a little while, and fire it back up but no, it has decided it will KEEP IDLING AT ALMOST THREE THOUSAND RPMS. I was so happy, and then without any warning or notice it stuck a knife in me and twisted, hard. The idle never even thought of going down. The hoses are all in place, it's not the booster vacuum line, I pulled the booster line and held my hand over it and that made no difference to the idle. It sounds like it is trying to self destruct. Which honestly wouldn't bother me at this point. I'm so sick of this hateful thing I don't even care, I took off and just flung the cursed hunk of junk around the neighborhood streets good and hard and fast. It wants to die so bad, I'll help it along, there are a lot of very tall cliffs in Arizona and I've seen Thelma and Louise. Except that I will just give it a good hard push and wave bye as its @$$ end goes over and then I'll go buy a shiny new 4Runner and ENJOY my weekends for a change. Because I will never have a day where I just drive this <expletive> thing around for fun. And I can absolutely FORGET ever getting it out on a trail. Hey, you want to know the best way to enjoy a Comanche? BUY A TACOMA AND SLAP A COMANCHE BADGE ON THE TAILGATE. This thing drove so nice the first few months I had it, sure it had a few issues but it was actually usable. And now it's always always always some new thing every time I touch it. I'm not looking for help, I'm not looking for advice. There's plenty of that out there and I've read it all by this point. I'll test the fracking TPS for starters I guess. I've already freshened the grounds on the block and several other places. I'll pull the C101 out FROM ITS <expletive> ROOTS. It's not the grounds, it's not the sensor, this piece of unmitigated crap just HATE HATE HATES its owner. It does NOT want me to enjoy a single day of ownership where there's not SOME NEW BUSTED THING to worry about. And I fully expected to have to do some work on this thing it's just, gah, all the time, all the time, all the time, something to fix, something else that has to be fixed RIGHT NOW, no Bruce, don't even think of just driving it around! To be clear, I don't DISlike working on it, I've generally enjoyed, for the most part, the work I've done. That brake job though, gawd please make it stop, literally. It's just, I work and work and work and there's NO POINT at which my work feels effective, like I'm accomplishing anything. Isn't that the most frustrating thing, in both car maintenance and life in general? To feel like you are spinning your wheels for nothing? Seriously, does anyone, anywhere, just get to enjoy owning an old Jeep? Are all these XJ's I see out on the roads tormenting their owners to the same degree? I guess really I just got what I deserve for buying a 30+ year old truck. Ugh, how can they be so pretty and so hateful at the same time? I literally hate it, and then I look at it and think, "oh but it looks so nice". Gawd I'm a fool. I MUST have overlooked something, maybe when I put the breather box back on I bumped a line somewhere.
-
brake reservoir sediment (red mud, rust, ???)
brucecooner replied to brucecooner's topic in MJ Tech: Modification and Repairs
Job is done. My brakes are still crap. I think maybe Comanches just have crappy brakes unless fixed by someone who knows what they're doing (i.e. not me) Anyway, another long rambling pissed off rant about my brake job follows. I did learn something about master cylinders, that everybody here probably already knows. I pulled off the new master cylinder to bench bleed it again. I had lots and lots of little bubbles coming out of the ports for both chambers, which is normal. While on the bench however I found that depressing the piston produced NO flow in the rear chamber (that supplies the front brakes). The front chamber would make a geyser out of the internal port that you could see on the surface of the fluid in the chamber. The rear chamber never did this. I was also set up with the bleed kit with fittings that attach to tubes that go back into the reservoir. The rear chamber never pushed a drop of fluid up the tubes. I took back the 1st cylinder to Autozone and they replaced it without any fuss. Good ole Autozone. So I set up the 2nd cylinder to bench bleed and got the EXACT SAME behavior, NO FLOW from the rear chamber. Also, the front chamber (rear brakes) of cylinder #2 (try to keep count) kept pushing out little white flakes of...something. So I took master cylinder #2 back. The guy at the counter said the little white flakes were probably dried grease, they grease the seals so that while sitting on the shelf they don't dry out. So the fact even the sealant had dried told me the seals had probably had a long time exposed to air, which told me I didn't want that cylinder anyway. I also explained the neither of the cylinders I had gotten there would push fluid in the rear chamber and the guy said the only thing that would explain that is a bad cylinder. In the back of my mind I figured I was missing something but, whatever, I didn't want the cylinder to push more little white flakes into my brake lines so I just returned it and got my money back. They didn't even fight me on it. Good ole Autozone. So I figured I'd try a different store and got a new (not reman) cylinder at Napa this time. It's a considerably heavier unit than the Autozone one, but hardly any surfaces on it are machined. Even the insides of the chambers are rough as sandpaper. But, at least the grease on the bottom of the rubber cap seal was still wet, I took that as a good sign. I put the Napa cylinder on the bench and, yet again, the rear chamber (front brakes) didn't push a drop of fluid into the bleeding line. More swearing, throwing tools around. I'm following the instructions, doing what I see in the videos and not getting results, god how upsetting. So I read the instructions again and see that you push the rod in "3/4 to 1 inch". Okay, I was being super careful and pushing the rod in about a half inch at most. I put the push rod I was using in till it touched the piston and marked it at the cylinder flange. I then made another mark an inch back from that one so I'd have a depth gauge. What I learned was the the rear chamber (front brakes) did not even START pushing fluid until the rod was about 3/4 inch depressed. I guess this is by design? Maybe because the lines to the rear are longer they push first to compress the fluid in the extra length of line? But yeah, not a single piece of instructions nor instructional video mentioned this fact. Whatever, at least I was getting the piece of crap to push air bubbles through the rear line now. The instructions and videos I'd watched said you'd see bubbles come out of the internal ports for maybe 15 minutes, but what I found was that it took like, an hour of working the piston until no more bubbles came out. Also, those jackholes on youtube would say "work it until you get five strokes without air coming out of the fitting." I NEVER, EVER got more than two strokes that were solid fluid. It would be like, stroke, stroke, air. God I was so tired of standing over that stupid cylinder for more than an hour slowly working that piece of crap to try and bleed it. I finally got it so that no more air bubbles came out of the internal ports so I was like, eff it, and threw it back on the truck. I was actually able to bleed the brakes this time, in that the flow through the bleeders was solid with no bubbles. The pedal stiffened up, some, but still goes down quite a ways, and even with the new proportioning valve open all the way the rears don't lock up. Basically the brakes are back in the same crappy state they were in when I bought this piece of junk. I don't know, maybe there's air somewhere still, but I bled and bled at the fronts and rears with no sign of any more bubbles. I adjusted the booster rod out to about an inch, it should be resting against the piston now, if the first half inch of travel engages the rears, maybe it's a sign the shoes aren't adjusted right. But I have them slightly dragging the drums so, whatever. But yeah, I can just jam on the pedal and at no point is the thing coming to a stop good and quick. Every time I think I know what to do, read the instructions, watch the videos....there's some other, little detail that I don't know. Seriously, how do people own these things without pulling all their hair out? What keeps men from sending a few high caliber rounds through the radiator and putting themselves and any future owners out of the misery of Jeep ownership? Whatever, it sort of stops, as poorly as it ever did. But hey, after putting on two boosters, three master cylinders, new calipers, new rear brake hardware, new hoses, several feet of new brake line, I have fixed the original problem in that the brake booster no longer leaks. So I've spent hundreds of dollars and over six months of evenings and weekends to fix a leaking brake booster withOUT improving my brakes one iota! God I love owning this thing. -
brake reservoir sediment (red mud, rust, ???)
brucecooner replied to brucecooner's topic in MJ Tech: Modification and Repairs
Oh my gosh, it's like the stuff has a mind of its own, or anit-gravity properties. I swear it will start climbing out of the bottle if you leave the cap off by mistake. That was my best guess after thinking about it, since these new bleeders are an unknown quantity. There was plenty of air in the front lines. I had pushed some fluid out from the top side of the line before installing the bleeders, so it's possible the bleeder was effectively blocked and the cylinder was just gulping air back from the line. I found out after going out of my way to get the set from Napa that the local Advance has them too, I may try a set from there. I replaced most of the lines on mine. The front lines are completely new from the cylinder all the way out to the wheels. I union'd to the rear bypass line close to the firewall, as that bypass line was fairly clean looking and getting a line down to the frame rail from up high was nigh impossible. Also, my gas tank skid plate's front high bracket currently will not come around some fuel lines from the tank, making it nigh impossible to remove without cutting the bracket free (which I may do in the future). So I was happy to re-use that bypass line. But right after the line comes from behind the tank/plate, I re-ran lines from the old T all the way out to the axles. (there's a picture back up the thread of my rear work). I did put gravel guard/armor on all the rear lines, slightly complicated things but it looks nice. None of my lines were rusted, on the outside, the armor did have plenty of grease in it, but this truck was never offroaded which probably saved the lines. I used the NiCopp line everywhere too, pretty easy to work but it took some finesse to flare. Also the softer stuff wouldn't flare at all, just crushes in the tools. I had to get the S.U.R.R stuff from Summit to have any luck flaring, and even then I'd get little burrs on step 2. Copious use of die grease gave me the best results (and thoroughly cleaning my lines after flaring to remove the grease). My flares have been sealing at the fittings without leaks so far. *fingers crossed* My master cylinder was full of mud too (that was what started my whole calamity), but it was the internal state of my lines that led me to do all this work. The lines were all beautiful and new looking on the outside, even had the original protective coating, but inside they were nasty. Same here. After removing the cylinder it didn't look like any had gone inside the booster. I stuffed a paper towel in the booster hole and shot the area with brake cleaner, but I still plan to give it the wet towel wipe down and wash as well as I can before re-installing the cylinder. I'm certainly no expert, but man I've learned more than I ever thought there was to know about brakes. Your info about the booster rod was no doubt critical to getting this done right, big thanks for that. Also, hats off to you for sticking with it for a year. Part of me is "done" with the truck, but it's really just working on brakes I'm done with. I enjoyed every one of the couple hundred miles I put on it before starting this never ending brake job. The way it sounds and handles and moves (and looks) are just great. Well, except for the times it heat soaked on me, that's not fun. :) And that's what I really really want, to get to drive it again. -
brake reservoir sediment (red mud, rust, ???)
brucecooner replied to brucecooner's topic in MJ Tech: Modification and Repairs
Thanks for the instructions. Sorry, this post got long and ranty. Today was a hard day with these stupid brakes. I was so, so close to being done and driving again, then my entire hopefully final weekend of work just went out the window. Just jump to the end if you want to try to help with my joyless, never ending quest to bleed a set of brakes. I'm honestly about ready to sell this dang truck over the effing brakes. Every time I think I'm close to being done, something doesn't work and I have to undo a day or two's work and start over. I've literally tried to bleed this thing two or three times now. I got the closest I've come today, but then at the end it all quit working. It's all because I'm doing things wrong, I know, it's just very frustrating because I read and follow all the instructions carefully and I still can't get the job done. More below... The rod on the latest booster was definitely too short. I could tell by holding it up to the original booster and the bad booster I bought last year. I measured the cylinder bore depth, subtracted the flange, and it came to 0.962 inches. The new booster was about a quarter inch short. Given that the pedal has a mechanical advantage, I was probably losing a good deal of throw to the shortness. It was difficult to gauge the rod depth on the new booster since it's in the truck, but it was easy to put nuts on the cylinder mounting bolts to that depth, so I put nuts on the two bolts, then held a straightedge across them to tell when the rod was just shy of the depth. It was a little tedious, having to hold the rod while working the lock nut and turning the end out, but I actually enjoyed this step. I had already pulled the new cylinder Saturday for the rod adjustment, and even though I had theoretically bench bled it before the last installation, I planned to bench bleed it again anyway. I had already plugged the ports upon removing so I mounted it and began pressing the cylinder gently, using a spare rod that came with the booster. I could get gushers in the front chamber (rear brakes), but even with just a quarter inch of fluid in the rear chamber (front brakes), I NEVER got a geyser of fluid to come up. That coupled with the fact the snap ring in the bore looked slightly moist made me think it was bad. I took it back. It was probably fine and I just don't know what the hell I'm doing, but Autozone didn't give me any flack and just replaced it on the spot. There was a lot of casting flash around the inside and outside edges of the the chambers on the new cylinder so I taped over the ports, and held the cylinder upside down while I lightly filed the flashing off, until the edges were just smoothed. I had held the cylinder upside down the whole time I was filing, and I blew some air into it before tipping it back rightside up. Here's where I made my first mistake... I untaped the ports and, because I thought I should clean it just to be sure but did not want brake cleaner in the ports, I put some brake cleaner on a shop towel and wiped the insides of the chambers. I did not know it at the time, but I had just left a whole bunch of little bits of shop towel on the inside walls. I wouldn't discover this until later though. Anyway, I mount it on the bench, and begin working the cylinder very gently. My setup allowed leverage and a great deal of control by using a screwdriver as a lever in the end of the spare booster rod. I was extremely careful not to push the cylinder quickly nor very deep. The instructions that came with the first new cylinder I bought said to do this for about fifteen minutes, until you see no more air bubbles coming out of the ports. Here's where my mistake with the shop towel came back to bite me, as I could see little blue bits floating about in the chambers, I stopped constantly to remove the little blue bits and curse my stupidity. Anyway, it took more like an hour and fifteen minutes of steadily working the cylinder before the air bubbles quit appearing. I wasn't sure if I should take that as a sign of making another mistake or a bad cylinder or what, but I was tired of messing with it and the wife wanted to go out so I called it a stopping point, carefully closed up the cylinder and put it in a gallon sized ziploc bag on a shelf between two things to hold it upright. Today I went looking for speed bleeders. Apparently I'm going to be bleeding brakes every weekend for the rest of my life, so I figured they were a good idea. I got a set for the fronts from Napa that looked like they've been opened but not used, and were the only set Napa had in the entire city of Phoenix. It was easy enough to get them into the front calipers, and I was a little excited that bleeding the brakes might be easier next time I did it. (as if!) Anyway, before putting the new master cylinder in I decided to check the state of my bleed job. I mounted it back on the bench, got a couple more bits of shop towel out, and began working the cylinder and what do you know, more little air bubbles. I was worried again I had effed something up, even though I had been super careful with the cylinder. It only took a couple of minutes before the air bubbles stopped this time though, which I took as a good sign. I used a right-sized plank against the seat bracket to hold the brake pedal forward, then put the cylinder on. The plank popped out as I pushed on the rod but I seemed to have gotten the cylinder centered, so I tightened up the nuts on the cylinder and went through the struggle YET AGAIN of fighting the lines onto the ports. So it was time to start bleeding. I'm good and tired by this point, every few minutes I'm spilling brake fluid on something and just, tired, tired of working on brakes, tired of not having a vehicle I can enjoy, tired of hanging out in the driveway. Anyway, my wife volunteers to work the brake pedal, I take up station at the passenger rear wheel and the bleeding starts going, pretty well actually. The passenger rear goes solid with just a few presses, and my wife reports the pedal is stiffening a little bit. The pedal had never done that before. The wrench of course pops off the bleeder as I'm closing it for the final time, popping off the hose and getting brake fluid everywhere, which sends me into another cursing tizzy as was sure the wrench popped off while the bleeder was open. We reset, press, open, close, release again a couple times but the fluid is still solid so I call the passenger side good. I moved to the driver side rear, and this bleeder shoots out little bubbles for many many push-and-open-and-close cycles, but finally the bubbles all seem to be gone and I get a solid flow. I clean up the fluid spilled on the axle from the wrench incident, cap the bleeders, and put the rear wheels back on. I'm actually excited now, I'm thinking I might actually, finally be DONE working on brakes. But no, this is where things went south in a hurry. I lift the passenger side front, get the tubing and wrench ready. Since this one is now a speed bleeder though, I open it and leave it open. My wife gets on the pedal, but no amount of pushing produces any fluid at the bleeder. I make sure it's about a half turn open, and she's pressing, but still no flow. In the cylinder, bubbles come out of the rear chamber ports (front brakes) with every brake press. On and on, no matter how many times we press the brake, there are bubbles in the chamber and no flow at the bleeder. I can hear a slight gurgle from somewhere inside the cylinder with every push of the brake pedal, before the bubbles come out. I become suspicious of the cylinder and feel underneath it, and there's a trail of brake fluid down the lower front of the booster. I'm pretty sure it's leaking from the cylinder, so I begin another swearing tirade. I'm defeated. The pedal had actually stiffened after bleeding the rears. I was on the last step, and suddenly it's like the past two days have been for naught. Continually swearing, upset that I've given so much of my life to these brakes, I removed the cylinder YET AGAIN, and find out that actually the bore is dry. The supposed "leak" down the booster was just fluid that was splashing over the top of the open cylinder chamber and running down to the bottom and getting on the booster. I can't do anything around this brake job without getting brake fluid all over my truck. I'm so tired of wiping down, wetting rags, cleaning up brake fluid just, augh. Anyway, so maybe the cylinder's good, I honestly don't know and I wouldn't even be able to tell. I've been working on these brakes for literal months, and I still never seem to know enough to actually finish the job. I was so close today, and then at the end, nope, final step sailed. I've followed all the instructions, carefully, and it never seems to get me to the finish line. I pulled off the cylinder, again, thinking it was bad, effectively undoing a whole weekend's worth of work. I probably pulled it for nothing. Now I have to re-install the cylinder, again, and bleed all the brakes, again. This is probably the third or fourth time I've attempted to do this. I'm so tired of failing at this. I've come so far, but every time I try to bleed these brakes I fail in some new way. Every time I try it, I have to discover some new thing about bleeding brakes I don't know. I have learned any youtube video where a guy talks about how easy it is to bleed brakes is a filthy lie. If the video starts with a guy talking about how easy it's going to be do his brakes, I just quit watching. That's great dude that the universe smiles on your brake job but that ain't been my experience. But yeah, I was done, I mean done with working on this thing forever. I was so close, I thought I might get to finally enjoy my Jeep but NOPE. Nope nope nope. I've probably effed something else up. I hate looking at the thing now, it just reminds me of all the work and effort I've put into this thing to accomplish NOTHING. I've been working for literal months, around sickness and weather, spending so many days and evenings crawling around this thing, and I still can't get it done. The ONLY thing I've effectively done to this Jeep, in a year, is to replace the injectors. I mostly enjoy working on it, or I did back when I started. But months and months and it's still sitting in my driveway, gas in the tank slowly going bad, while I flail about underneath it. And when I feel like I'm having no effect the work is just pure drudgery. Maybe I'm just not mean to own this thing. And I can't say that Jeeps suck. The Jeep is in pretty good shape. It's not that the truck or the brakes are poorly designed. The problem is that I suck, I can't even get my stupid brakes to bleed. I feel like such an idiot for just going on and on and on and on and on with this stupid job to get nowhere. So many days and evenings I could have been doing something. I think about how I could have just grabbed any random beat to hell Tacoma and I'd actually be out there enjoying the beautiful Arizona scenery. But there I am, crawling around under a Jeep because I bought what I wanted instead of what I needed. At this point, I don't know if there's any point to me going on. I'm this close to just posting it on bring a trailer, taking whatever I get, and letting some other fool give up all their weekends to this hunk of inert steel. I'll just get the first beat to hell Tacoma I see and get back to enjoying my life. Anyway, rant over. It's been a hard day. ------------------------------------------------------------------------------------------ Main question: If your master cylinder (front brakes, in my case), doesn't seem to make pressure, and you see bubbles coming from the ports in the cylinder, what could that be a sign of? One variable factor was the addition of speed bleeders to the mix. Are there any issues that might be caused by a bad speed bleeder? Can they get "stuck" and refuse to allow fluid out. I guess I should have cracked the one on the other side and seen if I got different results, but I was so upset when it seemed like the cylinder was leaking I was just angry and upset. If I were remotely smart I would have jammed the old bleeder back in there and seen if that had any effect. But even with dozens of presses, I never saw a single drop of fluid come out at the caliper. It looked like the cylinder just wasn't building any pressure to the front lines at all. Bonus question. Can you get speed bleeders for the Dana 44 rear cylinders? I googled extensively but couldn't find any sort of indicated part. Also, big thanks to everyone who has helped. I have genuinely learned a lot.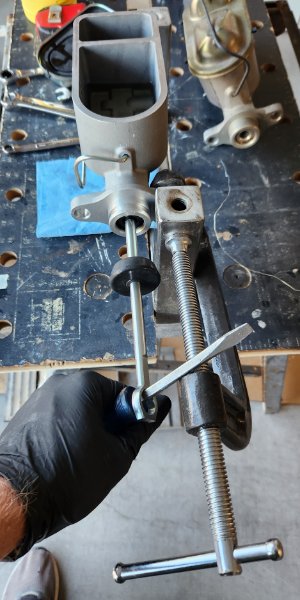
-
brake reservoir sediment (red mud, rust, ???)
brucecooner replied to brucecooner's topic in MJ Tech: Modification and Repairs
Thanks for posting that @Salvagedcircuit. I read the doc and it makes sense. If the booster rod contacts the cylinder piston after it has used up some of its throw, it won't have as much travel left to push the cylinder. It's interesting you mentioned this, because the booster I bought from Crown was explicitly listed for an '88 MJ, BUT the body was a different shape than the one that came off. The body of the one I got was not as "deep", and had an adapter bracket on the back to make up for the narrower body, so it would still mate to the firewall correctly. Everything still bolted back up, so I assumed it was okay, but now I'm wondering. Also the end that attached to the pedal was subtly different, and I had to leave out the plastic bushing in the pedal switch, or the brake lights would be always on. I left out the bushing and the brake light switch worked normally, but I should have been more suspicious. By that point I was so tired of working on brakes I'd take anything that seemed to work, unfortunately. So, my current plan is to remove the cylinder and double check it by plugging the ports and taking it through the bench bleed again. If it's good and tight I'll know that's not the problem. While it's off I can measure the cylinder depth and compare it to the booster. I am very very curious about an aspect of bleeding though. When I was bleeding the cylinder in the truck, I had clear lines from adapters on the ports over the top of the cylinder and back into the reservoirs, as normal. I would watch and when my son pushed the brake pedal, fluid and a few little bubbles would come out of the ports and over into the reservoir, BUT, when he released the pedal fluid would draw back through the lines and back into the port. I would guess that's normal operation, when the cylinder returns the pressure it built into the lines backs off, and fluid travels back toward the cylinder. Okay, say there's a bit of air in the line near the cylinder. You press the brakes, the air in the line compresses a bit, maybe it gets pushed along a little. But when you release the brakes, does that air not just "back up" back toward the cylinder? Thinking about it, I guess the fact that the bleeder is open lets the air travel further toward the wheel every time you press the brake. Because when you close the bleeder, the cylinder has to work against a closed system, and thus doesn't pull the fluid as far back. Basically I'm wondering, if there is air near the cylinder, even though I'm seeing no bubbles at the wheel, I have to pull those bubbles alll the way to the wheel, so I have to pull the whole contents of the line through before I even see the air. Which reminds of the definition of insanity, keep doing the same thing expecting a different result. I'm almost tempted to take push all the fluid out of the lines while I have the cylinder off, and just restart from scratch. Now who's insane? -
brake reservoir sediment (red mud, rust, ???)
brucecooner replied to brucecooner's topic in MJ Tech: Modification and Repairs
Yep. The calipers and cylinders are new, but I was very particular to get them on right. The bleeders are all higher than the fittings and banjo bolts, which I take as a sign I got it correct. I did not know that trick of pressing the pedal then just cracking the m. cylinder fitting (essentially using it as a bleeder, I guess). I'll definitely give that a try. The pedal travel is the same whether the engine is running or not, I don't think the booster makes any difference to it. And I've been thinking about some sort of catch basin to fit under the cylinder. When I pulled the lines last time I had about half a roll of shop towels stuffed under the cylinder, and still had to clean up a bunch of fluid. I keep a bottle of water handy to splash on spots after I wipe up the brake fluid. And then I wipe up the water. My son has said part of my problem with it is that old Jeeps aren't supposed to be that clean. I guess there's a chance the master cylinder might be toasted. It's a rebuilt one, but I got it at Autozone so, rolling the dice on it I guess. It's odd to me that the cylinder allows as much travel as it does so easily. When I was bench bleeding it I had to really work to push it an inch, but that was without the mechanical advantage of the pedal. I'd put "lack of mechanic's skill" above any part failure at this time though. -
brake reservoir sediment (red mud, rust, ???)
brucecooner replied to brucecooner's topic in MJ Tech: Modification and Repairs
The ETERNAL BRAKE JOB continues. I am nothing if not persistent. Still don't have brakes (more on that later), but I FINALLY got brakes lines everywhere brake lines are supposed to be, and got the rear drums pointlessly rebuilt with shiny new hardware. Man, reassembling drum brakes is like trying to stuff everything back into an old timey pocketwatch. It's not horrible under the back. It looks clean with the crusty old prop. valve gone (now have one under the hood). I got gravel guard on all the lines so they look correct, and I at least figured out not to run lines directly between the axle and the bump stop. The rear lines are now running from the previous bypass/emergency line to the rear, which was much cleaner than the main line. I tried as hard as I could, multiple times, to remove that tee from the line so I could use a simple union, but the fitting on the master (supply) side would NOT budge with any amount of penetrant, patience, heat nor hammering. I finally said eff it and plugged off the now unused side, then ran the other side out to the hose. Anyway, everything is now plumbed and nothing leaks (so far), and I've bled quite a bit, but the brakes are still effectively non-functional. After plumbing was done, I re-bled the master cylinder with it in the truck, with fittings that ran lines back into the reservoirs and making my son pump the brakes until there was no more air coming out of either port. I then re-attached the lines to the ports and bled all the corners, farthest first (though now that the front/rear are on separate lines I can tackle the ends in any order). I did some of the bleeding with a vacuum pump (tricky), but I'd always follow that up with a few applications of the old "push the brake pedal in with a plank of wood then go to the wheel and crack the bleeder" trick. All four corners show a solid flow of fluid when you open the bleeders with the pedal down. The new prop valve is over half open, and I was definitely getting fluid at the rears so don't think the valve is a hindrance. I left only a little clearance between the new drums and shoes, and if you jack the rears up and spin a wheel then press the brakes they do grab enough to stop the wheel. Same on the fronts, you can spin one then press the brake and it will stop. But still, the pedal goes pretty much to the floor, it has no stiffness at all, and there just isn't much pressure behind what fluid gets pushed through. I can drive it, slowly and gingerly, around the neighborhood, but that's it. So I've had a lot of practice at bleeding brakes, but no luck so far, and have no idea where the air bubble or bubbles might be. At this point my options seem to be starting over by pulling the cylinder, emptying the darn lines of fluid, then just starting again from step one, or sell this darn thing to the next sucker who wants to spend every spare evening and weekend of the rest of their life trying to get it roadworthy. Anyway, are there ANY diagnostic tools that might help me determine where the softness is coming from? I am wondering if, after bleeding the master cylinder, when I removed the bleed fittings from the cylinder I basically just undid all my work and let air back into the cylinder. But if that's the case, how DOES one attach lines to a freshly bled m. cylinder without getting air all in it? Also, just because I'm getting fluid out of a cylinder does not mean there isn't air left somewhere up the line, and maybe I actually need to keep bleeding more to get that air bubble to the end of the line and out the bleeder. Argh! If I ever get this done I hope I never see another drop of brake fluid in my life.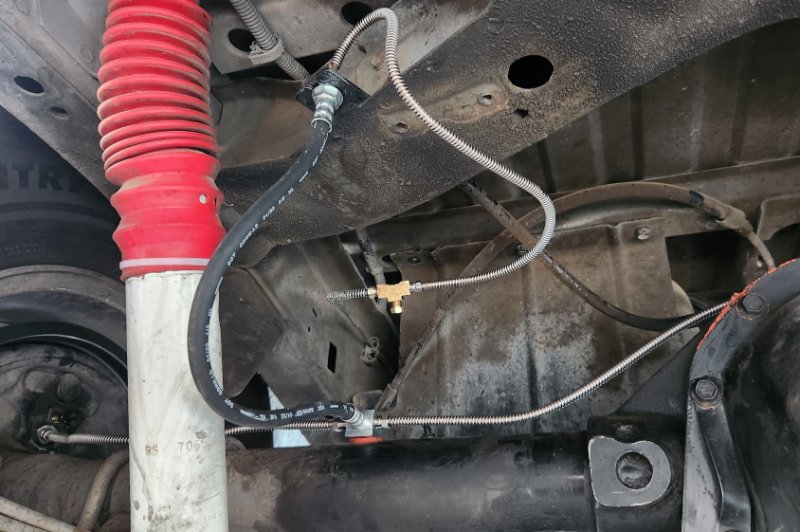
-
brake reservoir sediment (red mud, rust, ???)
brucecooner replied to brucecooner's topic in MJ Tech: Modification and Repairs
My cold is not most peoples' idea of cold. I start shivering at about 65 degrees, it's ridiculous. It also didn't help that it decided to rain on almost every, single day, I thought I might go out and fiddle with the truck. I appreciate the precip but its timing was poor. The mini prop valve came from Speedway. I actually live a few miles from the warehouse here on the west side. https://www.speedwaymotors.com/Speedway-Compact-Adjustable-Brake-Proportioning-Valve,1979.html This valve was used by someone else around here who gave it high marks. I did get the big Woodward(?) one, but could NOT find a place to mount it, while the mini one slipped in right next to the cylinder. I can still get the big ole stock windshield washer reservoir back in. Well, if I were to ever get done with this brake job I could. I did briefly debate mounting a valve under the rear end, where I could reach beneath the wheel arch and work it, but didn't consider that a good long term arrangement. The m.c. is definitely pushing fluid, but at what pressure I couldn't say. I didn't give any context to the bleed procedures... there's so much more to this saga. I did have this cylinder on the truck when I had only replaced the booster and cylinder (no lines or other hardware). At that point it had been bench bled. I used the procedure from the included instructions though. You put little red plastic plugs in the ports, add fluid, and slowly work it back and forth until no more bubbles come up into the chamber. Once I realized the "new" booster was leaking worse than the 30-year old one, I decided to ditch the distro block and run lots of new lines. So I ordered a new booster, and at the same time ordered new rear brake cylinders (from Crown), but my plan was to replace the cylinders at a later time so I could get back on the road sooner. Anyway, the new master cylinder came off the truck, the port plugs went in, and the cylinder was stored in a sealed ziploc bag in the garage, still with fluid inside, while I learned how frustrating it is to run brake lines. The cylinder never sat up dry and was in an airtight bag the whole time. Fast forward a bit, and upon finding out I need to run new lines on the rear axle, I decided to replace all the rear hardware too. So I order rear hardware kit (Crown Mfg. again) and discovered it was gonna be like three weeks till it even ships. Argh. So I formulate a brilliant plan to... 1. mostly drain the m.c. so it's not holding onto much of the fluid that was in the old crusty lines 2. bench bleed the rear chamber while on the truck (using the port plug procedure) to pressure test the rear line, since its fittings would be easier to reach before final plumbing on the front line 3. bench bleed and pressure test the front lines and, hopefully, have just enough brakes to let me ease around the neighborhood So I did mostly drain the front and work the cylinder with it in that state while bleeding the rear chamber, but the seals and everything were still wet as I didn't completely drain the front chamber. Those NPT fittings, yeah. Apparently others have used them with success. I will say the cylinder side fitting tape was visibly wet the day after my initial pressure test and there was a tiny drop of fluid on the bottom. I loosened the flare fitting and cranked the NPT fitting down some more, hopefully that will do the trick. I just talked to Summit today, but there's still no ship date on my rear drum hardware, argh. If it don't ship soon I'll have to cancel and find another source. It's a Dana 44 rear so have to get the 10x2.5 hardware. But I should go ahead and at least plumb the rear axle and install the new rear cylinders, so the whole system can be pressurized out to all the wheels. And the old hardware will work just fine, I just wanted shiny new stuff on all four corners. But I did at least ease it gingerly around the neighborhood yesterday! That felt like progress. But since The Heartbreaker (the truck's name) always has a surprise up its sleeve, it decided to idle at 1500 rpm for the test run. I thought oh great, another leaking booster, but back in the driveway I pulled the line to the booster and put my thumb over it but it was still idling high. Just something in the control system was out of its head. After a while warmed up, with few moderate revs the idle settled back down to its usual 500-700-500-700 cycle. God this truck just, argh! I've halfway given up on ever getting this thing out of the neighborhood. It might as well be one of those theme park rides where you crawl around a premade track in a little gokart. Anyway, I do NOT envy you having to freeze your fingers off on metal parts while dodging polar bears on the arctic waste. I'll take a walk around my neighborhood in 100 degree air over that any day. -
brake reservoir sediment (red mud, rust, ???)
brucecooner replied to brucecooner's topic in MJ Tech: Modification and Repairs
About that... Oh, yes, I'm still struggling through this brake job. The weather got cold and I got sick (still dealing with it) which has meant my poor Comanche has been driveway decoration for months now. Yes, everyone point and laugh that it's taken me like, four months to do this, (even I think it's sad) then when you all have your breath back let me ask about something. For the front lines, the line comes out of the master cylinder port then goes down toward the location of the old distro block. Down there it meets a T, which sends one line down to the driver's side front, and the other line exits the T straight back toward the firewall. This line headed for the passenger side caliper line runs beside the booster then turns UP, basically following the route of the original line, turning passenger side just below the pinch seam, and following it for a while before turning down before it goes around the charcoal cylinder and out the passenger wheel well. Note that it no longer passes through a distro block (that thing is gone). The line headed to the rears comes out of the m.c. (front port) goes under and around to a proportioning valve right next to it, that is currently closed. From that valve a line goes down and meets the original bypass line to the rears, which is plugged at the back until I get new rear hardware. And don't worry, I have wrapped fuel line around the booster bolt/nut so the brake line isn't rubbing metal there. And note that this picture was made during a test fit, hence why there's no tape on the NPT adapters on the valve. Anyway, getting to my quandary. I bled the front lines today and could NOT get the pedal to stiffen up. I was getting solid flow without any air bubbles out of the bleeders at both front calipers. But the pedal is going nearly to the floor, is very soft. The calipers do grab, and after jacking up the fronts and verifying they do stop the front wheels, I very slowly eased it around the neighborhood. But that pedal is super soft and the fronts just aren't grabbing and stopping was iffy at best. Which leads me back to what gogmorgo wrote. My front passenger line goes UP to run along the firewall, then DOWN to meet the wheel, giving it a length of high spot. I'm suspicious that all that upward bend may contain an air bubble that's not moving. Like I said, the rear line is closed at the prop. valve, which I think would mean that short segment between m.c. and valve is holding pressure. But, like gogmorgo said, it would be very hard for very much viscous fluid to slip past an air bubble in a tiny 3/16 inch line. Note that I followed the route of the original line, it's even snapped into the original clips, so this shouldn't be some new problem I've introduced. I'm going to bleed them again, and probably give the high part of the line a few light taps as I work to hopefully loosen any bubbles. But if anybody has any ideas about why the softness persisted I'm all ears.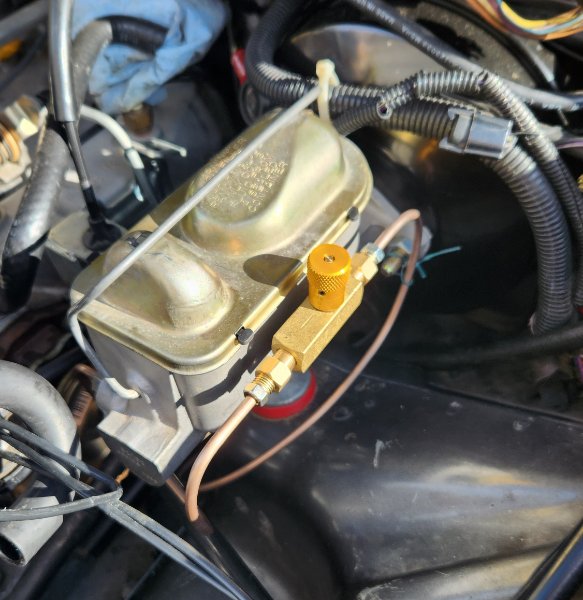
-
I've been hearing a brand new noise from the 4.0 the past few weeks. This is definitely not the old piston slap, I had gotten used to hearing that. This sounds like, dried peas rattling around in a tin can. It seems loudest around the area of #1 up in the valve cover... 20230131_174537.mp4 I can also hear it from underneath too. Not sure if it's coming from the bottom or just traveling from up high. 20230131_174646.mp4 It's been running Rotella T5 30 weight oil for a while now. I'm wondering if this oil cleaned up the top end which coupled with the lighter-ish weight oil let a tired lifter start nagging. IF it's a lifter, is that something that can be fixed with the valve cover off? (I have a new cover gasket waiting for me to get to it)
-
Replacing Brake Distribution block
brucecooner replied to dinghyboy's topic in MJ Tech: Modification and Repairs
Thanks for the update! Glad to hear it's been working for you. I actually live just a few miles from a Speedway warehouse and was passing it today so stopped and picked one up, will definitely give it a go. Yep, you can buy the valve by itself OR with the adapters from NPT to 3/8 x 24, so I picked up the one with adapters. Now I'm waiting on the new booster and rear cylinders to come in next week. -
Replacing Brake Distribution block
brucecooner replied to dinghyboy's topic in MJ Tech: Modification and Repairs
Interesting.... If you look closely at the picture of the mini adjustable valve on a Speedway product page... https://www.speedwaymotors.com/Speedway-Motors-Brake-Proportioning-Valve-Kit-With-Fittings,387281.html Etchings on the part indicate you are getting a Deltrol EF10B "flow control valve", detailed here... https://deltrolfluid.com/products/in-line-valves/flow-control/flow-control-free-reverse-flow-adjustable/ef10b The valve has NPT fittings, which may indicate its original use wasn't in automotive braking systems. But anyway I guess a "brake proportioning valve" is just a "flow control valve" by another name. A rose by any name right? From what I've read a brake proportioning valve is just a valve that limits the maximum pressure output. The output pressure increases to a set point (controlled by the dial in this case), then remains constant despite increasing input pressure. I actually live near the Speedway store here in Phoenix, tempted to head over, pick one up and see if it works. -
front fender flares flaking away
brucecooner replied to brucecooner's topic in MJ Tech: Modification and Repairs
Dang it. The Heartbreaker strikes again. Well if I can just get some XJ fronts I guess. -
front fender flares flaking away
brucecooner replied to brucecooner's topic in MJ Tech: Modification and Repairs
Duh me, repros are all over the place. I suspect they won't last 30+ years like originals equipment, but they come in black, which is the color I want my flares to be... https://www.morris4x4center.com/fender-flare-kit-master-5agk-m.html Yes, I'd have to paint them to protect them. All the products I've looked at claim they WON'T fit MJ's, which I really doubt. I highly doubt AMC would design different flares for two models largely identical from the beltline down, but at the least the fronts would be the same. -
front fender flares flaking away
brucecooner replied to brucecooner's topic in MJ Tech: Modification and Repairs
It's all flare, no trim there. Sun is getting to the plastic. I should at least dab some paint on it to keep the rays off I guess. Yep, that's exactly what I see. Dang. Odd that it's not happening to the rears. -
Replacing Brake Distribution block
brucecooner replied to dinghyboy's topic in MJ Tech: Modification and Repairs
Yep, I'm hoping to move the proportioning functionality under the hood, seems to work well for lots of folks. You got any pictures handy? My son and I tried holding it in different spots last night and were at a loss as to the best placement. It seemed to fit on the inboard side of the m. cylinder okay, but getting to the fittings was going to be tight. Also, will the hard lines hold that standard (larger) valve in place, or is a bracket required? We could probably fashion one that comes off the m. cylinder bolts (most sold seem to do this), but even having room for nuts and bolt heads was iffy. Has anyone mounted the valve under the cylinder? -
I had noticed the paint is flaking off the tops of the front fender flares, but only right up next to the body. I took a closer look today and it looks like the actual material of the flares themselves is flaking away, taking the paint with it. Ack! The rear flares are not doing this, I'm suspicious it's a combo of age, sunlight, and heat from the engine doing in the flares. Is there a mitigation for this? Can I apply something to stop the loss? The truck is gray, and I'd actually like to paint the flares black, if possible, but painting might be pointless if this rot is just going to continue under a fresh coat of paint. Are there aftermarket solutions? I like the flat metal flares I've seen on some XJ's, but they all seem to require cutting the fenders or adding armor, which I don't want.
-Copy.jpg.6aababe9f05826f61b66c47b2a28590a.jpg)
-Copy.jpg.9eb215e448dc10614ae8588ece7ecc31.jpg)
-
Replacing Brake Distribution block
brucecooner replied to dinghyboy's topic in MJ Tech: Modification and Repairs
Hi Coolwind. I'm looking at deleting my rear prop. valve for an under hood setup too. The issue I face is that I got the Wilwood prop. valve that seems to be the favorite, but due to its size there is no clear and obvious place to mount it near the master cylinder. I'm debating just deleting the windshield wiper fluid reservoir, or finding a smaller one, so I can have some space on the outboard/fender of the m. cylinder to mount the valve! I really like your setup using the mini-valve here, as it's easier to find a place for, and being lightweight won't require a bracket to hold in place. I think this is the one you're referring to... https://www.speedwaymotors.com/Speedway-Compact-Adjustable-Brake-Proportioning-Valve,1979.html Your post sounds like you must have gotten the rears dialed in and working with this setup, and I was curious to see how it has worked for you in the years since you installed it. -
brake reservoir sediment (red mud, rust, ???)
brucecooner replied to brucecooner's topic in MJ Tech: Modification and Repairs
In case anyone else in the future is foolish enough to try replacing the master cylinder on their '88 Comanche and goes looking for fittings, I figured out the port sizes. Front: 1/2 x 20 Rear: 7/16 x 24 Very likely the same on a Cherokee. These sizes are reversed at the attachments to the distribution block. Goodness knows why. I also enshrined it in a picture that might helpfully appear in image searches. (I also did this so that I can remember it too.) I've got some steel nuts that came with the crappy tubing and look like they'll be covered with rust in a week. Why is it so hard to find these sizes in brass?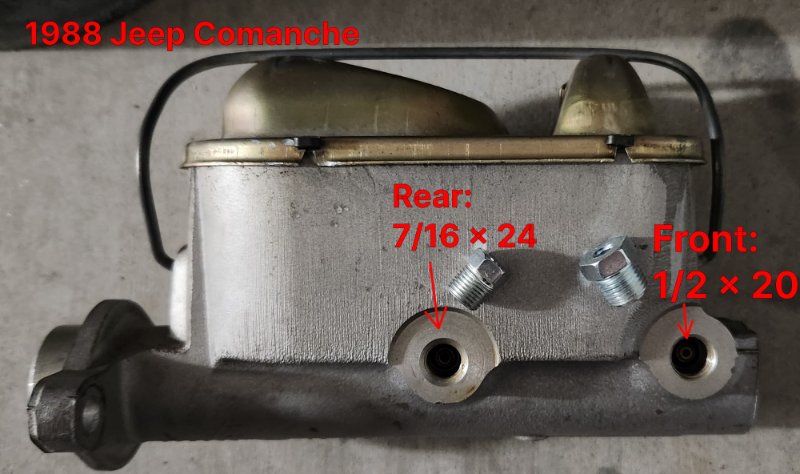
-
brake reservoir sediment (red mud, rust, ???)
brucecooner replied to brucecooner's topic in MJ Tech: Modification and Repairs
It was the 4LimeTimes (?) stuff. https://www.amazon.com/Copper-Nickel-Brake-Transmission-Tubing-Universal/dp/B07BMZBT3Q/ref=psdc_15721801_t3_B085GG7KZP?th=1 The business end of the flare looks okay-ish. Some do come out a little oval shaped. But they don't have the neat trumpet shape from the side view. They have this almost spiral look to them, which makes me think that since the punch/die is threaded into the tool, it is grabbing and twisting the line as it turns. I took one out after the OP1 step, and that's when they develop this twist. I did try using more die lube, thinking maybe it had too much friction and that was leading to the twist, but that didn't help. I found a thread somewhere that indicated others had the same problems with Amazon sourced line... https://forum.ih8mud.com/threads/titan-double-flare-tool-problem.1240821/ But then other people on that thread could also use stuff from Amazon without issue. I wonder if there are batch differences in different products or something. That thread seems to indicate they have better luck with a Summit product. https://www.summitracing.com/parts/urr-br-ez100 Good to know in case I don't have the guts to redesign a lot. The amount of bending and rerouting I do under the bed will ultimately depend on how much energy I have after working up front. :) Cuz I don't know if I have enough mechanical mojo to run a line alllll the way from the engine bay to the back. I need to drop the gas tank skid plate and see what I'm up against, which would be a good quick project while I wait on parts. I have noted that were I lazy, I could go to the tee that combines the bypass line with the prop. valve output and goes to the axle, just block off the prop. valve input side (thus removing the old prop valve from the system), and then just connect the bypass line start up at the front to the new prop. valve under the hood. So it would go: new prop. valve (front) -> bypass line -> tee (under bed, with one input blocked it's effectively just a union) -> axle, achieving the desired result. Super lazy, like I said.
-
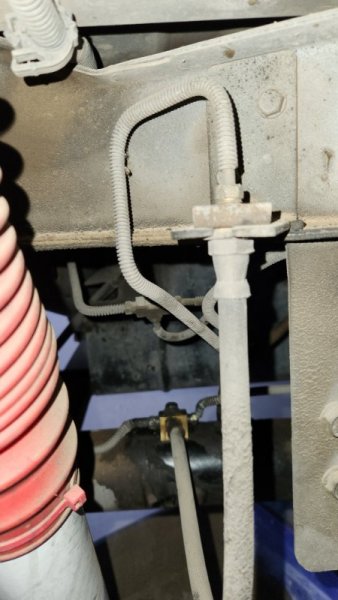
brake reservoir sediment (red mud, rust, ???)
brucecooner replied to brucecooner's topic in MJ Tech: Modification and Repairs
Waiting on parts now. I got the Titan double flare tool, but practicing some flares I learned that the crappy nicopp line from Amazon is not up to the job, going to get some better stuff from Summit. However, while I was mapping out the rear lines under the bed, I noticed that the final hard line that mates to the flex line that goes to the axle has this large upward loop (picture below). (the soft line goes out of the bottom of the frame in the picture below, then continues back into the picture to the brass T on the axle in the background) I'm suspicious that this might be a place for air bubbles to hang out and be very difficult to get out of the line. I'm I'm trying to improve things here, would it be better to route this to remove this upward loop? The metal plate on the right of that photo is the bracket that holds the original prop valve, and I'm wondering if I could move this bracket from a horizontal mount to a vertical mount position on that bracket, and take out this high point in the line. Also, are the brake fittings on a Comanche going to be 3/8 x 24 ? I know there's a couple large ones (1/2 inch?) that mate the master cylinder to the distribution block up front, are there other mismatched sizes in the system?