


CO MJ
-
Posts
105 -
Joined
-
Last visited
Content Type
Profiles
Forums
Gallery
Everything posted by CO MJ
-
Leaf spring shackles flipping forward
CO MJ replied to CO MJ's topic in MJ Tech: Modification and Repairs
Nope, stock 4 3/8 on both sides -
Leaf spring shackles flipping forward
CO MJ replied to CO MJ's topic in MJ Tech: Modification and Repairs
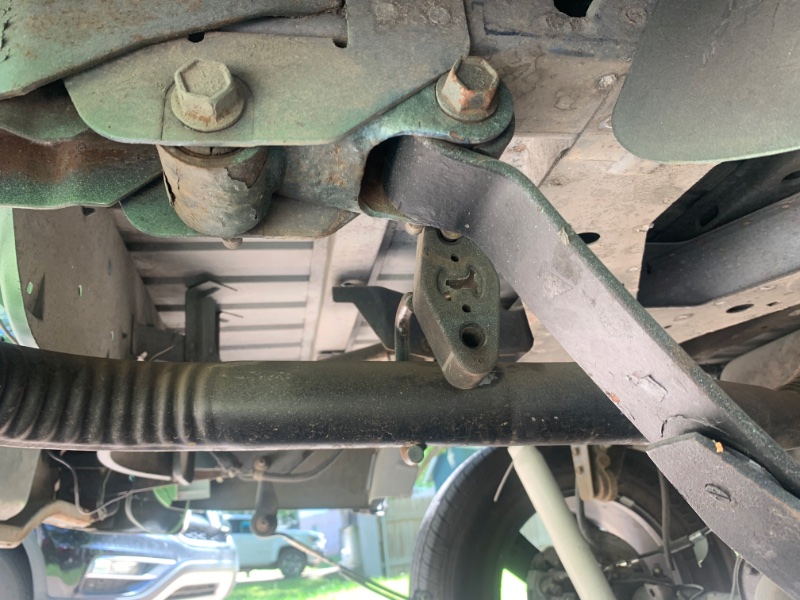
Yeah it's on the ground, you can see it in the background, it's still maybe 30 degrees from perpendicular to the line between the spring eyes. The passenger side sits at similar angle when it's popped back into place but it folds forward every time I hit a pothole -
Leaf spring shackles flipping forward
CO MJ replied to CO MJ's topic in MJ Tech: Modification and Repairs
I looked at my old thread and I think I measured them off the truck at 58" and stock at 56". Not sure how that could possibly be though, I'll remeasure on the truck -
Leaf spring shackles flipping forward
CO MJ replied to CO MJ's topic in MJ Tech: Modification and Repairs
I had a long email thread where he ensured me these were correct and they would relax despite my comments to the contrary so I'm hopeful he will propose some solution seeing as he was incorrect, we'll see. I believe others have had the same problem with this kit. The kit is for 4.5" all around but just looking at the truck the rear sits probably 2" higher, maybe more -
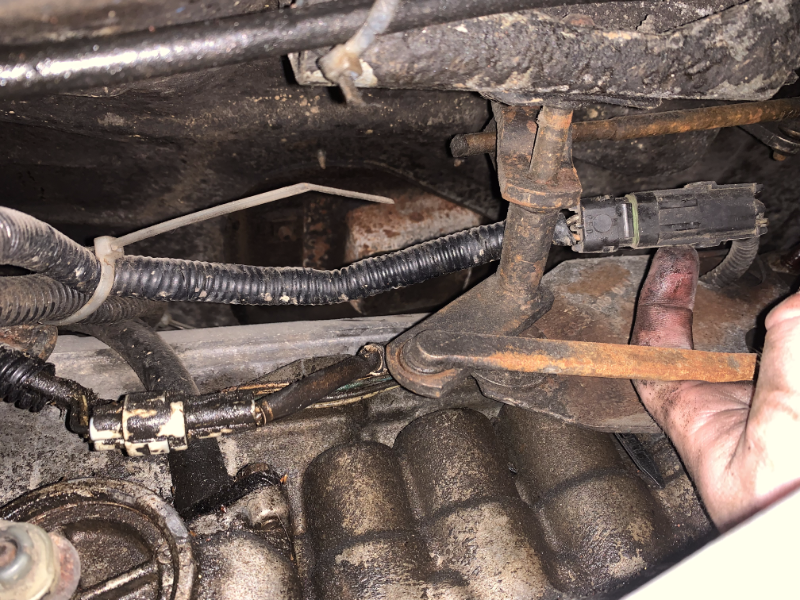
I made a post when I first installed Rusty's 4.5" lift kit as I was having trouble getting the leaf spring shackle angle correct. I think consensus was to put some weight in the bed and as the springs relax they should lengthen enough that the shackles will sit at the correct angle. Well, 6 months of driving around with a few hundred lbs in the back, I have had the shackles flip forward and stick against the frame more than a few times. The springs don't seem to have relaxed much at all either. See the photo for the issue I'm having and see the shackle in the background for the angle they're sitting at (still probably 20-30 degrees from where they should be). Any ideas how I can fix this besides continuing to pester rusty to make it right?
-
Belt squeak - harmonic balancer?
CO MJ replied to CO MJ's topic in MJ Tech: Modification and Repairs
Agreed, I think that will be a this weekend job. Swapped out an old belt I had, no more squeak. Found a small tear in the newer belt, not sure if that could have caused the squeak or not but all seems to be well now. -
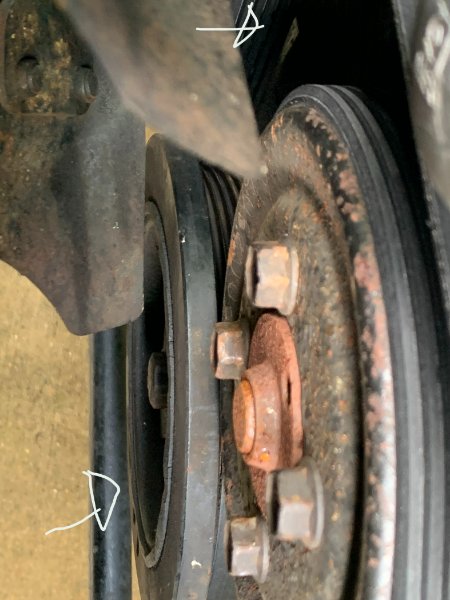
My belt is squeaking with a pretty regular chirp, maybe 200bpm. Seems pretty consistent with the rpm of the actual belt, one chirp per rotation. I recently replaced my alternator because the pulley nut loosened and wore itself off the shaft. I went ahead and replaced the belt with a new goodyear 102.5" belt. The exact same thing happened with a new alternator, I'm wondering if maybe my belt was too tight. Replaced the alternator again. I also recently replaced the AC compressor, no problems with the new one yet. I also replace the idler pulley. I do not feel any play in the water pump pulley or the fan pulley. In the pic below is my harmonic balancer. The rubber ring doesn't look awful, but it is starting to stick out. You can also see a spot where the belt has rubbed against the timing cover, but this may have happened while my alternator pulley was failing. I do not see any movement in any of the pulleys or belt at idle or when given throttle, and there is a good 1/8" between the belt and the timing cover. A mist of windex cures the squeak immediately, which also makes me think it is not the harmonic balancer. I don't really have a way to check alignment of my pulleys, but I also the shaft of my power steering pump is not flush with the pulley, it sits a few mm offset inside the pulley. Can these pulleys shift over time? I can't imagine this moving out of alignment, I had no squeal before the first alternator pulley failure. I do not hear any noises that seem out of place with a stethoscope, I'm pretty confident my belt is the right tightness, and tightening further does not alleviate the symptoms. I'm really at a loss as to what to do next aside check pulley alignment, but that's pretty hard to verify if my harmonic balancer is out, and you can't even hold a straight edge on it because of the protruding rubber.
-
Sliding Rear Window Weatherstripping
CO MJ replied to Dandxj's topic in MJ Tech: Modification and Repairs
I redid my entire window recently. You can buy rolls of 1mm adhesive backed felt strip, fold it in half, and use some kind of smooth card to push it into the channel. I used a 2" wide roll and cut off the excess once it was in the slot. As for the weather stripping, I have looked across many websites and catalogs from various companies and can't find quite the right profile. There's a couple generic cut to length profiles on amazon that I may try, but haven't pulled the trigger on yet. I may try 3d printing a replacement in the near future as I'm leaking as well. -
Actually stumbled across your post shortly after posting. Should be blowing cold by end of week 👌🏼
-
Think so. Expansion to condenser, condenser to dryer, dryer to compressor, compressor to expansion. Might have the wrong order but there's definitely four hoses in the engine bay
-
Does anyone have part numbers for all 4 a/c hoses? Rockauto only has the suction/discharge hoses and I need the other two as well
-
Are they actually loud? I find it really hard to believe that two little 50w speakers move enough air to be satisfied
-
How much power are you giving it? "60W x 4 + 200W" So are you running the sub off a single channel, a bridged pair, or that fifth 200w channel?
-
Good call. I will have to pick up a current clamp. Any idea what normal draw for the blower would be?
-
I'm starting to plan what I'm doing to do for audio in my build. I'm not trying to win any competitions, I just want something that would be maybe a step above of what you'd expect out of a modern OEM system in a similar size vehicle. I'm mostly curious what size subs you guys are using. I've seen a few big boxes with two 12's, but I feel like that is probably far far more power than I personally want. I'd like to be able to feel the bass but not blow out my windows. I think a single 10 or 12 is probably what I'll go with. So far I have installed 6.5" Kicker 46CSC654 in my doors (not sure if the comanche doors take 6.5" but my 97+ cherokee doors do). Next I want to buy an amp that's got enough power for my someday subwoofer, as it might be a while before I get to that part, but I'd love to go ahead and power the door speakers because my head unit amp is trash. So my plan is to see what you all are running, get an idea of the size and power rating of the sub I want, buy an amp that will support that in the future, go ahead and wire the door speakers to it, and call it a day for now. I've no idea what I want though - a 12" 500W? a 10" 800W? even an 8"? No idea. Bonus points if you have buckets and photos of your enclosure - will be replacing my bench before I build my enclosure and could use ideas there as well.
-
That's a good one, I'll check that as well. Would you expect the turn and radio fuses also to get hot in that case? Mine are not
-
Correct
-
My relay is on and I do have voltage at the clutch coil though, if that was is I shouldn't have any power to the coil. I think something is causing my blower to draw excess current, bad ground or a blockage in the vents maybe, making the voltage sag too low for the coil to pull in the clutch.
-
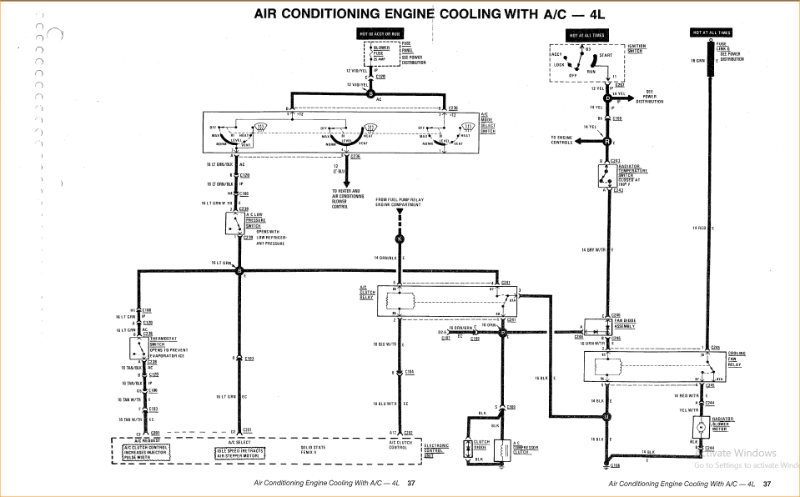
I am currently converting my AC system over to r134 and trying to tell if my compressor is good. I currently have empty lines, so have a jumper on my low pressure switch. I thought by jumping the switch, I'd be able to see if my compressor clutch engages or not, and alas, it does not. If I jump the compressor coil wire straight to the battery, it kicks on just fine. My coil resistance is a hair low at 3.4, but within spec I believe. I did notice I am reading 14.5v on my battery, but only 11.5 at the clutch coil when the engine is on. According to the diagram, it looks like the voltage path is battery, to the fuse box, c120, c100, through the low pressure switch, to the clutch relay, c309, to the coil. I've checked all these connections and they seem pretty clean. I suppose I could be getting some voltage drop from the original harness itself, in which case, big bummer because that's not getting replaced any time soon. I've tried various combos of climate control settings and that doesn't not appear to have any effect. Another note is my rad temp switch is jumped so the fan always runs, but that doesn't seem to me that it would cause issue. Anyone know of some other magic that might be the reason I'm getting that low voltage at the clutch, or if that's normal at any point? Edit: I also just noticed the blower fuse is getting very hot while the engine is on Edit Edit: If I set the blower to minimum the fuse doesn't get as hot and I can get the compressor clutch to kick in
-
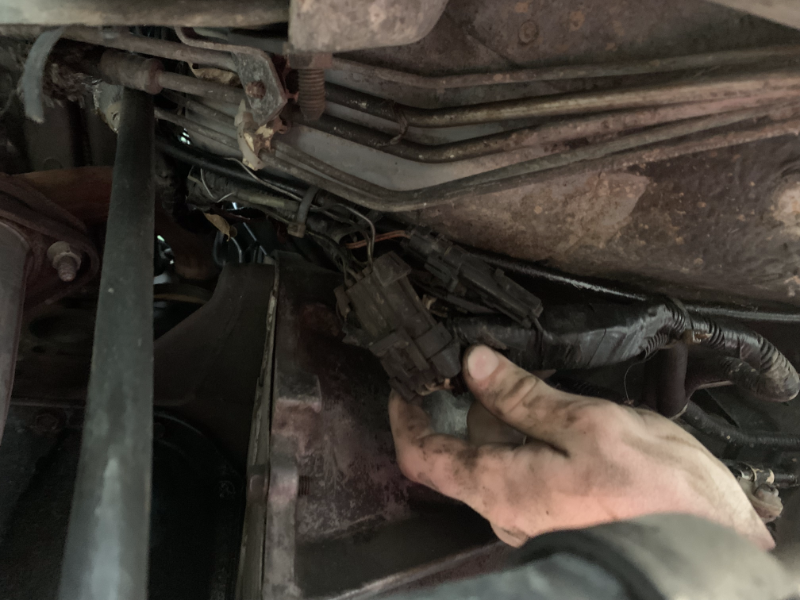
PO did a manual to automatic conversion on my MJ. I think instead of replacing the engine harness, he retained the manual harness and spliced in the automatic bits where needed to make it work. Now, I have an automatic harness I plan on swapping in, but today is not that day. I'm trying to diagnose reverse lights not working. I've got power at the trans fuse, but when I put it in reverse, I'm not getting anything on the other side of the neutral safety switch. I'm trying to follow the wires from the switch (though I assume it's probably worn out, seems like a common thing) to the c113 to do a continuity test of the switch. According to the diagrams, it looks like this should be on the passenger side of the engine bay, coming out of the engine harness above where the NSS is. However, the wires coming out of my NSS go over the top of the transmission, into the big mess of connectors in my first pic, where the brake lines come down the firewall (possibly the wrong word). I am touching what I believe to be the C113 in the first pic. There are a few other connections here that I do not see in the diagrams, and continue down the driver side of the transmission a bit before disappearing. If anyone can confirm if these are indeed stock, and provide any info as to what they might be, or confirm that this is some BS from the PO, I would appreciate it. I cannot find in the electrical harness diagrams anything that shows where the NSS wires actually run, so I don't know for sure this is wrong, but it sure seems like it. PO located the TCU under the driver side dash, so my suspicion is that these wires all pop back up there since they are also driver side.

-
It was working, I'm installing a different unit. It turned out to be a bad dome light fuse. I am using a manual for an 88, I am wondering if maybe there are some slight changes in 89. After my edit, I went back, and I was no longer getting continuity to the flasher fuse, and according to the diagrams I don't know how this could be possible, I will have to look for a potential short somewhere. Then, I noticed I was getting continuity at the dome light fuse, and it was blown. Replaced and everything seems to be working. I double checked, there is 12v hot to the ETR fuse, but there is definitely no wire connected to the other side.
-
I've got no voltage on the constant hot (but I do have ign) at my radio on my 89 mj. The manual says this comes from the etr fuse, and I have voltage there and a good fuse, so seems like my wire may be shot. The manual also says to make a repair at spice J, which according to the diagram is behind the cluster, so I pulled the dash bezel. Even if I could get my hands behind the cluster to unplug everything, it still looks like I won't have access to the spice as the harness runs inside the upper dash piece. Is there any way to make this repair without pulling the whole dash out? edit: I tested for continuity to the etr fuse, nothing. I pulled the fuse box, and it looks like there's no wire going to one side of that fuse at all. I checked all the other wires, and I get continuity to the wire for the turn signal flasher power. That's kinda weird, right? My turn signals work and that fuse is good though.
-
This will be very helpful, thank ya! So I tried fitting the drive side end cap, and to my surprise, it fit! The cutout for the bumper profile isn't perfect but I just chalked that up to cheap parts, but it looks like it's because of the dimensional differences. It's close enough I think I'll live with it. Turns out the passenger end cap doesn't fit because my bumper is crooked! Nothing looks bent to me, and the brackets look identical, but the passenger side bumper sits an inch or so closer to the truck than my driver side. Very odd. Going to pull it and measure some things and see if I can figure out where that inch went. Otherwise, driver side will require a hole on top for the little clip on the cap if I feel like it, and the hole on the bottom I think will line up with the existing bottom bolt for the bracket, just needs to be sized up to fit the bolt. The two bolts that hold it to the fender line up nicely.
-
Copy that. I pulled up some pictures of both and they looks very similar, but they're pretty cheap so might just go ahead and order them
-
There's a small plastic tab on the top side of the bumper end cap that looks like it goes into a slot in the bumper, probably just going to cut it off if I am able to use my factory bumper rather than try to make the hole for it