

mrmel2you
-
Posts
119 -
Joined
-
Last visited
-
Days Won
1
Content Type
Profiles
Forums
Gallery
Everything posted by mrmel2you
-
Exhaust manifold spread?
mrmel2you replied to mrmel2you's topic in MJ Tech: Modification and Repairs
Worked on The Beast for a bit today, had to take a break, had company come over. Went back out about 15 minutes later, it fired right up :) Not sure what the heck happened, but happy as a fat kid in a candy store right now, LOL :) Drove it around for a bit, still has a stumbling issue whenever I go to stop. Other than that, runs super smooth--peppy too :) -
I'm a newbie here "Double Six", but glad I could help :) This club is AWESOME, filled with AWESOME members and there a ton of helpful files in here. Really helped me out, this is my first MJ (first ever Jeep product) but I'm getting to like it more and more every day :) Happy Trails, Papa Mel :)
-
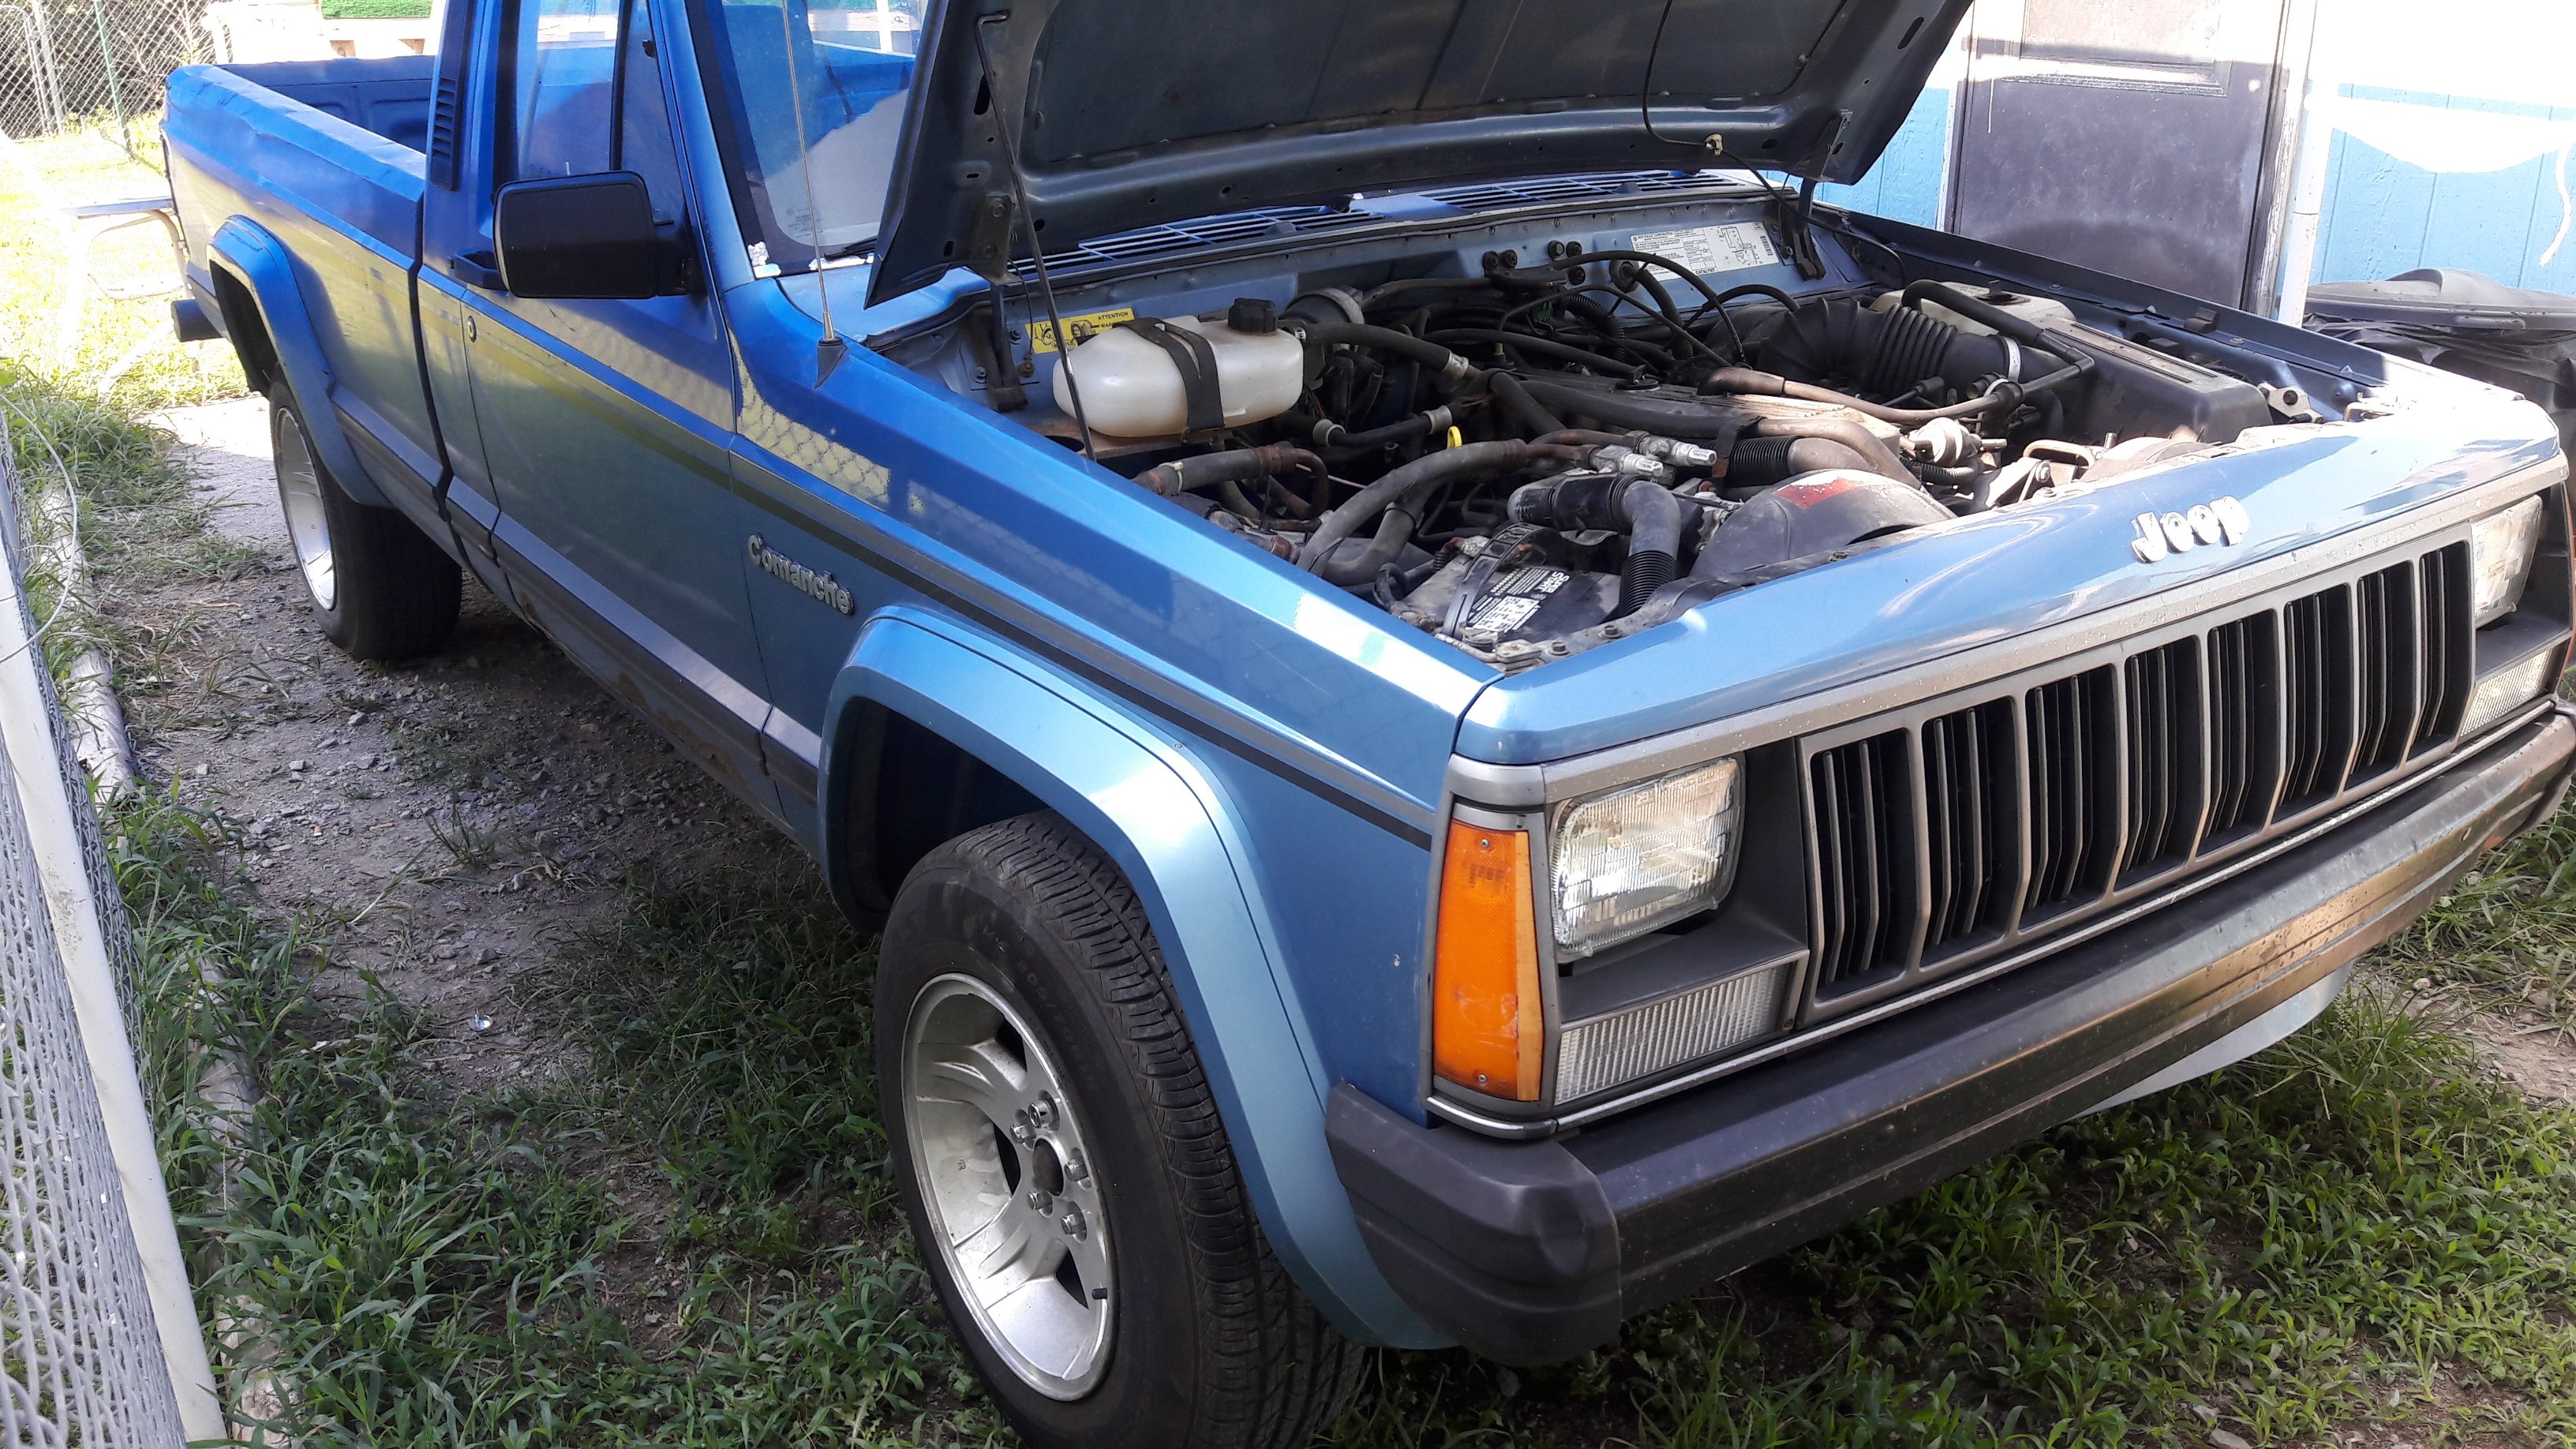
Not sure what or how I did it---but "The Beast" is ALIVE :banana: Some of you might remember, when I first bought this MJ, it was in rough shape. Has a 2.5l popcorn popper that sounded worse than a Geo Metro, only running on 3 cylinders. I pulled the head off, only to find out 2 bolts were broke off in the head and only 3 bolts were left holding everything else on. It only had a piece of speaker wire for a ground between the engine and firewall. Almost all the vacuum lines were unplugged or missing altogether. I found the problem with the head was due to a broken exhaust valve in #3 cylinder. Luckily no damage to the head, seat or cylinder. Replaced the valve, new stem seals and lapped all the valves. So far so good. Put the head back on, hooked everything back up---used new bolts and washers (grade 8 or better). Run all new vacuum lines (thank you WEB for the vacuum diagrams and wiring schematics). Started it up the following day, ran great for about an hour, went driving around the lake. Came home and started up the drive-----it died :( Spent the next 2 days checking, cleaning and resealing all the connectors/fuses/relays etc... Still had no spark or fuel from the tbi unit----fuel pressure up to the tbi was up to specs though, but nothing coming through it. Spent the better half of the day today rechecking everything. Walked inside the house, neighbor came over and talked with them for about 15 minutes. They left and I went outside to crank it over one last time------it fired right up!!! After everything I did, and all the checking, double checking and triple checking---I still don't know what in the heck happened, it just started right up!!! I'm telling ya----"The Beast" has ghosts or gremlins lurking under the hood of it, LOL :)
-
Exhaust manifold spread?
mrmel2you replied to mrmel2you's topic in MJ Tech: Modification and Repairs
On all the connections that I unplugged, I used a piece of masking tape and labeled both halves as #1-#1, #2-#2 etc... Did not want to take any chances of mixing up any of the wiring connections. Did the same thing for all the vacuum lines also :) Even took pictures with my phone and a Canon camera of everything that I had to take apart, just to be sure :) As I said, it ran fine (for about an hour) the lake is only about 10 minutes away and takes about 30-40 minutes to drive around it. Only drove there and back home :( At a loss right now, but have company coming over and might not get to work on it until Monday. Will keep everyone posted :) Happy Trails everyone, Papa Mel :) -
You can remove the shaft from under the hood. No need to remove the brake booster. Remove the bolt at the joint towards the firewall, remove the bolt from the joint towards the gearbox. Use a small pry bar at the joint at the gearbox, pry the shaft towards the firewall. Should come right out. You may have to spread the clamps apart a bit (where the bolts are at the joints) use a small pry bar/chisel/screwdriver----whichever one you want to use, I used an old flathead screwdriver I had :)
-
Exhaust manifold spread?
mrmel2you replied to mrmel2you's topic in MJ Tech: Modification and Repairs
Well, fired The Beast up today and took it for a spin around the lake today (Shawnee Co. Lake, Topeka, Ks.). Made it all the way out there and back with no problems. Turned the corner on our block and she stumbled a little. Made it up the drive and it died. Cranked it a few times, nothing. Noticed the left turn signal was not working, popped of the tbi cover and looked under the butterfly----dry as a bone, half tank of gas, can hear the fuel pump cycle with the ignition. Pulled apart all the connectors under the hood and cleaned them and put them back together. Checked all relays and fuses, checked out good. Fuel pressure is within specs at the tbi. On a good note though, while I was out for the drive, it ran like a new truck. It's a lot quicker and smoother running than what I was expecting it would. That's it for today, tomorrow is another day :) Happy Trails everyone :) -
Exhaust manifold spread?
mrmel2you replied to mrmel2you's topic in MJ Tech: Modification and Repairs
Did a little checking in the forums to get some info on the fuel puddling issue in the tbi. Then my "old school training" kicked in. I unplugged the injector, after a few cranks---it fired right up. Turned it off, plugged the injector back, starts right up and no more fuel puddling :) To say that I'm shocked with how this thing runs, after running on only 3 cylinders for who knows how long, is an understatement. Idles smooth, like a new, has a ton more pep, no knocking and not smoking (2 big pluses for me). Can't wait to get The Beast on the road tomorrow for a little drive around the lake :) Next projects---#1-tackling the cancer on the floorboards, #2-getting the exhaust system replaced, #3-shocks/brakes/tie-rods and ends/bushings/ball joints, #4-------gotta win the lottery so I finish 'er up, LOL :) Many many thanks to everyone for all the help and info, I could not have done without you guys :) You're all the BEST of the BEST :) Papa Mel is ouuta here for now, Happy Trails everyone :) -
Exhaust manifold spread?
mrmel2you replied to mrmel2you's topic in MJ Tech: Modification and Repairs
Got everything buttoned up, checked--double checked--triple checked, all vacumn lines/electrical connections/bolts/nuts etc... Refilled the radiator (water and antifreeze) checked the plug gaps, plug wires etc.. Tried to start it up, that was a no go. Almost burned up the starter :( Took the cover off the tbi unit and below the butterfly found fuel puddling up in it. Now what??? Bad injector in the tbi??? Bad tbi unit??? Will do more checking on it tomorrow, this guy is beat. -
Exhaust manifold spread?
mrmel2you replied to mrmel2you's topic in MJ Tech: Modification and Repairs
:bowdown: Praise to the Jeep Overlords :bowdown: :clapping: WOO-HOO :clapping: , Papa Mel finally got the head and intake manifolds back on "The Beast" today (then it started raining :rant: ). Tell ya all how I did it and maybe save someone else from having the same issue(s) that I went through. After a lot of cussing/wrenching/prying/hammering/and jacking, I did it. Mind ya now, this is on a 2.5 popcorn popper :) Loosely, put in the rear outter exhaust manifold bolt, followed by the one in the middle (on top). Now if your manifold has "spread" as in my case, you will notice that the front hole (in the exhaust manifold) will not line up with the one in the head. I used a small 3/8" square metal chisel between the front exhaust manifold port and the intake manifold port. I then took a small hammer and started hammering the chisel down and the intake manifold spread apart just enough to get the bolt started. Loosely tighten that bolt down. Then, from underneath the vehicle, I place a fllor jack under the exhaust down pipe and kept jacking it up until all the other bolts lined up. Sounds simple, right? Only took this ol' fella a few days to finally figure it out, LOL :) Now I can't wait for this rain to quit so I can get out there and finish it up. Really anxious to hear it run on 4 cylinders for once, instead of on three, LOL :) All in all, had a great day :) Happy Trails everyone, Papa Mel :) -
Exhaust manifold spread?
mrmel2you replied to mrmel2you's topic in MJ Tech: Modification and Repairs
No telling how long ago that the bolts broke off in the head (it's a 2.5) before I got it. The gasket that was on it (exhaust side) had #1 and #4 ports burnt/blown out about halfway. Has had a really bad exhaust leak ever since I bought it, I now know why. Wondering if (after who knows) how many miles the po drove it like this, that maybe after the 2 outter bolts broke off, it created just enough heat to cause the manifold to warp at the ends (I don't know). I do know that when I took the head off, all the bolts on the head/exhaust manifold/intake manifold came out with no problems whatsoever. There was no strange sounds (pinging, creaking etc...) coming from either manifold when removing the bolts, no binding of the bolts or manifolds either. Easiest head I've ever had to pull, only took about 45 minutes-----but getting it back together? A little over 2 days-----and still counting :( -
Exhaust manifold spread?
mrmel2you replied to mrmel2you's topic in MJ Tech: Modification and Repairs
Motor was cold, parked it the day before. Got the 2 end bolts in, center of the manifold is about a quarter of an inch below the bolt hole in the head. Made some progress, but not through wrenching/prying/cussing yet, LOL :) -
Exhaust manifold spread?
mrmel2you replied to mrmel2you's topic in MJ Tech: Modification and Repairs
"Bignuke", The manifolds are the same ones that came with the truck. I took both off the day before, now the bolt holes are not wanting to line up right :( Getting ready to go out and see if it was something I was overlooking or whatnot. Would really love to get this buttoned up sometime today :) Wish me luck, Happy Trails everyone :) -
Exhaust manifold spread?
mrmel2you replied to mrmel2you's topic in MJ Tech: Modification and Repairs
Tried that----still didn't line up, center one was still off by almost a quarter of an inch :( It's almost like the #1 exhaust chamber had spread out towards the front of the engine. I can get either the front and center bolt in, or the center and back one in----but all of them at the same time. Cleaned all the threads with a chaser, using all new bolts and washers (NOS parts) and they are the same and correct length/thread pitch/diameter. Even tried using the original bolts, got the same results. Oh well, round 2 with The Beast tomorrow. Getting late here and 6:30 comes way too early for this ol' fella. Hopefully I can get things sorted out in the morning, getting kinda "antsy" to hear what The Beast sounds like running on all 4 for a change, instead of sounding like a sick wannabe Geo, LOL :) Thank you for your suggestion "shelbyluvv" :) Papa Mel has left the building, good night to all and Happy Trails everyone :) -
Exhaust manifold spread?
mrmel2you replied to mrmel2you's topic in MJ Tech: Modification and Repairs
I fought with this issue for over 3 hours today. I tried prying, jacking on it from the bottom, you name it---I tried it. Even tried bolting just the exhaust manifold on by itself, then tried bolting on the intake manifold by itself----neither one wanted to bolt on with all of their own bolts. Yes, it's the same head that came off of it, never been out of my sight :) Both manifolds have been under the hood of The Beast, never totally taken out. I'm using the same bolts that came out of it. Took a cardboard box and punched holes into the top of it and placed each bolt in the holes as they came out (so I would know which bolt came from where). Everything else bolted up with no problem whatsoever. But these manifolds are driving me nuts. -
Finally got the head on The Beast today :) But when I went to put the exhaust manifold on, only the two outside bolts lined up. Unable to get any of the other bolts to line up (ehaust manifold or intake manifold). Wondering if the manifold expanded or whatever. When I took everything apart to rebuild the head, the two outside bolts on the exhaust manifold were broken off in the head. All other bolts were in and looked fine, ez-outted the broken ones----and now nothing wants to line up. Am I missing something here? Help :)
-
"The Beast": Can't get any worse :)
mrmel2you replied to mrmel2you's topic in Member Projects: Your Comanches
Surprisingly, the motor had no knocking or smoking while running on only 3 cylinders :) So I'm thinking of stuffing in another valve, new stem seals and lap the valves and put it back together. Had a ton of gunk built up on the outside of the block, valve cover gasket was leaking like crazy (previous owner didn't have it tightened down, finger tight on all but one bolt). The head was a different story, took a 3/4" drive ratchet with a 28" long handle and a lot of grunt to break the bolts loose (compressor is down, so no power tools). Hope to have The Beast up and running within the next day or two. Next project will be tackling the cancer on the floorboards, will be posting pics on that as well. -
Well, Papa Mel finally pulled the head off The Beast. It was like I expected, #3 exhaust valve was broken and burnt a little (pic #1). If I am correct, it has the "403" head on it (pic #2). Under the valve cover, I wasn't expecting to see the top of the valvestems to be so clean, rest of the head was gunked up pretty good (pic #3). Inside, the head looks pretty clean also (pic #4). #3 cylinder looks good also, no knicks or grooves in it. All cylinders have a thin ring at the top, can barely feel it with my finger nail, think it will be good to go for a while. (pic #5)
-
Chrysler 2.7 V6 into an MJ
mrmel2you replied to mrmel2you's topic in MJ Tech: Modification and Repairs
Would keep the MJ 2wd, but the 2.7 is just way too wide. maxes out almost 25 inches head to head. Too wide at the bottom also, wider than the control arms on the MJ. Oh well, at least I'll have a ton of spare parts for the wife's car now, LOL :) Will park it out behind the shed under the lean-to and cover it up, and part it out later on :) Really need to back out and finish pulling the head off the 2.5 in the MJ and figure out why the #3 cylinder is dead. Thanks for all the input fellas and Happy Trails to everyone, Papa Mel :) -
Chrysler 2.7 V6 into an MJ
mrmel2you replied to mrmel2you's topic in MJ Tech: Modification and Repairs
No, it's rwd, 4 speed auto w/ overdrive :) Big 4 dr sedan -
I just got a great deal on a 2.7 V6 with automatic trans (in a 2010 Chrysler 300) bought the car for $200. Has only 37,000 miles on it, one owner, been hit hard from the rear, still drives. Engine and trans are both perfect, look and run like new and the engine has a lot of grunt. Has anyone put a 2.7 into an MJ before? Engine looks awfully tiny in the 300, but also looks a bit on the tall side (being so narrow). Only bought the car as a parts car, bought my wife a 2010 two years ago (twin to this one) just in case anything happened to hers :) Really like the idea of having this engine and trans in The Beast if it's possible and feasible. At least I have all wiring harnesses and ECM for it, can always upgrade my fuel pump :)
-
All I can say is; WOW :) I was looking online for a few little odds and ends for The Beast, and guess what I found? Stumbled across a link for "oempartsandaccessories.com" They have almost everything in there for a person to build a totally new MJ. They have seat tracks (manual/power/bucket/bench/curved) lower dash panel, lower back panel, kick panels, pillar panels, door hinge pillars (even the reinforcement panels) doors, fenders-----and get this, COMPLETE 6 and 7 foot beds. Tailgates, fenders, doors, dash panels----just about every part you can think of can be found right there. I know that this might not be the proper spot to place this, if not----please feel free to move or delete it. I was just so thrilled about finding this place, I just had to share it with everyone :) Happy Trails Everyone, Papa Mel
-
1991 XJ Steering Column into 1990 MJ
mrmel2you replied to mrmel2you's topic in MJ Tech: Modification and Repairs
Still trying to figure out something on the tilt column; as long as the trans' cable is connected to the column, everything works. If I remove it from the end of the linkage rod, the rod end comes out past the column cover and the ignition stays in the locked position. Do I have to take the column apart to remove everything that is related to the cable (linkage rods ect...) or is there a simpler way of doing it, or am I just overlooking something here? By the way, pulled the bench seat out and took it totally apart, fixed the slider cable (used 400# pull steel wire, bought in the hardware dept' of Whacko-Mart, $4 per 50' roll) added some memory foam (4 layers) to the seat, appled that using carpet tape between layers, re-installed the seat cover. For the cutout for the shifter, I used a piece of the above mentiond wire inside the bottom of the front pockets, used zip ties to secure into the cover, then zip tied it to the bottom of the seat cushion. When I was done with it, looks like a form fit seat cover. No more puckers or sliding around, and the seat feels 100% better under the buns---plus it added a lot more support. Will add some pics later when it stops raining :) -
The Beast, Papa Mel's 1st Jeep MJ
mrmel2you replied to mrmel2you's topic in Member Projects: Your Comanches
The valve and the arm that is connected to it are both there. Missing the rod and whatever else that connects the rod to the diff'. I checked out the link on the diy adjustable rod, going to do that asap. I do a lot of hauling and that little trick would make doing it a lot safer. Thank you so much for all the help "Comanche Addict" :) -
The Beast, Papa Mel's 1st Jeep MJ
mrmel2you replied to mrmel2you's topic in Member Projects: Your Comanches
I finally crawled under The Beast, was not wanting to see what I did see :( Driver side shock---all that's there is the top half of the shock, rest of it is totally gone. All 3 of the other shocks are blown, fluid all over them (not motor oil, thankfully). Load sensor (?) arm is swinging in the wind, thinking it mounts to the side of the diff', not sure on this one. I'll do some Googling and see what it's supposed to look like, LOL :) On a good note, the cancer that is in the driver side floor area (to the right of the gas pedal) is not really that bad. That's something that I know I can take care of, LOL :) Going to take the valve cover off tomorrow and see if I can figure out what's up with the #3 cylinder. Good friend of mine suggested it may even be as simple as a bent pushrod, said he's had it happen to him twice before, once in his CJ and few months later in his MJ. Hoping that's all it is, but if not-----it's off with The Beast's head, LOL :) -
1991 XJ Steering Column into 1990 MJ
mrmel2you replied to mrmel2you's topic in MJ Tech: Modification and Repairs
Woo-Hoo, got the "honker" fixed. Everything else works as it should; turn signals, hazard flasher, intermittent wipers, dimmer switch, tilt and ignition switch :) All that's left to do is finding a horn button cover, column was complete except for that. This ol' fella is wore out, time to hit the shower and off to bed, LOL :) Many thanks to all that helped me along on this little project :) Next time, I need to remember to dig a bit deeper in the forums here---tons of great info and ideas :) Happy Trails everyone, Papa Mel :)