

BlueDove91
-
Posts
17 -
Joined
-
Last visited
Recent Profile Visitors
755 profile views

BlueDove91's Achievements
Jeeper (1/11)
-
4.0 Renix - Timing is off 180° but runs
BlueDove91 replied to Big_Mark's topic in MJ Tech: Modification and Repairs
Interesting. Thanks for re-explaining that. I didn't deal with installing the distributor...it was in its current position since before I owned the truck. So-- #1 TDC compression + #6 exhaust is what I had mine on, then. Which is the correct combination. And according to your explanation, the way my timing marks were when I found them (10 oclock and 10 oclock, or in your terms 12 oclock and 12 oclock) is normal for that firing position, while also having the rotor at position 1. What confused me was: all of the info I found instructed me to align the cam mark (while the TC is off) facing the crank mark. AND that the rotor should be at position 1 with the marks facing each other. Then to reassemble sprockets together with chain. Which, according to your explanation, would have resulted in #1 compression + #6 compression. Not good. I'm still confused as to why all the generally available info didnt align with my experience. But just glad that what I did worked. -
4.0 Renix - Timing is off 180° but runs
BlueDove91 replied to Big_Mark's topic in MJ Tech: Modification and Repairs
Sorry Gojira... You lost me there 😅 I need it dumbed down...basically novice level here, as I know only as much about this stuff as I've had to do on my own MJ. And I keep it pretty simple...mostly stock, daily driver, maintain as needed. Good news is -- I drove around town today and all seems great. She seems to run a little tighter, smoother, and quieter than before. No weird noises or issues. -
4.0 Renix - Timing is off 180° but runs
BlueDove91 replied to Big_Mark's topic in MJ Tech: Modification and Repairs
Big_Mark I just finished changing the timing chainset on my '91 4.0, and I encountered the same situation that you have laid out here. I had TDC at #1 plug with pressure test, timing cover/balancer lined up at zero mark, and rotor at the #1 position. When I pulled the cover and matched my new gears to the ones I had just pulled off...the cam gear timing mark was at 10o'clock -- 180 AWAY from where it should be. Turning the cam gear only (chain off) to align with the crank gear's mark put my rotor at #6 position. It was my first time trying this repair...and as you can imagine, all of the available information online is telling me one thing, and yet I'm looking at a completely different situation -- it was pretty confusing, and nerve-wracking. Not to mention the thought of putting it all back together, only to have to do it over again. I just finished the project a few hours ago, and have been feeling nervous that I'm going to go driving tomorrow and discover I messed something up. I did take a quick test drive up the block. Seemed pretty normal. Although I'm noticing new little noises that I'm not sure are actually new or are just my paranoia...lol. Anyway -- it is reassuring to find your post. Thank you for the detailed explanation and walk-through with pics. Funny enough, I ended up coming to the same conclusion -- it was running fine before, best to leave it how it was. And I also noticed the alternate hole for the cam pin, and questioned whether it was just a matter of maybe a mechanic (or the factory?) having used the opposite pin hole, and so my cam gear seats in with the mark OPPOSITE to what everyone else's does. I'm curious -- have you had good results since this post? Ever have to circle back and redo the timing again? -
Heater vent modes not working: solved
BlueDove91 posted a topic in MJ Tech: Modification and Repairs
I recently replaced my vacuum lines. When complete, my heater vent modes wouldn't work (stuck on defrost). I was familiar with the potential issue of the line leak and the vacuum ball, but the ball was nearly new and the lines were brand new (with flexible silicone lines). There was no vacuum leak, but the modes were still not working. Which was a head scratcher. The problem ended up being the check valve in the line where it connects to the engine manifold. Apparently when I put the new lines on, I put the check valve in backwards. Flipped it around and now the vent modes work as they should. Wanted to post this fix in case it helps someone out there. Truck is a 91 4.0 HO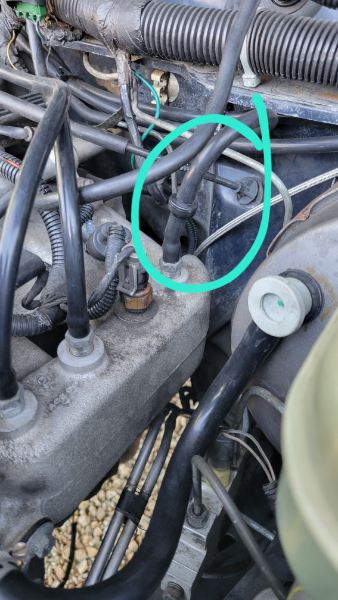
-
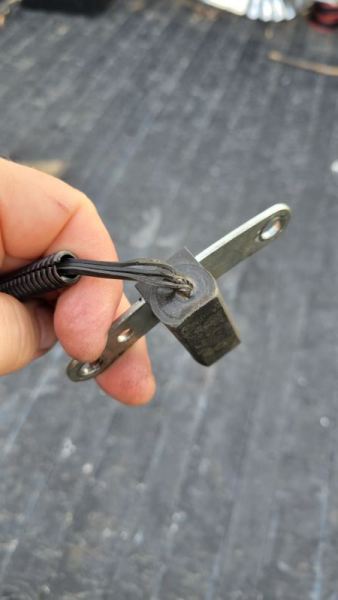
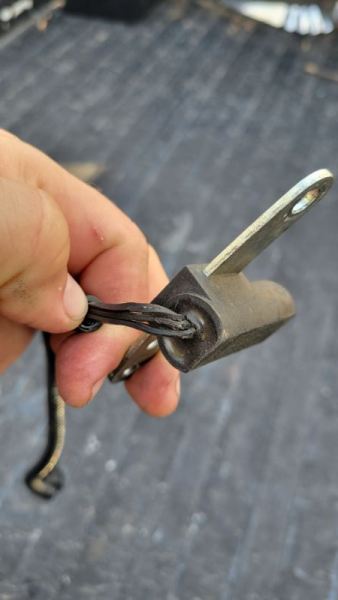
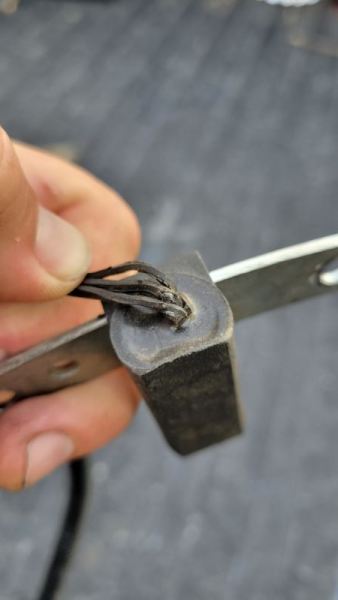
(Truck: '91 MJ 2wd 4.0 HO, SB Base) SOLVED: I want to make this post to add into the pool of what is already available for those who are experiencing a similar issue and trying to troubleshoot it. Several weeks ago, I was driving home going around 40 or 50, when suddenly my truck just shut off. The engine just stopped. I lost all acceleration, but the power was still on. So I pulled over to a stop, turned the truck off, waited a few seconds, and cranked. It started right up. Scratching my head, I shifted into first and pulled back onto the road. I hadn't gone 20 feet before it died again. This time I tried to restart it, and it would crank but not turn over. I shut it off, waited a minute or two this time, and then tried again. It started up just fine, and I pulled back on the road and drove home with no further problems. It seemed so bizarre to me. I felt that dread surfacing in my gut of "oh no, what is going on now...". I'm sure you know it. But I wrote it off as just a glitch of something. After that, the Comanche drove fine for a while. I did feel an occasional "hiccup" here and there, where it seemed to lose power for just the slightest moment, but would correct itself and was fine afterwards. A couple weeks later, I drove to do a job, finished, went to the store...and when I came back to load up the groceries and go home, the truck started up and then died right away in the parking space. Again, I restarted it, and managed to get out of the parking lot and into traffic -- and it dies again right as I'm entering a roundabout. Now it cranks but won't start, so I wait again... and it eventually starts up. I'm several miles down the freeway, going about 65...and it dies again. Power steering goes out, the truck won't restart, I almost run off the road because when turning the key to try to crank it the steering wheel locks up and I suddenly forget what to do. Anyway...scary stuff. I managed to pull off safely. Again -- waited a few minutes, until eventually it cranked and turned over, and I was back on my way. I eventually made it home. But the grace period with this intermittent issue had ended, so it was time to research and fix it. As is frequently the case, there were many different opinions/suggestions about what could be the ultimate source of this issue, as well as write-ups from people over the years troubleshooting and chasing all kinds of different things, often to no avail. My issue wasn't a goose chase, thankfully. But I wanted to post about it in hopes to give one more scenario/solution for this problem. I didn't see anybody post *specifically* about what turned out to be my issue. With that said: The issue DID end up being the Crankshaft Position Sensor. BUT, what threw me off was that I had replaced the sensor just last year...as well as the TPS, IAC, Plugs, Wires, Cap, Ignition Coil, Fuel Pump, Fuel Filter, 02 Sensor, Fuel Check, Fuel Pressure Regulator. I did it all. One thing that helped me was the thread that showed the list of OBD codes, and how to initiate the code sequence. It DID give me a code that had to do with the CPS ( I think code 11?), so at least I figured I'd start there before trying other things. I tried using a multimeter to check the CPS...but for the life of me I have still not figured out how to use a multimeter. I'm not even sure mine works right. It didn't tell me jack squat. So I just decided to take the CPS off and replace it. Once I took off the old CPS, I quickly discovered what the problem was -- in the area where the wires feed into the sensor, the plastic sheathing was worn through and the metal wiring was exposed on all three wires. That would do it, I guess. It doesn't seem like there is anything near the wires that could cause friction enough to wear through that sheathing. So I'm assuming it was a heat thing and it just melted through? The way they made the part, they put that corrugated plastic sleeve around the wires, but it doesn't cover them all the way -- it is too short, and leaves the wires exposed at either end (sensor side, and/or plug side). Anyway, I wrapped silicone self-sealing tape around the exposed area of the wires on the new part in hopes that it will protect it better this time. Because that part wasn't even a year old before failure. After putting the new CPS in, there have been no further problems and the truck drives great. I'll attach some pics of the old CPS here as well to show the issue. Thanks for reading, hopefully this helps someone. ** I guess one final thought would be: anyone know how those wires could become exposed like that in just a year's time? And so close to where they enter into the sensor? Is my theory about heat/melting the most plausible? Or should I be concerned about something else that needs to be addressed which led to this happening? Thanks.
-
Ah, thank you for that, makes sense. My AX-15 is in the first range ('91). So it'd be 1/2 in. Does it already have a PB in there that I can re-use? Or I need to order a new one for the external setup? The original trans is staying in for now.
-
Also...pilot? Pilot bearing? Is that something I need for this swap as well? I've read comments mentioning it...not even sure what it is. I know I sound like a real novice...that's because admittedly I am. On this part of the truck at least. My mechanical experience has always been strictly on an "as-needed" basis.
-
Okay, thanks!
-
Right on, thank you. As for the Wilwood MC bore, I don't remember. I know Summit said the MC was good for my specific truck so I went with it, along with the support of the mechanic working on it. How would I ensure if a new slave would be compatible for it? My truck is a 91 Base, 2wd. 4.0 L HO. Clutch components are all new as of last November, which is when my slave went out the first time and we tore into it all. By the end of a *months-long* saga of repeatedly getting the truck back from the mechanic, only for it to exhibit pedal abnormalities and poor shifting, we had replaced the slave twice, master twice, line once, and put in an all-new clutch system. I believe he was using the so-called "higher quality" Luk slave cylinders both times. When we replaced the hydro line, I know they had to get an adapter to connect it to the slave as well. And of course we bled the snot out of it every which way during those months. Now it's feeling like it's slowly going out again -- but thankfully not all at once like the first time. Last month I had a different mechanic bleed it due to air pockets, and he said the fluid came out really dark, if not black. If I can afford the time, I will see if I can gather those parts together. Because it is my daily driver, these things tend to have a unique urgency when they happen, haha. Trying for a more pre-emptive approach this time.
-
Yeah, I live in the middle of nowhere with no good junkyard for jeeps...So that kit is looking pretty good to me. I'm inclined to spend a little bit more on something if it allows me to save on time, energy, headaches, and delays..and is quality. So it sounds like with that kit, I'd have everything I need other than it being wise to purchase a better quality throwout bearing, and I would also need to source a front input seal somewhere? Are those easily available for purchase anywhere? I currently have a wilwood MC which we installed during the last round of chasing these clutch hydraulic system issues (I've had all clutch/clutch system parts replaced and have had three seasoned mechanics at a loss for what to do over the last year). We also upgraded to a braided steel hydraulic line...so I won't really need that from the kit, unless the line is a different length between the internal vs external setup. I would probably upgrade to a better slave cylinder option as well, just bc I'm ready to have this thing work and last. But as I said...I'm willing to cut the loss on that for the convenience of it all coming in one kit and fast. Other than the Redline...is there anything else I'm missing that I might need? Gaskets?
-
Hey, thanks for answering those questions that is super helpful info. Helps me out a lot. One more question to clarify -- which part are you referring to that is available for purchase through aisin? The throwout bearing...or the front input seal...or a shaft?
-
Thanks for sharing all the info. I'm pretty new with this stuff, so I have a few questions. My (newer) internal slave is failing (again) and I'm getting ready to finally do this swap as well: - Why do those new holes need to be drilled? Is it necessary? I don't have a 3D printer, or a friend w one. - Front input seal...is that basically a gasket that goes on the face of the bell housing where it mates toward the engine? - Are clocking rings, or clocking, something I should know about? I haven't seen that mentioned in other writeups for this conversion. Just wanting to be thorough in my prep/understanding so I don't get halfway into the job only to discover I don't have what I need, or realize afterwards I did something wrong. Thanks!
-
Post Brake-booster swap, abnormalities
BlueDove91 replied to BlueDove91's topic in MJ Tech: Modification and Repairs
NVM...just did my own homework on that matter in the forums, which I should've done to begin with, really. I think Ive got enough info to getme by for now. Thanks. -
Post Brake-booster swap, abnormalities
BlueDove91 replied to BlueDove91's topic in MJ Tech: Modification and Repairs
And I guess I would also ask where that would fall in the valve bleeding order. -
Post Brake-booster swap, abnormalities
BlueDove91 replied to BlueDove91's topic in MJ Tech: Modification and Repairs
Hmm, okay. I'm confident that didn't get done. Is that pretty common to find on most Comanches, or just on some? How easy is that to find?