Search the Community
Showing results for tags 'to'.
Found 1 result
-
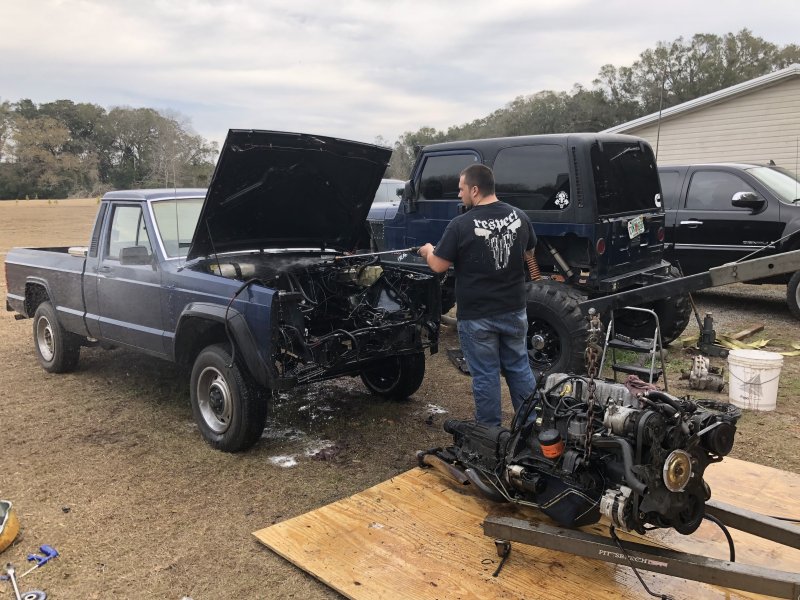
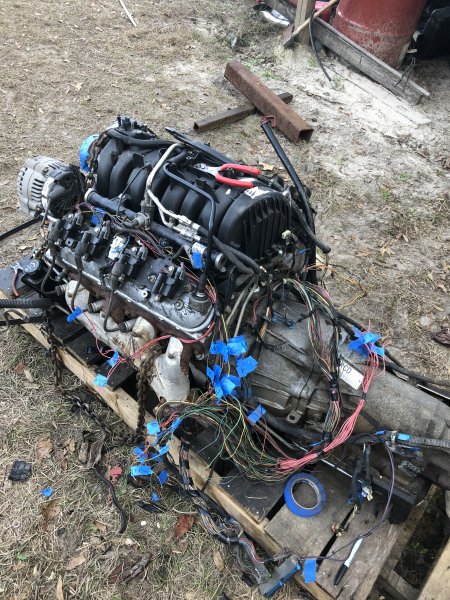
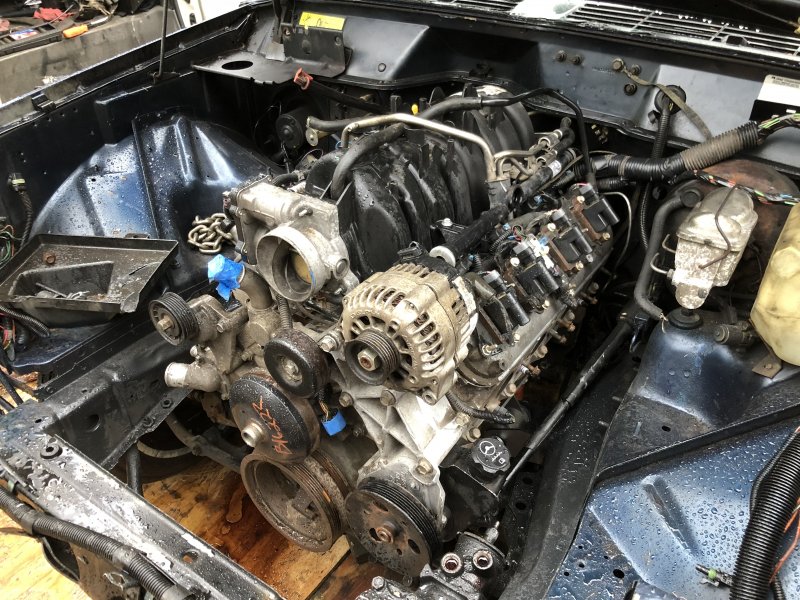
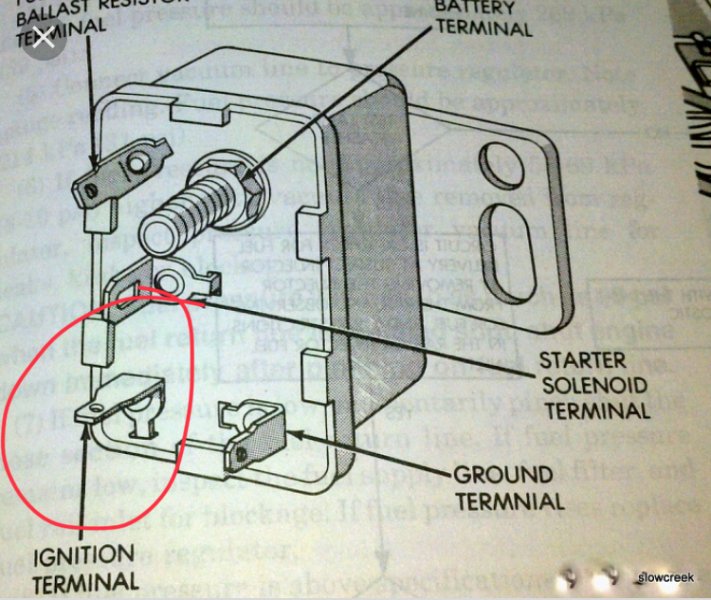
 Alright so as the title says, I’m going to discuss how I did my budget LS swap for less than 1000$. This is my first write up I’ve done so please bare with me. I have always made YouTube videos of my builds so I will try and post a link to each video I made pertaining to that portion of the swap. I purchased my 88 comanche for 500$ and drove it home. Was a rust free 2wd 4.0. It ran great but I have a problem with leaving anything stock and going all out. Last year I built a 12v Cummins TJ and had a blast doing it, but this build I wanted to go fuel injection. LS is the only logical choice. I am a 23 year old with a wife, a baby, student loans and a mortgage. Extra money is hard to come by, like I’m sure it is for most of you. I enjoy having cool rigs but don't always have the money that most internet builders seem to have. So I have to get creative and do things for cheap, yet still being professional quality. Enough babbling and on to the swap lol. I'm going to refer to my motor as an LS but it’s really just an old iron block 5.3 LM7. Same thing tho. These motors can be found all over junk yards. They can range from 200-1000$ depending on the person you buy it from. Then you still need to buy a trans and case and harness and computer and all the other goodies. I have found however when doing swaps like this that it is easier and a lot of times cheaper to buy a donor vehicle. And I did just that. I picked up a wrecked 03 Tahoe for 700$. It had front end damaged and a twisted frame. No good for anyone else but a goldmine for me. I got it home and got it fired up. I then had a buddy come over and flash the computer and remove the VATS (vehicle anti theft system).100$ It is important to make sure the motor and everything runs fine before you disassemble it so if somthing isn’t right after the swap it’s easier to narrow down that it was somthing you did and not a Pre-existing issue. Once I verified everything was good I started pulling everything off I could possibly need. I.E. motor, trans, case, harness, ecu, gas pedal and harness (DBW) , both driveshafts, gear selector cable, exhaust, trans cooler, fuel pump, hoses and Ac lines. After I had taken everything I needed off I posted the Tahoe on swip swap pages on Facebook and parted out the rest. I ended up making all my money back from the Tahoe on the left over parts and made a 300$ profit. Now it was time to start getting ready for the swap. The Tahoe came with a 5.3 4l60e and NG(somthing) case. The junk push button kind. I sold the case and bought a 241c transfer case for it. Basically the same case just manual and not electronic. Now this was the time when everyone and their brother started telling me I couldn’t run an LS in a Comanche without the Novak motor mounts. Well, if I did buy them that would mean I would have to buy an LS1/6 intake, water pump and move the Altenator. That’s another 5-800$ I didn’t have to spend, on top of the price of Novak’s mounts and headers. The other option I had was to keep the truck intake but run a cowl hood. I didn’t like either of these options so I decided I would make my own mounts and use the stock manifolds if possible. I purchased universal motor mounts off of eBay for 60$. I was determined at this point to make it work and prove all those internet builders and nay sayers wrong. If I could squeeze a 12v in a tj, this should be a walk in the park! I came across someone who had done this swap before in an XJ and he gave me some pointers on how to do it. The only 2 modification needed to make it fit were to clock the alternator down about 2-3” and run a smaller pulley for the power steering pump and run 1/2” spacers between the pump and the bracket. I will I’ll post a link here on how to modify the stock Alternator bracket. the power steering pulley you will need is dorman P/N 300-130 While the motor was out I went ahead and put a cam and valve springs in it. This is obviously not needed for the swap so I’m not factoring it in to the total cost. But since I had it out I went ahead and did it. I cleaned the motor real well. It surprisingly had no leaks. Now it was time for the harness chop. I spent the next couple of days researching and watching videos on how to convert the harness to a stand alone harness. LT1swaps.com is very helpful and also the videos from YouTube username “youcandoit2”. Watch his videos a few times and then it’s time to pull up your pants and get to work. This was my first big wiring job and was honestly overwhelming. And it stayed overwhelming until I was about balls deep into the harness then it all seemed to make more since. It took me about 8 hours to de-pin and clean the harness of the Unnecessary wires and sensors and wire up the fuse box. I did notice that if you go by the wiring digram from the YouTube videos I mention earlier, his diagram is wrong for the relays. Each pin needs to be moved one space counter clockwise for it to function properly. While I was in the harness I went ahead and did a wire tuck on the harness so you would not see any wires in the engine bay. I ran the wires behind the intake and through the firewall for a nice clean look. About 40$ in relays and fuse box Once the harness was complete it was time to pull the ol 4.0 out and get the engine bay cleaned up. The next weekend I dropped the LS in and started designing the motor mounts and finding the happy medium where the motor was as high up as I could get it with out hitting the hood. I took some measurements before I pulled the 4.0 out to see where the 5.3 sat in relation to it. I was honestly surprised with my findings. I measured the stock springs at ride height with he weight of the motor on them, I measured the distance from the ground to the rear sump of the oil pan and also the the front of the pan over the axle. 4.0 spring was 13” rear sump 12.5” front of pan 19” 5.3 spring 14.5” RS 11.5” FOP 18.5” I will post link here for video on motor mounts here. Once the motor mounts where set and welded in it was time for exhaust. You have to cut the factory collectors off to get them to fit but the stock manifolds will work and fit between the rails. They have also been proven to flow enough air with out any noticeable restrictions up to 900HP so stock manifolds will work just fine. Depending on which motor you end Up getting may determine if you have to modify the driver side manifold tho. The angle is just slightly off on some manifolds and needs to be cut and rewelded to point straight down. These manifolds are cast steel so they are able to be welded to with out any preheat or post heat. Once I had them fitted between the frame rails I welded on V band clamps to them for easy installation and removal. 20$ on eBay. At at this point the motor is in and staying in. Time to start working on wiring . If you wire your harness like I did from his videos mentioned above, you with only have a couple wires to hook up. A constant 12v power wire, an ignition wire, a fuel pump hot wire and the wire for the starter solinoid. Under the dash is a small fuse panel. On that fuse panel there is an empty spot marked “ign.” This spot gets 12v after key is turned on. I cut the orange wire for the fuel pump right before the plug on th fuel pump and ran my fuel pump wire from the harnes to that. The starter solinoid wire goes to the Jeeps starter relay. It is the bottom left pin. Should be labeled “ignition terminal” on the diagrams. I will I’ll post a link for the video I made on wiring it here. At this point I tapped into the Jeeps fuel line and ran fuel hose from the intake to the Jeeps hardlines. About 30$ in hose. I am still running the factory Jeep pump and seems to be doing fine but I’ll eventualy upgrade to a GM fuel pump. If you are still following along I applaud you! I’ve been typing for 2 hours now and I’m getting lost in the timeline of what I did next lol I will continue this write up tomorrow hopefully.