

adam518
-
Posts
148 -
Joined
-
Last visited
Content Type
Profiles
Forums
Gallery
Everything posted by adam518
-
1990 Rebirth ('97 Conversion)
adam518 replied to Rymanrph's topic in Member Projects: Your Comanches
Looks good with a little mud in the tread! -
1991 4.0L daily driver/weekend wheeler build
adam518 replied to adam518's topic in Member Projects: Your Comanches
Here's a couple of pics of the mats and also the seats. -
1991 4.0L daily driver/weekend wheeler build
adam518 replied to adam518's topic in Member Projects: Your Comanches
1. They are the Corbeau Moabs. I need to take the passenger's side out tomorrow to make it easier to finish the install of my little sub. I'll take a few pics of how I mounted them. I think they are comfortable, but I know that is subjective. I am 6'0" and weight about 170 lbs. The seat bottoms are great, but I am not sure if the seat back would be comfortable for anyone much wider than me. The seat back bolsters are a tad more aggressive than they appear in the pics, so if you are bigger around than me, they may not be comfortable in your back. Also, if you are over 6'2, I would not recommend them. I spent about 3-4 evenings mocking up the seat mount brackets to get the seat positioned perfectly. The seat bottoms are slightly wider than a Cherokee seat. In order to clear the transmission tunnel, I had to play with how high or low the seat sat. As you move the seat lower, it would have to be moved toward the door to keep from hitting the tunnel, which made the seat not sit directly behind the wheel. As I raised the seat it be could moved further inward. In the end, I got the seat centered behind the wheel and away from the tunnel and console. I have plenty of head room, but it would not be ideal if I were a whole lot taller. I have a '97 XJ and have always really liked the way the factory seats have felt. I hear people complain...but I dig my stock seats. In the end, I feel if you like XJ seats, then you'll like the Moabs. They are basically the Jeep design with just a tad more bolster support and a higher headrest that allows for a 4 or 5 point harness. They also have a nice sized seat back pocket and they fold forward beyond 45 degrees with the pull of a lever. 2. The floor mats are made by Rugged Ridge. Almost every Jeep aftermarket company carries them, but almost all of them come with Rugged Ridge logos. I can't remember where I first saw them with "Jeep" logos, but when I decided to try and order a set, they were a major beee..ach to find. I got mine from teamcherokee.com. If you order a set, I would call the order in. Even though I ordered mine correctly, they initially came with Rugged Ridge logos. To get them with "Jeep" logos, it will cost a few extra bucks. I'll take a couple pics of them as well. 3. Spray dye is great. I work at a Corvette restoration parts catalog company and we sell plenty every day. I would not dye a really high wear item like seat covers. It works best on vinyl that has some give like the door panels and dash. Rigid items work well, too, but hard plastic is more likely to get deep scratches which would show the color underneath. It is really to touch up, however. If you have a scratch in an area you don't want to spray for fear of overspray, you can always spray a bit on a paper plate and then brush it on with a small paint brush. Dye is like painting...90% of your results have to do with prep. You'll need to get the parts to be dyed very clean first. Also, it is thinner and somewhat translucent compared to paint, so multiple thin coats is the best way to go. -
1991 4.0L daily driver/weekend wheeler build
adam518 replied to adam518's topic in Member Projects: Your Comanches
I am pretty happy with the seats. The bolsters are relatively small and that makes it easier to get in and out of. I initially wanted 2 door XJ seats but could not find a nice set around here. The Corbeau's I got are designed to be a direct replacement for TJ seat, so they were relatively easy to adapt into the MJ. We cut all of the windshield molding tabs off before painting the truck. They will be installing a '97-up windshield. I like the one piece trim better and wanted it black since the rest of the truck is either blue or black. -
New Build For A New Comanche Owner
adam518 replied to jakepurkey's topic in Member Projects: Your Comanches
A TJ front D44 is a direct swap into the MJ, but it really isn't worth it unless you get a good deal. The TJ D44 has the same outer knuckles as the D30, which is the weak link in both axles, so you're not really gaining a whole lot in strength. If you plan to pick up a D30 for the front, get one from a 1996-1999 Cherokee. They made the u-joints larger in 1996 and 1999 was the last year that they were high pinion. The high pinion D30's are both stronger and have better ground clearance than a low pinion out of a 2000-2001 Cherokee or any of the TJ's. For the rear, toss the D35...it's a turd. The 3 most popular options would be a Ford 8.8, a Chrysler 8.25 & a Dana 44. If you can dig up a Comanche D44, you are golden. It is a direct swap. If you can find a Cherokee D44, you will have to weld perches. Either the Ford 8.8 or Chrysler 8.25 would require perches to be welded. Ford 8.8's can be found with 4.10 gears frequently and they will generally have disc brakes. The Chrysler 8.25 would be an easy find. They were in TONS on Cherokees throughout the 90's. In 1997, they Chrysler 8.25 went from 27 splines to 29 splines. The 29 spline 8.25 is actually a really decent axle and can be bought cheap. The vast majority of the Cherokees were I6 autos and they mostly came with 3.55 gears. You don't have as much aftermarket support for the 8.25 as you would a 8.8 or D44, but most popular lockers are now available and gear selection has gotten pretty good. I was lucky when I got my MJ b/c it already had a D44 swapped in. If it didn't, I would probably have gone the 8.25 route. -
1991 4.0L daily driver/weekend wheeler build
adam518 replied to adam518's topic in Member Projects: Your Comanches
I just about have all of my interior installed. The glass company is supposed to install my new windshield and rear slider either tomorrow or Monday...so I am just about on the road. Here's a few pics... I mounted Polk 4x6 plate speakers in the stock rear location and Polk 5.25" components in the front doors with the tweeters flush mounted in the door handle trim moldings. The 4x6's are powered off the Alpine head unit and the components are powered by a 2x90 watt Alpine amp. They play loud and clean with very tight and punchy mid-bass, but provide very little low-bass. For a little extra depth, I am installing a self powered 8" Kicker sub that fits perfectly behind the passenger's seat. I know it won't hit crazy hard, but I'm ok with that. The music I listen to ranges from southern and classic rock to metal to adult contemporary and jazz...heck I even like some classical and folk music, but there isn't a single rap or hip hop song on my Ipod. I've used a Blaupunkt 8" self powered sub before. It sounded pretty decent and it was only 70 watts. The Kicker sub is 150 watts rms and is advertised to play all the way down to 25 hertz...we'll see how it does. I had to make a rear bulkhead panel and am happy with how it turned out. It's made from 1/8" marker board and covered with an extra yard of carpet that I ordered from the company who made my carpet set. The carpet is actually a Ford color of all things. I wanted 80/20 loop carpet (it tends to be more durable) and the Ford color matched the charcoal pretty well that was used to dye the rest of the interior. The carpet is made by ACC. They will make carpet for your Comanche out of any carpet color they have for any other vehicle, but you have to approve samples first and it is a no cancel - no return deal, of course. I used spray dye on all of the interior parts. The dash is a junkyard piece out of a 1996 Cherokee that I used to replace my old cracked dash. The headliner and the center console are also from the junkyard. The seats and seat belts are new, but the rest of the interior is original. All of the pieces with exception to the seats and belts were dyed using a 1982 Corvette charcoal color. -
Amen. Keeping it manual will make it easier and quicker, but you will need to find a 4wd AX15....and yes the AX15 is the best/easiest trans to do your conversion. Take your time & locate a good '94 up Cherokee bell housing to get the more reliable external slave cylinder setup. It is well worth the effort. I did a 2wd to 4wd conversion on my own '91. Could it be done in a weekend...sure...now that I have done it, but on my first go around, no way! Even at the time I did my swap, I was completely familiar with the MJ/XJ suspension after having toyed with my own XJ for several years as well as helping lift several others. If you can, plan on it being down for a bit and try to do it right. As stated earlier, other stuff will always pop up. It is really not that big a deal to do the swap and I am sure you can do it, but I wouldn't tear into my truck on Friday night if I needed it to get me to work Monday morning.
-
Must show pics! Congratulations on the truck. I am sure you will find whatever help you are looking for on this forum. BTW, did I mention I truly dig 4wd 4.0L shortbeds...tough act to follow, even 20something years later.
-
1991 4.0L daily driver/weekend wheeler build
adam518 replied to adam518's topic in Member Projects: Your Comanches
Thanks Ryan. I'd bet I could make one for what it would cost to get it here. I'll try to find some thin hardboard and pick up an extra yard of the carpet I used for the floor. Also, I noticed that my local Pull-A-Part has gotten a Comanche since I've been there last...maybe I'll get lucky. Just looking at the b-pillars I wasn't sure how the ends of the factory panel would have been made, but that makes sense. Once it is all together, are the metal tabs on the end of the carpeted panel visible? -
1991 4.0L daily driver/weekend wheeler build
adam518 replied to adam518's topic in Member Projects: Your Comanches
Thanks. Last week I got the carpeting, center console (out of a '96 XJ), driver's seat, headliner & a lot of the interior trim installed. I held off on a few pieces because I was waiting on a new stereo, speakers and amp to arrive. I do have one question for those of you with bucket seats. My truck was originally a bench and I assume it was that reason that it didn't have a trim panel behind the seat. Either that or it was just plain missing. Regardless, it looks like I will have to make one as MJ's are scarce at junkyards around here. I plan to use expanded pvc board to make a piece and cover it with carpet to match the floor. I saw on another thread that there were brackets at the bottom that attached it to the floor, but how is the original made on either end where it meets the rear cab corner interior pieces? I assume at the top it simply tucks under the lower rear window trim, but the sides have me a bit perplexed. -
1990 Rebirth ('97 Conversion)
adam518 replied to Rymanrph's topic in Member Projects: Your Comanches
I Installed the Novak cable kit in my truck, but I have a 231. Initially, I had the same problem. I could adjust it to get 2wd or 4wd low, but not both. After some playing with it for a bit, I finally was able to get it adjusted properly and now have positive shifting al the way from 2-hi to 4-lo. I will say that tiny adjustments made a big difference...at least for me. BTW, I had problems with my install, though different. I called Novak and it turned out I was also the only one to ever have a problem with their install. Later, someone commented on my build thread that they had the same problem, called Novak and guess what...it seems as though they were the first one with the problem...I suppose they forgot about me. It wasn't a big deal to fix, but is seems like a common theme. -
1991 4.0L daily driver/weekend wheeler build
adam518 replied to adam518's topic in Member Projects: Your Comanches
Thanks...I appreciate the compliment. BTW, the brow is about my favorite part of the Honcho. To me, it looks like it's ticked off and coming to kick your rear. It's amazing just how helpful these types of forums are. Even though my build is moving at about half the pace of most of the guys on here, I'd probably still be scratching my head if I weren't able to draw on the experiences of the the people in this forum. I got my new passenger's side window regulator yesterday and installed it last night. It actually went pretty smooth. I am starting to see a little light at the end of the tunnel. Part of me wants to throw it together and get it on the road, but I am trying to stay focused and do a nice job. It sill needs more poor man's Dynomat on the inside of the door skin as well as a few spots on the floor and to the rear of the lock pillar. http://www.lowes.com/pd_154017-81326-PS625_0__?Ntt=peel+seal&productId=1018733&rpp=16 http://www.ratrodsrule.com/forum/showthread.php?t=3226 It's funny, but if you read the reviews on the Lowe's site, almost everyone who is buying this stuff, or at least reviewing it, is using it for automobile sound insulation...not roofing. I can't remember if I first read about Peel & Seal here or on the Cherokee Forum, but it works well and is relatively cheap. It takes about 4 rolls in the cab to do it all...floors, doors, rear bulkhead, firewall & overhead. I drove the truck for a while with the floor covered & zero interior except for the dash and a driver's seat. It was amazing how much quieter it was than before it was on the floor. Hopefully, with the carpet and all of the rest of the interior in place, my tunes will be nice and clear. -
1991 4.0L daily driver/weekend wheeler build
adam518 replied to adam518's topic in Member Projects: Your Comanches
Made some pretty good progress today. The dash is installed as well as the cluster and all of the switches, dash lights, ac control unit, yadda yadda. It actually went pretty smooth. I got the window trim on the diver's side...that was a bit of a pain, but it's on and I managed to do it without scratching anything. I have '97 up style exterior mirrors and had to trim the one I installed to get it to fit properly. I will do the passenger's side later. Right now, a new window regulator for the rh door has shipped and is on the way and the trim for that side will wait until after it arrives. Lastly, I POR15'd the firewall below the fuse panel down to the floorboard. It had a fair amount of rust beginning at the base of the fuse box. The infected area made a wide delta shape flowing out from there. The floor pan itself has been repaired before and is in good shape, but the bottom portion of the firewall below the fuse panel looked kind of ugly. Nothing really picture worthy today, but I am optimistic that it should be on the road in relatively short order. I have to go out of town for work this week or I would be shooting for this next weekend to get it wrapped up. -
1991 4.0L daily driver/weekend wheeler build
adam518 replied to adam518's topic in Member Projects: Your Comanches
Roger that, although mine would be more like upper thigh busters and I'm not exactly short. ;) -
1991 4.0L daily driver/weekend wheeler build
adam518 replied to adam518's topic in Member Projects: Your Comanches
Just curious...what is the "knee capper thing" ? -
1991 4.0L daily driver/weekend wheeler build
adam518 replied to adam518's topic in Member Projects: Your Comanches
Okay...here we go. I also want to share a couple of non-MJ pics. 1st, my daughter posing with my XJ (she loves all of my Jeeps) and 2nd the Honcho (just because Honcho's are insanely cool). Here is the MJ as it looks as of tonight. I don't know what it is, but the color comes out a bit light in the pics. It is darker in person. It is not quite navy, but definitely darker than the pics. Maybe soon I'll be able to roll it out into the sunlight for pics. I have to remind myself "baby steps". I want to hurry and get it done, but that doesn't fit my family life. Hurrying this project and adding stress sucks all of the fun out of it, and fun is the only reason I am doing it...so it is what it is...baby steps...a little progress every day. Tonight, I got the wiper motor assembly reinstalled and the wiper grill in place. That's not exactly ground breaking, but i was home early for dinner and scored some points with the wife....surely they will be cashed in soon enough when I can't break away from a terribly important part of reassembly... -
1991 4.0L daily driver/weekend wheeler build
adam518 replied to adam518's topic in Member Projects: Your Comanches
Thanks guys. I haven't posted in the last week or so. I do have the flares, rear bumper trim, tailgate door handles & front bumper all mounted up. I know it doesn't sound like a lot, but everything has fought me along the way, especially the front bumper install. I bought the heavy duty tie in brackets for the front bumper. Like most similar bumper mounting systems, it installs on the outboard side of the frame rail and utilizes the three steering box mounting bolts on the driver's side. Two of the three broke off in the box. I also had a weld nut break inside of the frame rail on the passenger's side. It was one of the two sway bar mounting bracket bolts that is also utilized for the tie in bracket. I spent pretty much all of yesterday afternoon just installing the front bumper and getting the wiring all squared away for the driving lights. I removed the windshield. It was going to be replaced anyway, but I went ahead and took it out to make installing a replacement dash easier. The old dash is out, so now my interior pretty much consists of a driver's side seat, steering column and the wiring harness. I also managed to fix a water leak (I hope) the was coming in around my fuse panel. The wiper gutter was leaking along the front pinch seam and water was running down the front of firewall. The fuse panel seal was bad and water was coming in there. I sealed the leading edge of the gutter and removed and sealed the fuse panel to firewall. I dumped about a gallon of water in the gutter and no water found its way onto the wiring harness connection, so hopefully that is fixed. For good measure, I also replaced the rubber seal that goes at the back of the hood just in case water was finding its way in there. I'll post pics later today. -
**Warning** Post has bad language, but it's funny http://dontevenreply.com/view.php?post=107
-
Interested in a decent set of tail lights shipped to Tennessee.
-
1991 4.0L daily driver/weekend wheeler build
adam518 replied to adam518's topic in Member Projects: Your Comanches
Got my truck back yesterday!! Last night I put the front grill and lights back in place. Easy 10 minute job, right? Once together, I tested the lights. The left blinker blinked twice as fast as it should and wouldn't blink at all if the headlights were on. I thought maybe they didn't get a good ground when they put the rear harness back in place...no dice. Maybe there was a pinched wire or short in the rear harness...no such luck. Oh, I know..,maybe there was a problem with the front harness I installed along with the junkyard front header panel, so I removed the harness and swapped my old harness back in...nada. In sheer frustration I went back and checked what I should have done first..the bulbs. It turns out that they swapped two of the bulbs on the driver's side rear. They had a tail lamp bulb in the back-up socket and the back-up bulb in place of one of the tail lamps. Any, all is well now and I did get the grill and front end put back together before heading home. *Note to self* Always start with easiest and cheapest fix and work you way up. I brought my family by my office on our way out to eat to show off the Comanche. While not a truck lover, the wife actually complimented the Comanche, but in my heart I think she just wanted to make me feel good. The first pic is the younger of two reasons that I only play with the Comanche a little here and a little there. My daughter is four and was having too much fun running through the aisles of my warehouse to bother with a pic inside of dad's truck. -
1991 4.0L daily driver/weekend wheeler build
adam518 replied to adam518's topic in Member Projects: Your Comanches
Thanks. I dig guacamole! Anyone know a source for new old stock emblems? Mine look pretty good, but I would love to find a new set. -
1991 4.0L daily driver/weekend wheeler build
adam518 replied to adam518's topic in Member Projects: Your Comanches
The stock flares will be going back on. I plan to make all of the trim semi-flat black. I will be using a black grill in place of the stock chrome one. My drip rails will be black, as well as the J E E P letters on the tailgate, door handles, mirrors, etc. I will reuse the stock chrome emblems for the fenders and the 4.0L on the tailgate. I plan to install a new slider with dark tinted glass. I'll have the windows tinted after the fact to match the color of the slider. -
1991 4.0L daily driver/weekend wheeler build
adam518 replied to adam518's topic in Member Projects: Your Comanches
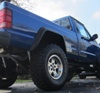
Here is how it looks today. I took these this morning. Was hoping to get it back today. It's not going to happen...maybe tomorrow. -
1991 4.0L daily driver/weekend wheeler build
adam518 replied to adam518's topic in Member Projects: Your Comanches
It wasn't a big deal at all. I just had to track down all of the necessary pieces. You'll need the following: Front Axle. Dana 30 is easiest swap. Get one from a '96-'99 XJ. They are still high pinion ('00-'01 are low pinion) and they got the better 297 u-joints beginning '96. Front Drive Shaft. I pulled a junkyard XJ shaft. Transfer Case. NP231 easiest swap and plentiful in XJ's. 4wd Transmission. A 2wd trans has a longer tail shaft & it's easier just to pick up another trans than to tear into the original. Rear Drive Shaft. You can have yours cut down. I had a new double cardan one made by Tom Woods and installed a slip yoke eliminator in the transfer case. Transfer Case Shifter. You can pull one from a junkyard XJ. I bought a cable style shifter from Novak. If you plan to lift it, doing so at the time of the swap would be the best time to do it. The whole front end will be out anyway. The parts are a simple bolt in deal. Another thing I did at the same time was to replace the old style hydraulic throw-out bearing to the newer style external slave cylinder. To do this you'll need the later style bell housing as well. Again, take one from an XJ. I think that's about it. With all of the pieces there and a buddy to help wrench and hand you tools (and help get the tranny in place) it's an easy weekend swap. It took me a lot longer working an hour or two at a time. I also replaced all of the u-joints, bearings, ball joints, brakes, regeared the axles, etc at the same time so it added a lot of time to my project. Send me a message if you have any questions, but it was really pretty straight forward. -
1991 4.0L daily driver/weekend wheeler build
adam518 replied to adam518's topic in Member Projects: Your Comanches
What can I say? I like em purty. Not to worry, it will see some trail riding and I don't even go to the mall.