

jcComanche86lb
-
Posts
74 -
Joined
-
Last visited
Content Type
Profiles
Forums
Gallery
Everything posted by jcComanche86lb
-
Making lower control arms.
jcComanche86lb replied to jcComanche86lb's topic in MJ Tech: Modification and Repairs
All welded up and ready to go. -
Making lower control arms.
jcComanche86lb replied to jcComanche86lb's topic in MJ Tech: Modification and Repairs
I have been planning either control arm drop brackets, long arms or radius arms but haven't decided yet. I plan on doing a 350/th350 swap next year so I don't want to build a crossmember that will need to be changed later. Long arms would be nice though. -
Making lower control arms.
jcComanche86lb replied to jcComanche86lb's topic in MJ Tech: Modification and Repairs
That's the reason for the angle. I had to angle it so that it would not hit that bracket while flexing. Thanks to everyone for their input. -
Making lower control arms.
jcComanche86lb replied to jcComanche86lb's topic in MJ Tech: Modification and Repairs
Whether or not they were worth the time or not I enjoyed making them and I think that's half the fun of having a jeep. Either way here is a quick update. Route pass complete and final cap almost complete. Hope to have the in tonight. -
Making lower control arms.
jcComanche86lb replied to jcComanche86lb's topic in MJ Tech: Modification and Repairs
I havent spent anything yet accept for the bushings. -
Making lower control arms.
jcComanche86lb replied to jcComanche86lb's topic in MJ Tech: Modification and Repairs
I do have a new set of bushings I just didn't want to burn the new ones when I was welding. I used an old set to keep everything lined up. I actually rarely drive my mj nowadays due to my new job supplying me a service vehicle. My plan is to buy or build a set of control arm drop brackets pretty soon so these will be kinda just a trial project. I will stick to off road for now. Thanks for the concern that's exactly why I posted, thanks. -
Yeah that's the only thing about them that i didn't like. I originally expected to have to angle them up to get the shock where I wanted it but ended up not needing to. They're kinda like rock catchers now. Its different when making them on autodesk not sitting under the jeep but theyll do for now. I plan on swapping in an 8.8 as soon as I get the cash so this is kinda a trial set.
-
Making lower control arms.
jcComanche86lb replied to jcComanche86lb's topic in MJ Tech: Modification and Repairs
I expected to get a reply similar to that. I really don't mean to sound stubborn but I still plan on at least trying them. I know the proper way to make but without a tubing bender I started running out of options. After reading stories about people actually grinding wj lower control arms to clear their axle brackets I figured mine couldn't be any weaker than those. I made the out of .25" plate expecting to make them stronger than stock. Even though they do angle about 35 degrees to clear the brackets on my axle I still figure the weak point to be the axle brackets. I do agree with you about the proper way to make them but every design has weak points in them. I would figure bending tubing would cause a weak point also. And there isn't much surface area to weld the tubing to the bushing housing. Or as in adjustable control arms the threaded area would seem to be the weak point. Hope I don't seem like I'm shooting down your advice, I just like talking about the subject. Thanks for the advice. -
Hey guys just wanted to share my latest project. I really couldn't justify buying new adjustable lower control arms due to their price so I decided to make some. I know this is a touchy subject due to possible safety issues but tell me what u think. And almost welded.
-
Yeah hopefully I'll be able to get the brake line rerouted before I'm back on the road. I actually have the park brake cable there to keep it out of the way while I grind and weld. So any opinion on how the shock mounts came out?
-
Parking brake or service? Or both?
-
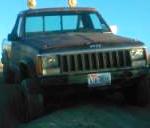
Hey everybody hows it going. Just wanted to share my latest update one my manche. I just finished the soa in the rear and had to fab some shock mounting brackets on the axle. I had a friend cut them out with his Vulcan CNC plasma. They came out ok but I should have made them shorter. I welded the up and actually like the way the turned out. Had to test them.
-
Mine are actually 2.5" wide. I opted out on making three holes across the top because I knew i wouldn't use them. While mine are only seven inches long it would only take a few clicks of a mouse and they would be eight. Kinda over kill but idk. What do you think about the welded joint as apposed to being bent?
-
They are seven inches long and two inches wide.
-
The diamond plate was just scrap laying around at the time. It really doesn't look bad just not what I had in mind when making them. I figure the top plate may affect the way the leaf spring sits on the spring perch. I have some other projects going that I might make out of diamond plate, like diff covers front and rear. I'm also working on a rear bumper that I can sell. I will post them as they get finished.
-
I had these made kinda as a prototype. Tell me what u think. They're made for a 2.5 inch axle tube and are made of quarter inch steel. If I go ahead and have more made I will just use flat steel instead of diamond plate. They are in three pieces and will need to be welded together.
-
Sorry, I did search the topic but didn't see that. Either way it's nice to see someone building a bad @$$ mj.
-
I just stumbled onto this video that looks pretty sweet. . Looks like something to keep an eye on their may be some different products they've found for the mj. Just thought I'd pass it along.
-
Axle Identification
jcComanche86lb replied to jcComanche86lb's topic in MJ Tech: Modification and Repairs
Thanks fellas, I had no idea that the non c-clip had a different diff cover. I can get back to making spring perches for my turdy five. -
Axle Identification
jcComanche86lb replied to jcComanche86lb's topic in MJ Tech: Modification and Repairs
Here is what got me thinking that it isn't a dana 35. This is the 35 in my truck now. It has the bulge that runs vertcally on the cover and the other one doesn't? The axle in question is smooth and round. Were there different covers for different years? -
Sorry to bring up an old subject that has probably been discussed. I did search but didn't find what I was looking for. What I really need is a second opinnion on the axle that was in my Mj before I got it. Before tonight I would have bet money that it is a dana 35 but while measuring axle tubes they didnt match up to what a dana 35 should be. From what I just looked at it may be a Chrysler 8.25 can someone please give me a second opinnion? I just find it hard to believe that it would be anything other than a dana 35 because the po said that it should have been the original axle? Thanks in advance.
-
Rustoleum paint job
jcComanche86lb replied to jcComanche86lb's topic in MJ Tech: Modification and Repairs
I originally planned on rolling on the paint but once I spent two days sanding I figured I might as well spray it. The paint I used was vansickle paint and its pretty tough stuff. We use it on our forklifts and pallet jacks at work. I only spent around 120 on paint, supplies, and hvlp from HF. The 5" orbital sander from HF was priceless, I wouldn't have ever finished without it. Good luck. -
Rustoleum paint job
jcComanche86lb replied to jcComanche86lb's topic in MJ Tech: Modification and Repairs
I really didn't even plan on painting it plus I ran out of time. Most of the major dents are in the bed so I figure I can always fix the dents and respray the bed. And also Ive never done any body work either. I'm happy with it though next up soa and a comancheclub sticker I figure it's worthy now. -
Glad you got it wiring cam be a PITA.
-
Rustoleum paint job
jcComanche86lb replied to jcComanche86lb's topic in MJ Tech: Modification and Repairs
Here's a better picture. Image Not Found It came out kind of satin black because of the hardener.