

Husafan
-
Posts
28 -
Joined
-
Last visited
Recent Profile Visitors
688 profile views

Husafan's Achievements
Can Spell Comanche (2/11)
-
Adding Emissions Components To My Comanche
Husafan replied to Husafan's topic in MJ Tech: DIY Projects and Write-Ups
Finally! The evap canister has been mounted next to the muffler under the truck bed. This task took around 5 hours longer than intended thanks to a bolt head shearing and about 4 hours trying to get it out. I finally gave up and mounted the canister using two new bolts. The mounted canister: And the evap canister has been connected to the rollover valve from the main tank: -
Most important upgrade yet:
-
Just to keep this current, I have started a DIY thread to document the attempted installation of emissions components: http://comancheclub.com/topic/36660-adding-emissions-components-to-my-comanche/
-
Just wanted to update this thread with the latest. As I mentioned in this thread, http://comancheclub.com/topic/36615-mil-warnings/#entry366926, my check engine light was coming on with error code P0443. Basically, the '99 Cherokee engine swap was done minus an emissions system. So my buddy and I went to Pic-N-Pull today and grabbed an emissions system from a '98 Cherokee. Here's a quick picture of the parts we pulled: I have started a DIY thread to document the installation: http://comancheclub.com/topic/36660-adding-emissions-components-to-my-comanche/
-
I am starting this thread to document the addition of emissions components to my '87 Comanche. As I noted here: http://comancheclub.com/topic/36615-mil-warnings/#entry366926, my Comanche, which had a '99 Comanche 4.0L swapped in, was throwing an error code P0443. When I went deeper, it appeared that the entire swap was done sans emissions components. In the picture below, you will notice there is no purge solenoid. We went to the Pic-N-Pull and pulled the following emissions components from a '98 Cherokee: Pictured above are the hoses running from the tank to the evap canister, from the evap canister to the purge solenoid, and from the evap canister to the capped tube. (I think that in some models, the capped tube actually connects to leak detection pump.) We also pulled the evap canister, which is the square thing, and the purge solenoid, which is the smaller cylinder down and to the right of the evap canister. I took the following picture of the emissions sticker from the '98 Cherokee we were cannibalizing: We will be working on the installation tomorrow, and I will update this thread then.
-
Ok, so after posting at expeditionportal.com, it appears that I will need the entire emissions system from a '99 cherokee before I can attempt to get it inspected. Has anyone done this kind of swap before?
-
[EDIT] Looking again, I don't see any evap canister either. I guess I'm missing the entire system here. :P So I guess start from scratch installing these pieces according to the diagram? So I went and picked up part #4669475AB - a Canister Purge Solenoid Control. I found the following diagram for hooking it up: And the following picture of someone's hookup: So I went and tried to find the corresponding connectors and such under my own hood. Here's what it looked like: So, as you can see, I found the loose electrical hookup that connects to the canister (#1 in the image) and I also see a loose hose (#2 in the image) which looks like it might be the right size if I remove what looks like a valve stem from the end of it. However, I certainly don't see two hoses, which I suppose could be expected if they put off bringing the whole purge solenoid over. Based on the diagram I embedded, the top hose should be connected to the evap canister and the bottom one should be connected to the map sensor. First question: does this sound/look right to you all? Second: is that the engine the map sensor is sitting on in the diagram? Is that where I need to be looking to connect the bottom hose? Third and final question: The Comanche also has had a second tank installed. When I was under there, I saw a couple of loose hoses (image below) that I am not sure should be loose. Might they need to be running into this system in some way in which they are not? I ask because the diagram has a couple of hoses going to the fuel tank. Again, any and all help is greatly appreciated! Thanks!
-
Actually, it's still titled as an '87 MJ. But here in Cali, it still has to pass emissions. I think it might be a slacker emissions, but it still has to pass. And for that, I am under the impression the MIL has to be off.
-
For For all intents and purposes, it can be considered a 99 cherokee. In fact, I probably should have posted this in the pub, since it isn't, technically, a Comanche. The engine, manifold, wiring - everything's been swapped in. The OBDII plugs in right under the steering column. I took it by the shop today and had a more specific reading. Turns out it's the vapor canister, which was left out of the swap. I think my next step is to try and find a vapor canister and then attempt to install it. :)
-
I've got an 87 Comanche with a 4.0L swap from a 99 Cherokee. The check engine light has been on since I got it, and the seller's mechanic told me they'd never really looked into it because emissions standards weren't as strict in Texas or Utah. However, now that I have it in Cali, I need to get the light off before I can get it registered. When I first pulled codes, I was getting two: P0132 and P0135. So I replaced the O2 sensor before the cat and the corresponding fuses. Unfortunately, the check engine light is still coming on. OBDII says 0 codes but is showing multiple MIL warnings and I was hoping some people on here could offer some guidance. The following are from the reader, along with my interpretations given the readers manual: 0 Codes MIL On Monitrs 2 Inc Catlyst O2 Htr 4 Ready Misfire Fuel Comp O2 Snsr Based on my reading of the manual, this means that 2 monitors were incomplete, the Catalyst Monitor and O2 Heater Monitor and 4 were completed and shown wanting, the Misfire Monitor, Fuel Monitor, Comprehensive Components Monitor and O2 Sensor Monitor. I should also mention that the vacuum canister that's normally in the front left of the engine bay is missing (I can take a picture if needed), and this is what the mechanic whom I picked it up from thought was causing the issues. If this is something that will require too much time or expertise to sort out on my own, I will probably end up taking it by the shop later this week. But if this is something I could use as a learning experience, I would love to take care of it myself. To be honest, I don't even know where to start in diagnosing and fixing these monitor warnings, so any help and guidance would be GREATLY appreciated. Thanks!
-
Ha! Thanks - I'll try resizing and posting images inline going forwards. Anyhue, the light came back on during my drive to work this morning, so I next step, replace the O2 sensor.
-
Well, looks like the light came back on this morning on the way to work. Time to change out the O2 sensor. :)
-
Thanks for the detailed reply!! I actually tried replacing some fuses first, and the light has stayed off, at least for the drive home. Update here: http://comancheclub.com/topic/36561-my-mj-yt-yts-her-name/ Should it come back on, I will definitely try the O2 sensor.
-
The second issue, out of the gate, was the fact that the check engine light was on from the get-go. When I asked Tod about it, he said he hadn't looked into beyond pulling the code because emissions standards in Utah and Texas are way lax. His theory though, based on the code pulled by him, was a lack of vacuum because of a piece that hadn't been brought over with the engine swap. I can't remember what he called it, but he said it is normally located in the front-left corner of the engine bay. Unfortunately, here in CA, you can't even register a vehicle when the check engine light is on, so I needed to get it fixed. I cleared and pulled the codes myself and got P0132 and P0135. According my subsequent forum searching, these codes relate to the front O2 sensor's heater, for which there is a fuse. The forum posters recommended starting with a fuse swap and then, if that didn't work, replacing the front O2 sensor itself. So I went to Pep Boys, opened the hood and pulled all the fuses. As it turned out, two of the 20's looked all milky and blown. So I replaced those two, cleared the code, and drove home without the light coming back on!! Fingers crossed that they stay off. YAY! I made my first fix all by my self. :) Here are some pictures of the fuses I replaced: http://postimage.org/gallery/14x4at9m/
-
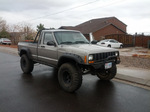
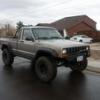
The first modification that was officially mine is the rollbar. It was fabbed and added by Tod from On Track 4x4. He added some holes for a CB radio antenna and some holes on top for mounting lights. Some pictures: http://postimage.org/gallery/7vuxy5m/