


TheBearken
-
Posts
23 -
Joined
-
Last visited
Content Type
Profiles
Forums
Gallery
Everything posted by TheBearken
-

88' Learn 'n Go Comanche
TheBearken replied to TheBearken's topic in Member Projects: Your Comanches
I believe it's rated up to 2000F, I used the VHT Flameproof header paint, I'll definitely report back how it holds up! -
88' Learn 'n Go Comanche
TheBearken replied to TheBearken's topic in Member Projects: Your Comanches
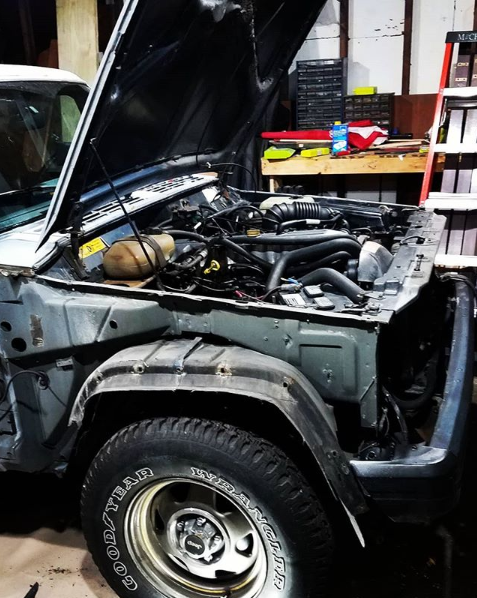
Not too many pictures from the process, but I touched up some of the accessory wheels while I had them out. So much sludge!!! I cleaned as much off as I could and still there are nooks completely full of the gunk, but at least the block is clear. Getting everything back together was a pain, I ended up cutting through the EGR tube because the fittings were not going to come off at this point. On reassembly they still line up perfectly so I hit it with some exhaust patch/wrap. A bit of a demoralizing moment was when I first let the fuel rail prime, the regulator wasn't sealed 100% and sprayed fuel all over my manifolds. Not too bad, but I had painted the exhaust shield and header with hi temp paint that still needed to cure, and the gas basically stripped it off where it landed. I'll have to revisit it next time because I don't have the heart to disassemble everything again to get them out. other events were getting it to turn over the first time after sealing the fuel rail, it ran terribly and I thought I majorly screwed something up/ ruined my truck. Turns out I put the vacuum tube for the MAP in the wrong grommet on the throttle body, and it responded immediately when I fixed it. Oil rained down from the pan and it turned out I never did a round of tightening past finger on any of the bolts, so that was a facepalm moment. definitely had a sinking feeling for a moment there but so far so good! I'm going to get it on the road a bit and see if any further leaking develops anywhere. Next on the agenda if nothing critical comes up, is getting a sport truck graphic applied, and digging back into the interior overhaul!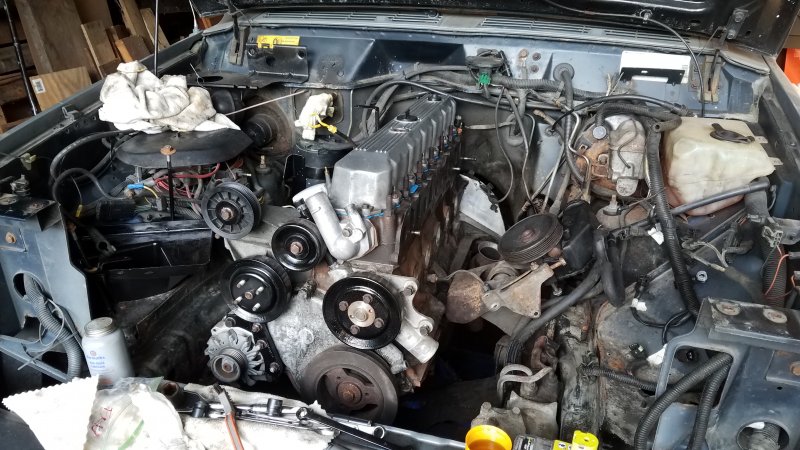
-
Renix engine top end cleaning
TheBearken replied to TheBearken's topic in MJ Tech: Modification and Repairs
So I did end up going through the rocker assemblies and cleaning everything off, checking for any potential issues. A few bits of wear but nothing that can't wait for a full rebuild in the future. I sweated a bit getting the head back on and then playing 2nd guess on if I left towels in the oil channels... I'm starting to bolt everything back on and clean up as I go. I hit some of the accessories with some fresh paint for that extra sheen. I'm having a terrible time on the aluminum for the AC/idler bracket and power steering bracket. For some reason the Alternator bracket and intake manifold have shined up perfectly, but I can't get the dark brown/yellowish/rough areas off these ones. When I get everything back on, what's the best practice on double checking before attempting to turn it over? I can hand crank it and everything seems to be moving as intended, but I'm still going to be nervous as hell.
-
88' Learn 'n Go Comanche
TheBearken replied to TheBearken's topic in Member Projects: Your Comanches
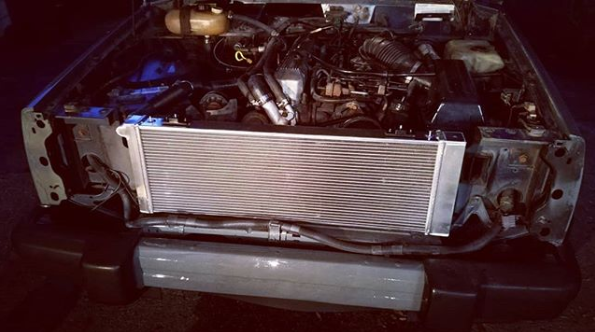
It's been a minute, hope everyone is safe and dealing with the various lockdowns well. I've put interior work on pause now that my garage is reorganized and I have the space to dig into the engine. I have about half and inch of sludge around just about every nook and cranny, so my goal is to clean as I go and check for any unseen issues. Also hoping to locate a persistent oil drip that started developing after I took it on the highway a few times back in spring. With everything being coated in grime it wasn't apparent were it was coming from so hopefully a cleanup will help in the future. I picked up a head gasket, new fuel injectors, oil pan gasket, rear main seal, and I'll be reconditioning all the brackets and fittings I can get to. Touching the distributor and having to redo the timing scares me, so I think that'll stay put and I'll work around it. Anyone have suggestions on other things to do while I have it in pieces?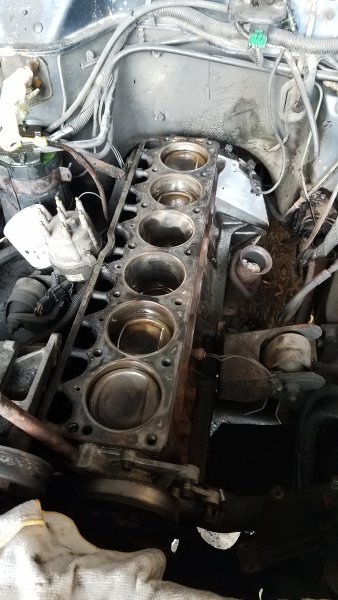
-
Renix engine top end cleaning
TheBearken replied to TheBearken's topic in MJ Tech: Modification and Repairs
Awesome find, It's been a while since I've looked through his spellbook, he really does have something for every occasion! -
Renix engine top end cleaning
TheBearken replied to TheBearken's topic in MJ Tech: Modification and Repairs
I think a rebuilt head will come in the future if my luck holds out, I'd like to do an HO conversion. That scotchbrite suggestion was killer, made a world of difference! I've definitely underestimated those little guys -
Hey guys, I've finally gotten around to cracking open my engine and was wondering what things I should tend to while I've got the top end off. My goal was to get the block cleaned off, replace the head gasket, replace the injectors, and clean/refurb all the misc. brackets and components I interact with on the way. Here are some of my big questions as I've never gone this deep into an engine bay before, but want to keep best practices in mind. -Is it ideal to completely disassemble the cylinder head and remove 100% of the build up and grime, or leave it together and spot remove the sludgy bits? I have this constant feeling that if I take apart spec-sensitive stuff like the rockers and valves, I won't be able to get them back together "properly" the same way again. -What's the best tool/solvent to use to clean inside the block channels? it's a tight fit -I'm getting a lot of oil in my air filter, is there something I can do in the valve cover to help mitigate that without rigging up a catch-can? -I haven't touched the distributor because getting my timing out of whack terrifies me, am I being dumb? -Best practice for cleaning the mating surfaces? Obviously scratches aren't good, but I can't seem to make any progress with plastic scrapers -Similarly, the calcium-like buildup on the valves and in the chamber doesn't want to go anywhere with a delicate touch... Appreciate any suggestions!
-
88' Learn 'n Go Comanche
TheBearken replied to TheBearken's topic in Member Projects: Your Comanches
Good to be aware of! That definitely looks pretty bad, but whatever service is on that truck looks way different than mine. They also did a full pre-treatment of the existing surface, and an internal treatment for the frame and all panels, engine bay. I'm happy with it currently, but I'll definitely run through a follow-up inspection after the winter to see how everything managed. -
88' Learn 'n Go Comanche
TheBearken replied to TheBearken's topic in Member Projects: Your Comanches
It's been a slow time due to weather, but I have managed to get a few things updated and the truck is back to being my daily. Fixed the rough starting issues thanks to Pete's suggestion by swapping in the old IAC, so that's been a relief. I bit the bullet and took it to Ziebart to have a full rustproofing and undercoating job done, and they did a fantastic job. I have much more confidence driving around in the saltslush now. I managed to track down a guy about an hour away that had some interior pieces available and picked up a beautiful black bench seat. My original plan was for buckets but I could not turn this thing down. Got it installed with FAR less issues than I expected, as my old bench seemed fused in place. Driver side power locks and window rail installed along with the 2nd painted door panel. Nothing is wired yet but that is definitely going to be a spring-summer task.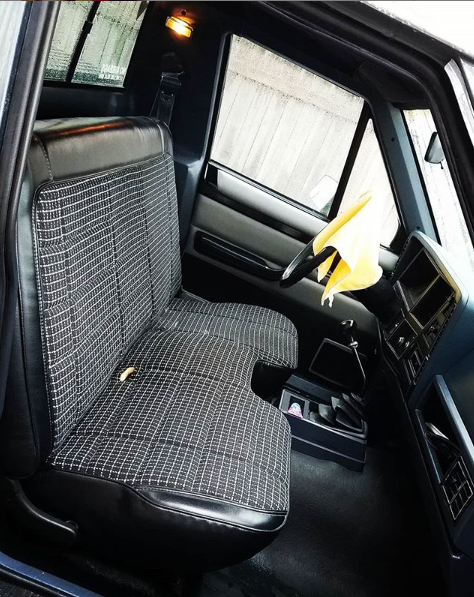
-
88' Learn 'n Go Comanche
TheBearken replied to TheBearken's topic in Member Projects: Your Comanches
You know, after doing the TPS adjustment and not seeing a difference after getting it spot on, I threw the old IAC and the thing fired right up! I guess it serves me right for replacing something that wasn't broke in the first place, definitely lesson learned. Thanks for the hint! -
10-Hole Wheel Restoration
TheBearken replied to TheBearken's topic in MJ Tech: DIY Projects and Write-Ups
Those are fantastic looking! Turbines were my #1 choice but I came upon the 10-hole sooner and for far cheaper. Someday though! -
88' Learn 'n Go Comanche
TheBearken replied to TheBearken's topic in Member Projects: Your Comanches
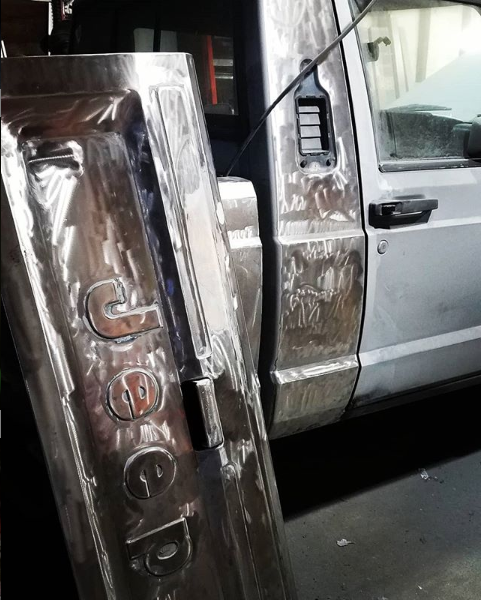
After having fun with Rivets (seriously, now that I've used them I'm a fan) I removed the manual window crank and installed the power rail and power lock gear from the donor Cherokee. I also swapped out the plastic exterior door handle and side mirrors for some lunky chrome ones from a junkyard Laredo. I'll need to find an alternative for the factory plastic door lining, and I'm holding off on any wiring shenanigans until I get the rough starting issue resolved. I am very pleased with how the color turned out! Getting the dash and rest of the interior painted is going to be a much larger task. I'll probably hold off until I can find some grey buckets and seat brackets first.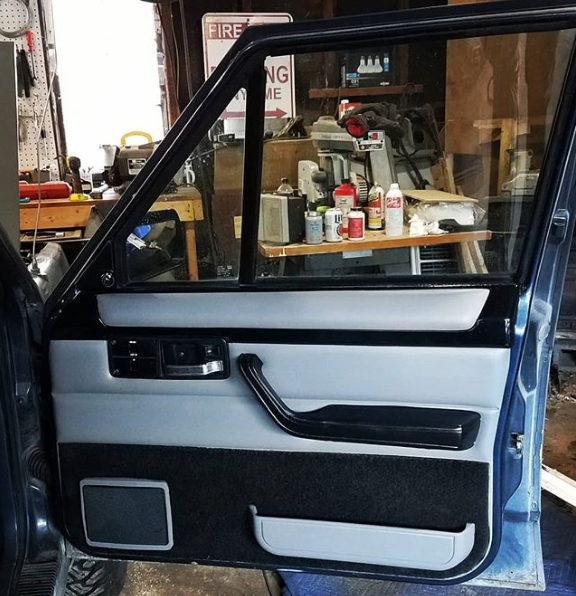
-
88' Learn 'n Go Comanche
TheBearken replied to TheBearken's topic in Member Projects: Your Comanches
So the truck has been back in the garage. A while after finishing the rotors and fender liners/frontal frame paint, I went to leave work and the engine was pegged at 3k and would not go down. It snapped out of it after hitting the highway on my way home, and since then it's been barely idling on startup and until I leave my neighborhood, afterwards it's business as usual. Looking into TPS adjustments and so far have dissembled and cleaned the throttle body. The AIC was just replaced a few months ago, so hopefully it's just TPS foolery. While that's resting, I've been working on installing the interior and power features from my 93 Cherokee. Hit the door panels with vinyl paint and they came out fantastic! (still looking for a gloss black suitable for the faux wood bits)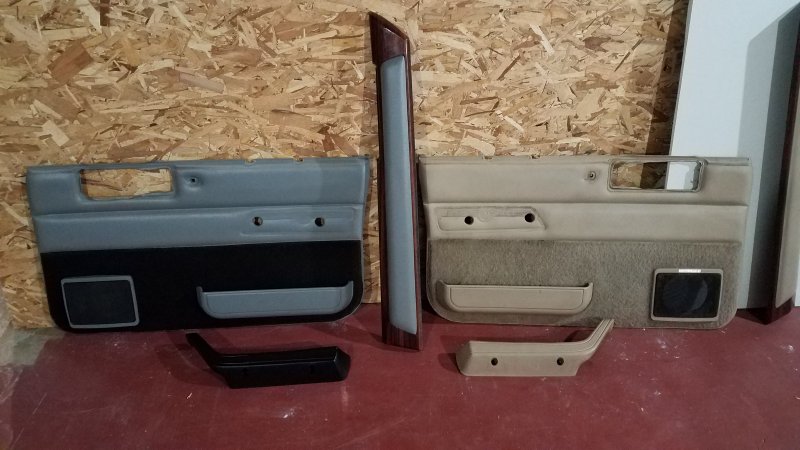
-
88' Learn 'n Go Comanche
TheBearken replied to TheBearken's topic in Member Projects: Your Comanches
We had our first snowfall in MI and it gave me cold feet (pun intended) about the state of my trucks weather resistance. So back into the garage to replace the old cracked fender liners, hit the frame with some POR-15 where I could get at it, and clean up the calipers and replace rotors/pads and hoses. Ironically the first auto DIY job I did, replacing rotors and brakes, ended up catching me by surprise on the truck. I was not prepared for the rotor/hub combination, so I had to hit the books, order new bearings and oil seals, and become intimate with bearing grease. All in all a fun experience, just took longer than I anticipated. The red paint adds about 5 hp at the wheels.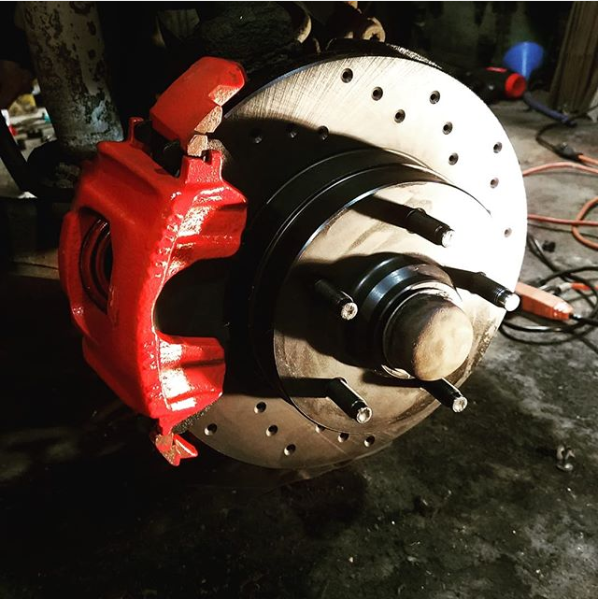
-
88' Learn 'n Go Comanche
TheBearken replied to TheBearken's topic in Member Projects: Your Comanches
Thanks! My criteria for a truck was that it not be huge, and be a little on the older side to keep things simpler under the hood. I was looking at import 4-banger trucks when I came across the Comanche for sale just up the road and did a bit of research. I was immediately sold on the reliability and parts compatibility, nothing like being able to go to the local scrap yard and get a replacement anything near 100% of the time. I bought a 93 Cherokee originally for the OEM wheels and power interior components, but after taking it to a Gambler weekend I've fallen in love with the peppier engine, so I may rebuild and do a HO swap after the winter if my luck holds up. On the hunt for 4x4 components for an eventual conversion, but it's not a priority Currently struggling to catch up to the weather, I had wanted to get the fender liners and flares replaced before snow hit, along with some additional rust preventative. -
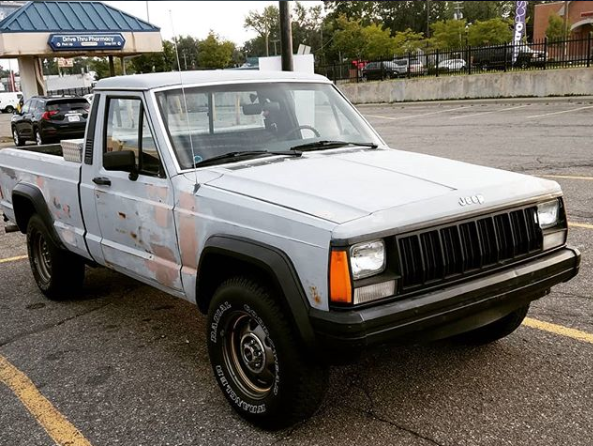
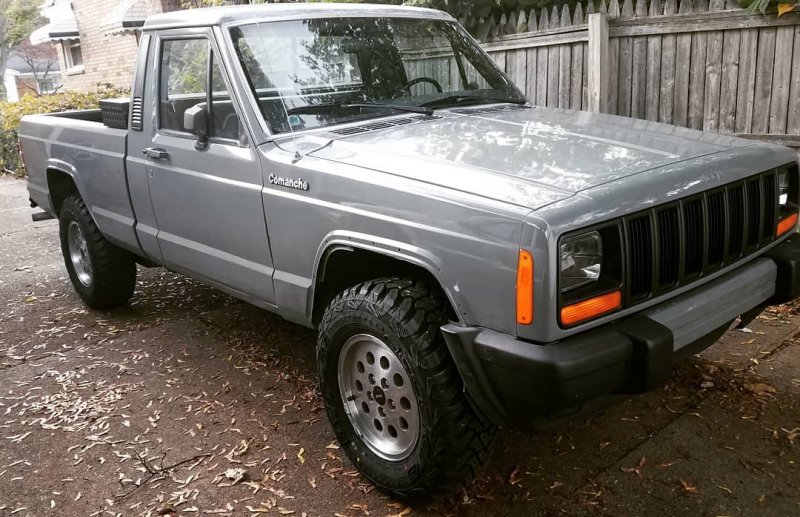
Picked up my 88' MJ while on the hunt for a responsibly sized truck, and it's been an adventure. My previous auto experience peaked at rotors and pad replacement, so the truck has definitely been a learning experience that continues to increase in scope. This forum has been crucial to my progress and the knowledge here is invaluable! Here is a few pics of where it's been so far: First day About 8 different electrical issues to hunt down and fix Front end conversion Pre-Paint surface prep Cooling system overhaul Present Day:
-
10-Hole Wheel Restoration
TheBearken replied to TheBearken's topic in MJ Tech: DIY Projects and Write-Ups
That looks pretty damn good, what polish did you use, and how bad was the corrosion beforehand? I definitely wouldnt have been able to get by with just scotchbrites in some areas but I may be sold on skipping clear based on your results. -
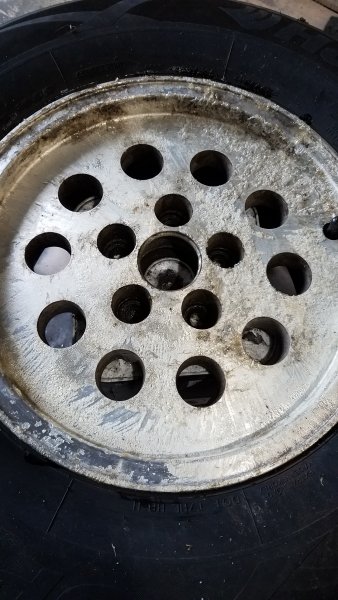
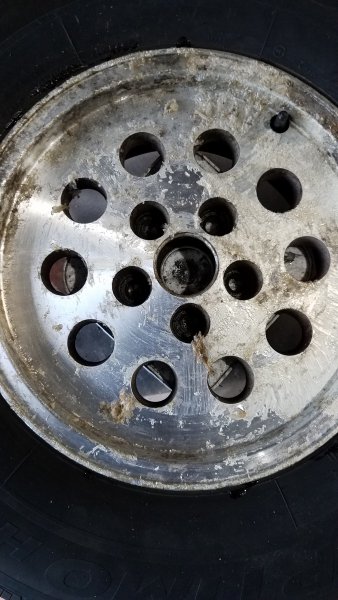
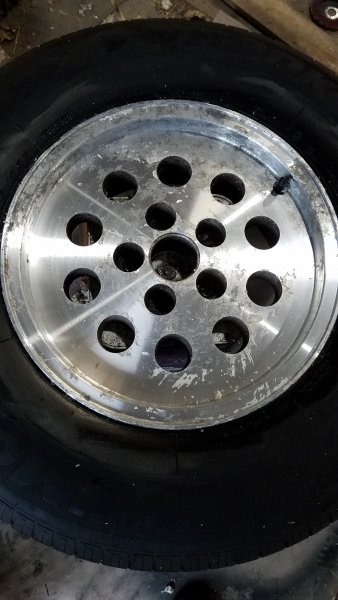
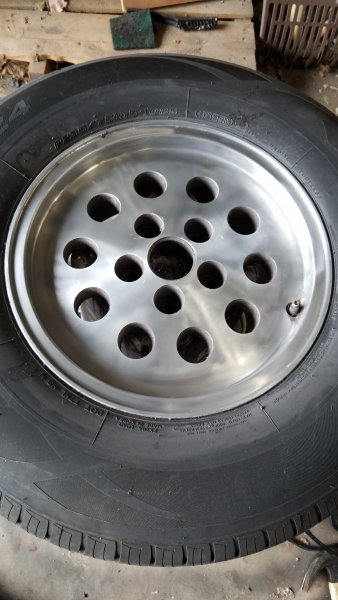
Hey Folks, I've been on a quest for some OEM wheels for a minute, and have my heart set on a set of turbines. I recently came upon a Cherokee for sale that had 10-holes (my 2nd choice) along with a ton of interior and power goodies I'm coveting, and the deal was too good to pass up. I figured I could post my experience trying to refinish the wheels and maybe get some pointers along the way. to start, I dropped the wheels after fighting some seriously overtorqued bolts and hit them with soap/water and a scouring pad to get off the surface dirt If I had more time and resources to dedicate, I would have had the tires removed, but since they're junk anyway, I'm just working around them the best I can I used KleanStrip Premium Stripper to remove the existing coating. Stuff works within 10 minutes and paints on with a brush. I coated the entire surface with a thin layer. After a few minutes you'll see the layers pealing up: I used a plastic scraper to remove the gelled up coating. It melted off like nothing for most of the areas, here is half the wheel scraped: After the first round, there are still a few spots needing hit again, so I applied more stripper and repeated the process. After that I hit it with a scouring pad and hose to get the residual goop off: At this point I know there's a decision to make about clearing up the damaged areas, and how far I want to go with the resulting finish. I ordered sanding pads for my orbital sander, a grinding/polishing wheel set, and some nylon pad-like attachments for my angle grinder. I started with the pads, which ended up working way better than I expected, and will most likely be where I end up. Afterwards I tried using the polishing pads, since they are listed as going up to 2000 grit whereas the pads are supposedly 320. Those ended up leaving a lot of black marks, and since they were rigid, they were leaving erratic patterns. Here is the wheel after going over it a few times with the scouring pads: I'm still working on the finish before I clear coat them. While I think they look 100% better than before, what I didn't account for is how the machining grooves which run perfectly circular would interact with the sanding marks. I did my best to hold my grinder so that the wheel would sand along the plane of the marks, but as you can see, I'm not able to do that in the tighter spaces. For cleaning up the holes, I just threw a small wire-wheel on the dremmel and it ran itself around each of them easy enough. I'll add some more when I finish, currently my obstacles are getting the finish more consistent, getting to the area around the valve stem, and removing the micro debris that accumulated in the machining grooves on some of the rougher areas (mineral spirits, aluminium cleaner, soap/water, thinner, nothing has wanted to make it go away). Let me know your thoughts or if anyone has some suggestions, thanks!
-
Middle seat console options
TheBearken replied to jeepmj_tj's topic in MJ Tech: Modification and Repairs
I believe the Dakota seats need a crossbar support across the rear in order to work, so I don't think you can just use the 40/20 by itself if that's what you were thinking. -
88' Bench seat to Buckets question
TheBearken replied to TheBearken's topic in MJ Tech: Modification and Repairs
Thanks for your help! So I definitely want original/Cherokee seats, I actually have one already that I pulled off a Cherokee long before I even owned the Comanche with the intention of making a stool haha. So bracket wise, only Comanche bucket seat brackets will do, or I can mod the bench bracket? That would be ideal because I know the driver side mounting point had been sitting in water so isn't going to come out without a fight. -
Quick one here folks as I haven't been able to find a definitive answer. I want to replace my bench with Bucket seats, and I know certain Comanche models came with buckets stock, but I haven't seen any around that are late 80's. Was this an option that only came in later models, and if so is there a difference to the brackets?
-
Sorry if it's posted somewhere else, but searching the forums didn't get me too far! I wanted to know if the front wheel well liners from a 97+XJ are compatible with an MJ with 97+ front end. I still have the original wells on now (hard plastic type). The MJ fenders are removed and I will be working on a front end conversion soon, I just didn't know if I'll need to swing by the scrap yard and retrieve the 97+ well liners (soft/flexible ones) or stick with the original MJ ones if they'll fit the newer XJ Fenders. Appreciate the help!
-
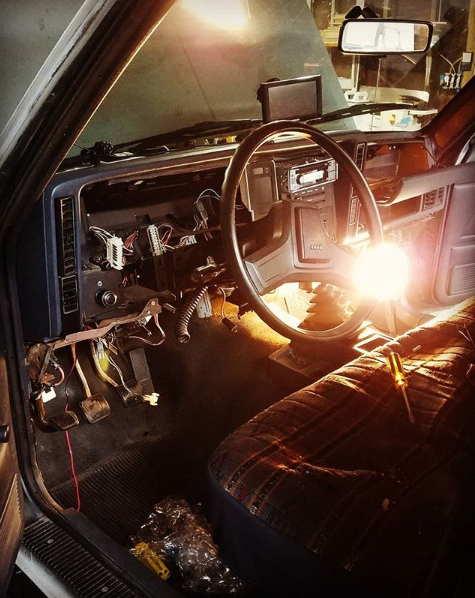
Hi all, I bought myself an 88' MJ this past summer and have been scouring the forums for tips and guides on fixing the many issues it came with. They've been super helpful and I've made good progress. I've only got outstanding electrical problems to resolve before I'm ready for winter. I've got the usual story, fluid leak/ window leak behind dash/ PO doing some sketchy radio installation work. My main concern for the moment is getting the Fuse block back in shape. Currently it's a mess and after cleaning it out and doing what I could to keep connections solid, it continues to be a constant pain when I'm trying to troubleshoot power issues and I have to go back to step one because I nudged the fuse block a little bit and something jiggled out of contact. I'm wondering if it would be better to use something like this: http://a.co/d/6eg43oy instead of ordering new connection pins and replacing them in the existing block. I figured it would let me move the block to a better location, and keep the original block for the relays and modules. does anyone have experience using similar products?