reson46 Posted August 11, 2009 Author Share Posted August 11, 2009 the stock and after market headers being almost exactly the same? Read it again. They are both Borla headers. One is an HO the other is for a renix Correct, they are both Borla headers. :thumbsup: Willy plan on selling the one with the erg fitting? No, that is what I just installed on the MJ. Willy Link to comment Share on other sites More sharing options...
freakjeep93 Posted August 11, 2009 Share Posted August 11, 2009 the stock and after market headers being almost exactly the same? Read it again. They are both Borla headers. One is an HO the other is for a renix DOH!!!! :wall: :wall: :oops: I'm a dummy Link to comment Share on other sites More sharing options...
1999MJ Posted August 11, 2009 Share Posted August 11, 2009 want to sell the HO header? Link to comment Share on other sites More sharing options...
reson46 Posted August 12, 2009 Author Share Posted August 12, 2009 want to sell the HO header? It's not for sale. Willy Link to comment Share on other sites More sharing options...
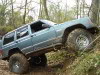
reson46 Posted August 17, 2009 Author Share Posted August 17, 2009 Had a great day wheeling at Elbe Hills Saturday. All the changes worked out pretty well so far...besides the muffler. I didn't get all the parts I had ordered to put the exhaust together so I just tossed the muffler on with some wire to hold it on. It made it through the first couple of trails. Then fell off and got really loud. You could tell exactly where I was the rest of the day. Not too many pictures of the MJ since I was solo this trip. We did have one guy break a D35 axle at the end of the last trail of the day. Considering it was welded with 37" tires it lasted longer than all of us expected. :roll: More pics here. Willy Link to comment Share on other sites More sharing options...
reson46 Posted August 18, 2009 Author Share Posted August 18, 2009 A couple of orders arrived yesterday. Got the catalytic converter and a couple of 45/180 degree bend combination tubes in 2.25" and 2.5" sizes. Besides a couple of straight pipes that I can get locally, hopefully I've got enough to finish the exhaust now. I may need to pick up another Flowmaster too. I bent up the inlet pretty well when it fell off. :doh: I'll have to see if I can salvage it. Willy Link to comment Share on other sites More sharing options...
reson46 Posted September 14, 2009 Author Share Posted September 14, 2009 I went ahead an picked up another Flowmaster and pieced the exhaust together. I tucked the catalytic converter and muffler up under the bed. I painted it with some VHT high temperate ceramic spray paint. I still need to install everything to cure the paint. Willy Link to comment Share on other sites More sharing options...
reson46 Posted September 22, 2009 Author Share Posted September 22, 2009 Installed the exhaust. I need to find some type of exhaust wrap to keep the emergency brake cable from melting. So far none of the auto parts stores around here have anything. :roll: I relocated the sway bar forward a few inches. It no longer contacts the drag link or springs. I also picked up a straight tie rod and drag link that I need to install. Now that the muffler is occupying the location once used for the passenger side shock I now need to relocate the shocks. This is something I was planning on doing anyway eventually. There was almost no travel with the shocks mounted where they were. I already have the lower shock mounts for the axle. For the top I'm going to use a piece of tubing with sleeves and multiple mounting points to put the shocks in a /\ configuration. This should allow me to use shocks with more travel. More to come as I make progress. Willy Link to comment Share on other sites More sharing options...
1990 Pioneer 4x4 Posted September 22, 2009 Share Posted September 22, 2009 Nice rig and write-up. :thumbsup: Ya seem to do quality work, wish I could find the same in our local auto shops. Link to comment Share on other sites More sharing options...
reson46 Posted October 6, 2009 Author Share Posted October 6, 2009 Installed a longer drag link, straight tie rod, and stock pitman arm reamed for the Chevy TRE. Now the steering wheel is centered. :D The drag link and track bar are pretty close to parallel. I only got a chance to drive it a couple of miles on the street, but it felt pretty good. :thumbsup: Willy Link to comment Share on other sites More sharing options...
Darren Posted October 7, 2009 Share Posted October 7, 2009 Why is the swaybar disconnected? Link to comment Share on other sites More sharing options...
reson46 Posted October 7, 2009 Author Share Posted October 7, 2009 Why is the swaybar disconnected? Because that is how we roll on the trail. :fool: Willy Link to comment Share on other sites More sharing options...
Darren Posted October 7, 2009 Share Posted October 7, 2009 :doh: Link to comment Share on other sites More sharing options...
89eliminator Posted October 7, 2009 Share Posted October 7, 2009 where did you get the axle side tracbar bracket or did you make it? Link to comment Share on other sites More sharing options...
BPB Posted October 7, 2009 Share Posted October 7, 2009 looks like balistic fab to me Link to comment Share on other sites More sharing options...
89eliminator Posted October 7, 2009 Share Posted October 7, 2009 looks like balistic fab to me thats what i thought. :thumbsup: Link to comment Share on other sites More sharing options...
reson46 Posted October 7, 2009 Author Share Posted October 7, 2009 looks like balistic fab to me Correct. It is their offset panhard bracket with one of their heims. Willy Link to comment Share on other sites More sharing options...
reson46 Posted October 19, 2009 Author Share Posted October 19, 2009 After failing at my first attempt to properly locate the upper mounts for the rear shocks, looks like I've got something that will work now. A few of the parts I started with. On the lower left are DIY4X lower shock mounts. The brackets on the lower right will mount to the frame. The tube will be drilled, sleeved, and welded to the frame brackets. This is my first attempt at doing anything with round tube. I knew I needed some way to mark two straight lines down the length of the tube offset 180* from each other so that I could get the holes and sleeves as straight as possible. I came up with this jig type thing with a couple of 2x4s and a hole saw. Here is the tube mocked up to check my chop saw notches. The jig also came in handy to hold the tube in place for drilling the holes. Holes drilled and sleeves in place. Sleeves welded in. Tube tacked in place. Lower mounts tacked in place. This is about how it will look when finished. Probably won't get much done for the next couple of weeks. Taking a long weekend to go to Yellowstone. :D Willy Link to comment Share on other sites More sharing options...
CWLONGSHOT Posted October 20, 2009 Share Posted October 20, 2009 Nice work!! Now to re-route the exhaust!!! CW Link to comment Share on other sites More sharing options...
CWLONGSHOT Posted October 20, 2009 Share Posted October 20, 2009 GREAT thinking on the drilling those parallel holes!!! CW Link to comment Share on other sites More sharing options...
reson46 Posted October 20, 2009 Author Share Posted October 20, 2009 Nice work!! Now to re-route the exhaust!!! CW Thanks. I already did the exhaust. Check out the post at the top of this page. That's what started all of this. :thumbsup: Willy Link to comment Share on other sites More sharing options...
Root Moose Posted October 20, 2009 Share Posted October 20, 2009 This thread is full of win. Link to comment Share on other sites More sharing options...
LoTGoD Posted October 20, 2009 Share Posted October 20, 2009 Nice work!! Now to re-route the exhaust!!! CW Thanks. I already did the exhaust. Check out the post at the top of this page. That's what started all of this. :thumbsup: Willy I think your last pic is what CW was talking about. From the angle of the camera, it looks like the shock will hit the exhaust if mounted in the outer-most position. After going back and looking, I can see you have plenty of clearance! Link to comment Share on other sites More sharing options...
reson46 Posted October 20, 2009 Author Share Posted October 20, 2009 Nice work!! Now to re-route the exhaust!!! CW Thanks. I already did the exhaust. Check out the post at the top of this page. That's what started all of this. :thumbsup: Willy I think your last pic is what CW was talking about. From the angle of the camera, it looks like the shock will hit the exhaust if mounted in the outer-most position. After going back and looking, I can see you have plenty of clearance! Now I see what you're referring to. That last pic does make it look close. The exhaust has plenty of room. You can kind of see in the next to last pic how much clearance the exhaust has on the right. Willy Link to comment Share on other sites More sharing options...
CWLONGSHOT Posted October 21, 2009 Share Posted October 21, 2009 YUP, Thats exactly what I was looking at when I posted that. Sorry man, didn't realize you have clearance!! Its some really nice work. CW Link to comment Share on other sites More sharing options...

Recommended Posts
Create an account or sign in to comment
You need to be a member in order to leave a comment
Create an account
Sign up for a new account in our community. It's easy!
Register a new accountSign in
Already have an account? Sign in here.
Sign In Now