watchamakalit Posted January 12, 2022 Share Posted January 12, 2022 I can attest to this. I lost a nice turbine with a brand new 31" tire. Add a strap. The piece of mind is worth it. Link to comment Share on other sites More sharing options...
howeitsdone Posted April 8, 2022 Author Share Posted April 8, 2022 Been awhile. Also been cold so I haven't really been motivated to work on anything. I decided to re-install the helper springs to help with the rear sag. Unfortunately the hardware had to be cut since it was rusted so badly when I did the AAL. I emailed Hellwig and they graciously sent out new hardware free of charge! Now that's customer service. Mind you, I'm not the original purchaser of these springs and I'm sure the transaction happened many years ago. So I spent some time this evening in the garage installing and they raised the rear about .75" which is about what I needed. Although new springs will clearly be a great upgrade... I have a small leak at the bottom of the water pump where the hose meets. Not entirely sure of the issue yet, but I just went ahead and purchased a new water pump. I still have rust in there so I got some Evaporust to flush. Once that's done I will install a new thermostat & pump to make sure things are working best. Been driving this everywhere though! I recently visited Atlanta for a couple weeks and drove the WK2 out there and back. It's got an oil leak (oil pan) and when I returned it became insanely worse. So I've parked that and really enjoyed putting miles on the truck. After tomorrow's maintenance, the WK2 takes over the garage while I put in some work replacing the oil pan. Dealer wants $1200... I'll figure it out Link to comment Share on other sites More sharing options...
Pete M Posted April 8, 2022 Share Posted April 8, 2022 dropping that IFS can be a real pain, but I'm sure the internet has some tips. Link to comment Share on other sites More sharing options...
howeitsdone Posted April 9, 2022 Author Share Posted April 9, 2022 Got the water pump replaced. Actually not a bad job at all. There was a bolt sitting loose in the housing and when I took the pump off the tip of the bolt was broken in the block. Either "Thanks PO" or "Crap how'd that happen..." Was easy enough to extract with the drill anyhow. ACE Hardware had me back up and running. Buttoned the cooling system up and got a leak at the thermostat housing with a new Fel-Pro gasket. Kinda has me stumped. It's positioned properly and torqued correctly. I ultimately took it off and sanded down the surface of the housing with a few different grits of paper. It's flat now, but pitted a bit so I think I'm going to buy a new one. I definitely need a new gasket again anyway since I ruined this one with RTV hoping it would work. I also took some sanding paper to the block itself in effort to remove the corrosion over the years. I could do a better job so maybe I'll try that tomorrow. Hopefully tomorrow will bring better luck! Link to comment Share on other sites More sharing options...
howeitsdone Posted April 9, 2022 Author Share Posted April 9, 2022 4 hours ago, Pete M said: dropping that IFS can be a real pain, but I'm sure the internet has some tips. Yeah, not going to be fun by any means. I have to buy either an engine hoist or one of those engine holders that go across the engine bay so I can drop the subframe. I have to change the transmission filter anyway and put in a drain plug so I guess I'll just get to know it a little better underneath... Link to comment Share on other sites More sharing options...
howeitsdone Posted April 11, 2022 Author Share Posted April 11, 2022 Back up and running. Water still has a slight orange tint to it so I think I'm going to do another flush. If that doesn't work then I'll have to run it that way until I can eventually find my 97+ donor. The leveling springs really made a difference too. Link to comment Share on other sites More sharing options...
howeitsdone Posted April 11, 2022 Author Share Posted April 11, 2022 Forgot to mention as well. My driver mirror was stuck in limp mode I applied clear RTV/Adhesive and held it in place overnight. Worked great! I could've applied it a little neater, but we're here... Link to comment Share on other sites More sharing options...
watchamakalit Posted April 11, 2022 Share Posted April 11, 2022 4 hours ago, PocketsEmptied said: Forgot to mention as well. My driver mirror was stuck in limp mode I applied clear RTV/Adhesive and held it in place overnight. Worked great! I could've applied it a little neater, but we're here... You need new breakaway clips the way it looks to me. Link to comment Share on other sites More sharing options...
Pete M Posted April 13, 2022 Share Posted April 13, 2022 On 4/11/2022 at 7:15 PM, watchamakalit said: You need new breakaway clips the way it looks to me. which can be found in the Vendors section of the classifieds. Link to comment Share on other sites More sharing options...
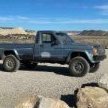
JWheeler331 Posted April 13, 2022 Share Posted April 13, 2022 Coming along. Link to comment Share on other sites More sharing options...
jeepmjga Posted April 13, 2022 Share Posted April 13, 2022 Looking good man! Time to get out on some trails out there! Link to comment Share on other sites More sharing options...
howeitsdone Posted April 18, 2022 Author Share Posted April 18, 2022 On 4/13/2022 at 5:09 PM, jeepmjga said: Looking good man! Time to get out on some trails out there! Finally put some dirt under the tires this weekend! The rear main took another loss on me. Still got me where I needed to go through steep hills and lots of sand though. Not disappointed at all with the 3.55 gears. They don’t like 7% grades on pavement, but off-road they did just fine. Link to comment Share on other sites More sharing options...
howeitsdone Posted April 18, 2022 Author Share Posted April 18, 2022 I also picked up this toolbox for $40. Sanded, painted, and put some rubber on the bed so it won’t scratch. Wish I did this sooner! Link to comment Share on other sites More sharing options...
howeitsdone Posted April 18, 2022 Author Share Posted April 18, 2022 So I was having a weird clunk noise in the front this weekend when giving throttle on a hill. 99% positive that the reason is because of the awful 10.6º pinion angle in the front. For some reason it never crossed my mind to check it, but I just had the random thought in my mind to check it. I'm going to remove all the shims in the LCAs and start from there. The UCAs are measured identical to the lift chart suggestion, but I'll adjust if needed. Link to comment Share on other sites More sharing options...
Pete M Posted April 19, 2022 Share Posted April 19, 2022 what's your caster set to? Link to comment Share on other sites More sharing options...
howeitsdone Posted April 19, 2022 Author Share Posted April 19, 2022 I removed the LCA shims and my caster is now 9.5º; It was like 11-12º. The pinion angle is about 7º. Thinking the arms just need a turn or two.. Got the UCAs unbolted from the axle yesterday and will adjust today. When I removed the LCA shims, I did a toe alignment and ran it down the road at 65mph and it did feel better. Almost like it would cruise better. But I still have this awful right pull. I thought it might be a bent axle, but I had the same problem with the original D30. Link to comment Share on other sites More sharing options...
Pete M Posted April 19, 2022 Share Posted April 19, 2022 are your left and right side wheelbase measurements exactly the same? Link to comment Share on other sites More sharing options...
howeitsdone Posted April 26, 2022 Author Share Posted April 26, 2022 Scored a full cluster from the local ads for a very good price. Since it’s my first time working with a cluster there were some errors. Battery voltage isn’t reading because the needle won’t attach. And then I opted to swap the odometer right over and not mess with setting the mileage. I didn’t realize the needles were calibrated though and it said I went 85mph! I guess these add extra HP! Luckily there is a speed trap set up down the road so I was able to calibrate it just fine. Looks a million times better! Eventually I’ll fix the voltage… Link to comment Share on other sites More sharing options...
Pete M Posted April 30, 2022 Share Posted April 30, 2022 nice don't forget to adjust the odo too. Link to comment Share on other sites More sharing options...
howeitsdone Posted May 2, 2022 Author Share Posted May 2, 2022 I swapped mine over so I didn't have to deal with it. Link to comment Share on other sites More sharing options...
howeitsdone Posted May 6, 2022 Author Share Posted May 6, 2022 New clutch over the last few days. Night & Day driving experience! It's been 7 years since I've had a new clutch in a vehicle and I forgot how smooth it is. I'll have to get used to actually rev-matching again I will note that I did not use a 2nd person to help bleed the Master/Slave. Pneumatic bleeder and some wood wedged in the seat adjuster to hold the pedal down as I opened/closed the bleeder. A bit more involved, but possible nonetheless. Link to comment Share on other sites More sharing options...
howeitsdone Posted May 7, 2022 Author Share Posted May 7, 2022 Back in July of '21, I replaced the RMS-lower, valve cover gasket, and oil pan gasket. I never replaced the upper because I didn't have a brass punch and thought the lower might solve the problem. Fast forward to now and I still have a leak back there. Get's really bad when traveling at higher speeds (more oil pressure). So today is the fun day of changing the upper RMS and putting an end to the BS. It's not going well so far lol. It's the original seal from 35 years ago and it likes going further up but not around. Fun weekend! Link to comment Share on other sites More sharing options...
saveevryjp1998 Posted May 7, 2022 Share Posted May 7, 2022 52 minutes ago, PocketsEmptied said: Back in July of '21, I replaced the RMS-lower, valve cover gasket, and oil pan gasket. I never replaced the upper because I didn't have a brass punch and thought the lower might solve the problem. Fast forward to now and I still have a leak back there. Get's really bad when traveling at higher speeds (more oil pressure). So today is the fun day of changing the upper RMS and putting an end to the BS. It's not going well so far lol. It's the original seal from 35 years ago and it likes going further up but not around. Fun weekend! I've used sturdy plastic straws with some luck. Link to comment Share on other sites More sharing options...
howeitsdone Posted May 8, 2022 Author Share Posted May 8, 2022 1 hour ago, saveevryjp1998 said: I've used sturdy plastic straws with some luck. Got it out after about 5 hours. The brass aftermath... lots more pieces around the garage somewhere Link to comment Share on other sites More sharing options...
Pete M Posted May 8, 2022 Share Posted May 8, 2022 whatever it takes to win the fight. Link to comment Share on other sites More sharing options...

Recommended Posts
Create an account or sign in to comment
You need to be a member in order to leave a comment
Create an account
Sign up for a new account in our community. It's easy!
Register a new accountSign in
Already have an account? Sign in here.
Sign In Now