Pete M Posted October 25, 2021 Share Posted October 25, 2021 inside that frame cap hides scary, scary things. Link to comment Share on other sites More sharing options...
howeitsdone Posted October 25, 2021 Author Share Posted October 25, 2021 1 hour ago, Pete M said: inside that frame cap hides scary, scary things. Thinking of cutting a bit off the top of it to get a look in there before going all-out. Link to comment Share on other sites More sharing options...
Pete M Posted October 25, 2021 Share Posted October 25, 2021 I've thought about filling it with chassis saver or por-15 and seeing what happens. Link to comment Share on other sites More sharing options...
howeitsdone Posted October 26, 2021 Author Share Posted October 26, 2021 New windshield. It's like seeing in 4k. For future reference, I ordered it as a '94 windshield (cheaper) and trim fit just fine. Link to comment Share on other sites More sharing options...
Pete M Posted October 27, 2021 Share Posted October 27, 2021 8 hours ago, PocketsEmptied said: It's like seeing in 4k. sooooo true! Link to comment Share on other sites More sharing options...
howeitsdone Posted October 28, 2021 Author Share Posted October 28, 2021 Got an NP242 out of an '89 Cherokee this morning from the JY. Took it apart to find a wonderful sight on the magnet There was almost no fluid in it, but what was in it was fairly clean, so I'm guessing they drove with low fluid for a bit. Crazy because the bearings appear to be in good condition and so are all the gear teeth. I was looking like: WHERE DID THIS METAL COME FROM? lol. I could repair my floorboards with this amount of metal. Someone has been into it before, so maybe they just didn't clean the magnet... I hope... Anyway, cleaned what remained and applied some RTV to all of the mating surfaces & loctite to the bolts. Snugged them all down and I'll torque them tomorrow when the RTV has time to harden. Link to comment Share on other sites More sharing options...
Pete M Posted October 29, 2021 Share Posted October 29, 2021 it most definitely came from somewhere. Link to comment Share on other sites More sharing options...
howeitsdone Posted October 30, 2021 Author Share Posted October 30, 2021 22 hours ago, Pete M said: it most definitely came from somewhere. Yeah, it looks like bearing/race material so I'm sure a rebuild kit is in my future. I move in two weeks so I'll put that on hold for now. Link to comment Share on other sites More sharing options...
howeitsdone Posted October 30, 2021 Author Share Posted October 30, 2021 Today was an experience for sure. Welded a section of the floor in. Before you say anything, yes I know the welds looks god awful. But I tell you it's in there for life. I've never welded a day in my life until today. Seam sealer will be my savior in this case it seems. But, hey, I don't have a giant hole in there anymore! I still have to further sand and paint. I only sprayed something down for now so it wouldn't rust overnight since I had driven a few hours to have access to a welder and ran out of time. The piece of metal is actually from a rear driver XJ panel. Fit well all things considered. Link to comment Share on other sites More sharing options...
Pete M Posted November 5, 2021 Share Posted November 5, 2021 practice on spare sheetmetal. then weld on your truck. but all-in-all it looks good enough. Link to comment Share on other sites More sharing options...
howeitsdone Posted November 6, 2021 Author Share Posted November 6, 2021 I didn't document much when doing this, but I swapped the D30 for one from a '98 XJ with 3.55s. Got it from the same guy as the replacement D35. Since it didn't come with rotors I replaced the knuckles with my '88 because I already had new everything for it. Next time I have to do the front brakes I will probably swap it back. I also replaced the worn LBJs with the ones I had just installed in the '88 axle as well. Other than needing an alignment, it's running well. I've been putting off the clutch until I move (I've already purchased it). Today, I had a full load from my storage unit and was in reverse to the driveway. I had to back into a curb and when the front wheels rested on the curb I gave it gas but the tranny just gave a loud bang and didn't go anywhere. Just wouldn't pull the weight. I ended up bumping it and made it fine, but hate that it happened. Hopefully it's ONLY the clutch and not something else. Drove just fine after. 4wd is a bit wonky. Doesn't seem happy. Will be a fun discovery. Side note, the RC suspension is actually not bad when under load. It's stiff for sure, but was very enjoyable on the 20min ride home. 1st "Off-Road" use Link to comment Share on other sites More sharing options...
howeitsdone Posted November 6, 2021 Author Share Posted November 6, 2021 11 hours ago, Pete M said: practice on spare sheetmetal. then weld on your truck. That's what I did (Top was 1st try, Bottom was 2nd) and the bead was certainly not the best, but would've been fine. But for some reason (maybe ground or just cheap welder) it just wanted to spit the weld. I'd like to acquire one and eventually learn, but this was simply to get the floor in before I move next week and won't have access to a welder. Link to comment Share on other sites More sharing options...
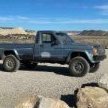
howeitsdone Posted November 14, 2021 Author Share Posted November 14, 2021 Made the move from Georgia to Utah this week. She held up nicely on the dolly. After packing the rear, it sat about 5" lower. Swayed like crazy due to the weight distribution. Not a fun way to drive 2,000mi for sure, but it does make a great enclosed trailer Can't wait to get everything situated so I can continue working on it. Link to comment Share on other sites More sharing options...
eaglescout526 Posted November 14, 2021 Share Posted November 14, 2021 Is it bad that I can see you're missing the upper trim piece? Haha looks nice and glad to see you made the move safely. Link to comment Share on other sites More sharing options...
howeitsdone Posted November 14, 2021 Author Share Posted November 14, 2021 5 minutes ago, eaglescout526 said: Is it bad that I can see you're missing the upper trim piece? It's awful right?? lol I was going to replace the header panel with similar year since it's actually cracked a lot of places, but I figure I'll just wait it out until I do a 97+ clip. Link to comment Share on other sites More sharing options...
eaglescout526 Posted November 14, 2021 Share Posted November 14, 2021 Lol all is good, just a comedic nit picker. Link to comment Share on other sites More sharing options...
howeitsdone Posted December 21, 2021 Author Share Posted December 21, 2021 Well, guess I better start working on it again lol I've honestly been driving it around town as my daily. Almost 900mi on it since this project started. Trying to keep to a minimum though now that salt is on the ground and I haven't refreshed the underbody yet. Since moving, I haven't had anything in the garage set-up. So first thing was buying a toolbox and building a couple tables/shelves this past week. Now that I've got that completed, I can finally start turning a wrench again. I've been slowly collecting the NP242 swap parts and the last will be here tomorrow. Plus the new clutch has been sitting looking for a job. I'll try to knock those two out together. Tonight I figured I would start on the decal removal. I'll probably hit a section each day this week. Boy does that factory color look great! Crazy how it's been almost pristine for 30+ years under there. Link to comment Share on other sites More sharing options...
MiNi Beast Posted December 21, 2021 Share Posted December 21, 2021 On 10/26/2021 at 1:20 PM, PocketsEmptied said: New windshield. It's like seeing in 4k. For future reference, I ordered it as a '94 windshield (cheaper) and trim fit just fine. Did you install the windshield or just the trim? I have the same color design trim and debated going to the 98 version with the rubber gasket, as wasnt sure how the trim would fit back.. Link to comment Share on other sites More sharing options...
howeitsdone Posted December 21, 2021 Author Share Posted December 21, 2021 @MiNi Beast Installed the windshield. It's my understanding the rubber trim started in '94 which was what I was hoping to have installed. The installer wouldn't do it though so he put back the old trim. There were some slight bends when put back in place, but nothing crazy. It doesn't lay flat everywhere because of this, but after a week I never paid any attention and works for me. Link to comment Share on other sites More sharing options...
MiNi Beast Posted December 21, 2021 Share Posted December 21, 2021 Gotcha man. Appreciate it. and yes that color is sweet. That camper shell is nice. good head room. Link to comment Share on other sites More sharing options...
howeitsdone Posted December 24, 2021 Author Share Posted December 24, 2021 Started on the NP242 swap today. For not having stubby or ratcheting wrenches, I'd say removal went fairly smoothly....until I got to the last bolt. It seized somehow and took the stud out instead. So I managed to remove the stud and pull the TC off, but now I can't remove the bolt from the stud itself. So I'm off to the hardware store in the morning to buy something to saw it off. Not so sure a cutoff would be smart and not thinking I can fit a Sawzall under there so may need to cut by hand. Might try a stud extractor and just hold the nut with the wrench. Then I went to swap the vacuum thing for the light since I don't have a harness yet and found out they're two different depths. So I'll have to address the electrical at another time. No big deal there. Honestly, I'd have the 242 in already if it weren't for that stud. Link to comment Share on other sites More sharing options...
eaglescout526 Posted December 24, 2021 Share Posted December 24, 2021 Have you thought about putting a couple more nuts on the stud and tightening them together and use one of those two as a hold with one wrench and wrench off the stuck one(maybe apply some heat)? Another one you could also try if you don’t want to damage the threads is to use a hot glue gun and a pair of vice grips/channel locks and hot glue the stud to either one and see if you can get the nut off that way? Link to comment Share on other sites More sharing options...
howeitsdone Posted December 24, 2021 Author Share Posted December 24, 2021 20 minutes ago, eaglescout526 said: Have you thought about putting a couple more nuts on the stud and tightening them together and use one of those two as a hold with one wrench and wrench off the stuck one(maybe apply some heat)? Another one you could also try if you don’t want to damage the threads is to use a hot glue gun and a pair of vice grips/channel locks and hot glue the stud to either one and see if you can get the nut off that way? I've already damaged the thread with vise-grips. That didn't seem to work though. It's an $0.83 part so not concerned with damaging it. I just don't have two 9/16"-16 nuts unfortunately or I would have tried that first. There's a stud that needs removal at the crossmember too and I tried jam-nutting it with no success. So I think I'll head to Autozone tomorrow and get an extractor. But now that I'm thinking about it I guess I could go to ACE and get two nuts to try that first since it's cheaper. Link to comment Share on other sites More sharing options...
watchamakalit Posted December 24, 2021 Share Posted December 24, 2021 I have a handheld butane torch that I absolutely love for stuck/seized threaded fasteners. I have found you don't always need to make things super hot to free up. I heat nuts and bolts frequently with it, with great success. they are cheap and easy to maneuver and fill. Just a suggestion. The studs in the frame can be a real bear due to the buildup of dirt and road debris that collects on top of them over time. In the past on other trucks I have cut them flush and drilled with decent success. Usually during drilling they will eventually become thin/ warm enough they will free up and just thread themselves out Link to comment Share on other sites More sharing options...
howeitsdone Posted December 24, 2021 Author Share Posted December 24, 2021 5 hours ago, watchamakalit said: I have a handheld butane torch that I absolutely love for stuck/seized threaded fasteners. I have found you don't always need to make things super hot to free up. I heat nuts and bolts frequently with it, with great success. they are cheap and easy to maneuver and fill. Just a suggestion. The studs in the frame can be a real bear due to the buildup of dirt and road debris that collects on top of them over time. In the past on other trucks I have cut them flush and drilled with decent success. Usually during drilling they will eventually become thin/ warm enough they will free up and just thread themselves out Absolutely. I do the same with a torch and some PB or WD40. There is too much oil all over the tunnel to use a flame safely. The stud for the TC has to be cut or removed with a tool. For the crossmember, I just haven’t bothered with it yet. But I want to take the drop off and bolt it back up so I probably won’t remove it. Link to comment Share on other sites More sharing options...

Recommended Posts
Create an account or sign in to comment
You need to be a member in order to leave a comment
Create an account
Sign up for a new account in our community. It's easy!
Register a new accountSign in
Already have an account? Sign in here.
Sign In Now