acerocknroll Posted November 14, 2015 Share Posted November 14, 2015 Hey all, been lurking for a while but finally found a Comanche of my own a couple weeks back so wanted to start a build thread to document the process of fixing it up. Little backstory, recently traded in my WJ towards a WK Grand Cherokee. Great vehicle but it's just a bit too generic SUV and I missed the little bit of Jeep-ness of the WJ and the ZJ I had before it. I'd been looking for an XJ to fix up and learn more about working on cars with (I do a lot of DIY projects etc but not super well versed with auto repair beyond the basics) but then I found this forum and got bit by the MJ bug! Got a line on this truck from a guy on another forum I frequent, seller wasn't in a hurry to sell so it wasn't even on Craigslist or anything. Good thing too since it took a couple weeks for me to get down to WV from Philadelphia and pick it up! It's a 1991 Eliminator, condition is pretty decent for a fixer upper, at least from what I can tell. Floors are pretty rusted out but frame seems okay. Runs, drives, shifts fine, needs some brake work though. I've already replaced the rear drums and shoes and will be doing the fronts next. One of the power steering hoses also just sprang a leak so I spent some time this morning replacing them. I know, the grill is upside down! Gonna swap it out for a cleaner one the PO threw in. Interior is not great, not terrible... will spend some time cleaning it up soon. Yes, it came like this and heck yes I'm keeping it! Until I replace with a Hurst shifter These should probably be plugged into something maybe! Who knows! (Please tell me if you know!) Seems to be an oil leak on the passenger side of the engine, saw some posts on this forum and elsewhere that this may not be a huge issue? Will clean it up and see how bad it is. Anyway, glad to finally have an MJ to call my own! I'm sure I'll have plenty of dumb questions for you guys in the weeks and months ahead. Thanks in advance! Oh yeah - any other Philly guys on CC? I can only remember seeing one other MJ in the city here like, ever. Link to comment Share on other sites More sharing options...
Strokermjcomanche Posted November 14, 2015 Share Posted November 14, 2015 Those two extra plugs are used for a/c . Link to comment Share on other sites More sharing options...
JeepsOLot Posted November 14, 2015 Share Posted November 14, 2015 Interesting, never saw an Eliminator with a bench seat! Looks to be a fun project. To piggy back on what StrokerMJ said, you will also find an unused plug by the throttle body, that is used for the auto tranny, don't need it. Welcome to the Club!! Jerry Link to comment Share on other sites More sharing options...
acerocknroll Posted November 15, 2015 Author Share Posted November 15, 2015 Those two extra plugs are used for a/c . Cool, thanks a lot! Interesting, never saw an Eliminator with a bench seat! Looks to be a fun project. To piggy back on what StrokerMJ said, you will also find an unused plug by the throttle body, that is used for the auto tranny, don't need it. Welcome to the Club!! Jerry Yeah, I was wondering about the seat too! Maybe the original buyer optioned for a bench instead of the buckets? Who knows... I don't mind it though. Thanks for the info on the other plug! Link to comment Share on other sites More sharing options...
acerocknroll Posted December 1, 2015 Author Share Posted December 1, 2015 Put a little work in this past weekend, I have a three month-old son and it's really tough finding even a little time to work on this thing! Nothing exciting to show cosmetically so here's a pic of him in his future truck with his grandpa. My dad came over to help me bleed the brakes, we didn't get too far since one of the rear lines is gushing fluid. So I've ordered a spool of cunifer brake line and associated tools, any tips before I dive in here? I think only one line is bad but I might take this opportunity to replace all of them. Should I delete the rear prop valve while I'm at it? I've seen a lot of references to replacing the MJ distribution block with an XJ prop valve but couldn't find a dedicated guide on the site here, anyone have a link? Link to comment Share on other sites More sharing options...
acerocknroll Posted December 20, 2015 Author Share Posted December 20, 2015 My wife gave me the morning off from baby duty and I finished replacing all the rear brake hard lines and the flex hose. Old: New: I removed both hard lines from the front nose and the lower front ports on the distribution block. Bypassed the rear prop valve (left it installed for now just in case I want to go back to it) and connected the main hard line directly to the top of the rear flex hose. Replaced the flex hose itself with a new one and ran new short hard lines from the sides of the hose to the wheel cylinders. If anything I did seems suspect, please let me know - I read up on the procedure a LOT but I'm still new to this. All that's left now is to add the plug to the bottom front port on the distribution block that fed to the rear prop valve and bleed the brakes. Does this seem to be the correct type of plug? It's the same size and pitch as the one on the line I removed, just want to make sure: Link to comment Share on other sites More sharing options...
88whitemanche Posted December 20, 2015 Share Posted December 20, 2015 If it works let us know the thread size and where you got it? My rear valve hasn't worked and I'm looking to eliminate it myself... Link to comment Share on other sites More sharing options...
acerocknroll Posted December 27, 2015 Author Share Posted December 27, 2015 It's a Christmas miracle! The Eliminator is on the road! Brake lines are all holding pressure and not leaking (anymore, after retightening all of them). 88whitemanche, I was hoping to be able to give a part number for that plug but of course it was in the incorrect packaging. It's a Dorman part and they had in in stock at Autozone. I brought the end of the line that goes into the bottom front port with me to the store and they had a bolt size-it chart which I used to confirm the plug was the same size and threading. I'll see if I can find the correct part # and will post it when I do. I also installed a passenger side mirror today, next up will be replace the front bumper and finally flip the grill the correct orientation! Drove it for about 30 mins today, shifts fine and no other major issues are apparent! Yet! Link to comment Share on other sites More sharing options...
shelbyluvv Posted December 28, 2015 Share Posted December 28, 2015 The bench is not factory. It is missing the head rests. Nice truck either way. Link to comment Share on other sites More sharing options...
gogmorgo Posted December 28, 2015 Share Posted December 28, 2015 Couple other things that strike me as odd are that it's sitting on turbines instead of the Elim's ten-holes, and also that the grill was redesigned for '91 so it can't be flipped upside down. Doesn't mean much, I suppose, could be a good reason for it all, but just a little funny when you start putting it all together. But still a solid truck :thumbsup: Link to comment Share on other sites More sharing options...
Strokermjcomanche Posted December 28, 2015 Share Posted December 28, 2015 When you ran the new brake lines It looks like in one of the pictures that you ran the line directly below the bump stop . It may just be the camera angle , but if you ever bottom the truck out it may ruin that line . Link to comment Share on other sites More sharing options...
acerocknroll Posted December 28, 2015 Author Share Posted December 28, 2015 Good lookin out Strokermj! You're totally right, I missed that. I'll have to rerun that line. Gogmorgo/shelbyluvv, there's a lot of weird discrepancies like that with this truck. I got the build sheet and it did come with buckets, not to mention a tape deck which was also replaced with the base radio? Weird that they would take the trouble to downgrade on a couple things but hey, a lot can happen in 25 years. Who knows, I'm not sweating it. The grill is not really attached properly at all, the bumper is dented in so far it wouldn't be possible to attach correctly even right side up. Gonna swap in a new bumper this week and it should start looking a lot better. Link to comment Share on other sites More sharing options...
HOrnbrod Posted December 28, 2015 Share Posted December 28, 2015 The grill is wrong for your 91- it's for 90 and below models. You need the one-piece XJ/MJ 01-96 grill with the built-in bar on the top like below - black in your case. Nice truck - keep 'er going. :thumbsup: Link to comment Share on other sites More sharing options...
Minuit Posted January 2, 2016 Share Posted January 2, 2016 You need a grille for a '91-'96 as said and avoid aftermarket crap for the front clip if at all possible. The parts you need would be plentiful in any half decent junkyard. With that damage you may or may not need to replace the brackets as well. The passenger side oil leak could be several things. The oil filter adapter's o-rings like to leak, but they aren't too hard to replace on these older engines. You'd need THIS seal kit. The one the parts stores sell are missing at least one of the o-rings you will need. If that checks out, you might want to look at the distributor gasket and the oil pressure sensor (that thing by the oil filter with one wire going to it). Possibly also a valve cover gasket. The head gaskets on these are known to seep a little from that exact area (they fixed it with an updated head gasket in ~1993). Unless it's gushing out oil, it's not really going to hurt anything. Other than that, looks like you've got a pretty solid shell to work with. There are no dumb questions on this forum, but if that brake line is under the bump stop, please get it out of the way ASAP. You're not likely to bottom the rear suspension out unless you put WAY too much stuff in the back but if you did it could make for a very bad day. The factory lines have a bend right before going into the drum like so: Link to comment Share on other sites More sharing options...
acerocknroll Posted January 3, 2016 Author Share Posted January 3, 2016 Thanks man! Don't worry, I'm not worried about dumb questions at all lol. I appreciate you guys catching my mistakes, it's part of why I'm here! So it's been an emotional rollercoaster but the bumper is finally off! What should take about five minutes normally was a total PITA due to the front end damage making it all but impossible to access several of the bolts on the mounting brackets, and extremely difficult to get to the upper torx bolts that hold the bumper to said bracket. In the end I was able to get all the torx off and will go back for the mount bracket bolts now that I have a better angle with the bumper removed. Also, I'm sure this is old news on this forum here but F#(&*@)&^ TORX BOLTS!!!!! AHHHHHGGHHHH ok just had to get that out lol Any protips on how to approach bending this back into shape so I can get to the last bolt and get the old bracket off and get the new one on straight? Before I go all HULK SMASH on it next week Also what is the correct replacement bolt to secure the vacuum canister inside the bumper? Mine were both gone so I don't have a reference. Link to comment Share on other sites More sharing options...
Doc. Posted January 4, 2016 Share Posted January 4, 2016 Not a "pro" tip, but a back yard tip. Do you have a come along and a tree? They can be very helpful for things like this. Link to comment Share on other sites More sharing options...
Strokermjcomanche Posted January 4, 2016 Share Posted January 4, 2016 Thanks man! Don't worry, I'm not worried about dumb questions at all lol. I appreciate you guys catching my mistakes, it's part of why I'm here! So it's been an emotional rollercoaster but the bumper is finally off! What should take about five minutes normally was a total PITA due to the front end damage making it all but impossible to access several of the bolts on the mounting brackets, and extremely difficult to get to the upper torx bolts that hold the bumper to said bracket. In the end I was able to get all the torx off and will go back for the mount bracket bolts now that I have a better angle with the bumper removed. Also, I'm sure this is old news on this forum here but F#(&*@)&^ TORX BOLTS!!!!! AHHHHHGGHHHH ok just had to get that out lol Any protips on how to approach bending this back into shape so I can get to the last bolt and get the old bracket off and get the new one on straight? Before I go all HULK SMASH on it next week Also what is the correct replacement bolt to secure the vacuum canister inside the bumper? Mine were both gone so I don't have a reference. Big pair of channel locks will bend the bracket to gain access to the bolts . Then you can hammer/ dolly the frame flange straight . Take the vacuum canister for reference to a parts store and they should have the bolts readily available . Link to comment Share on other sites More sharing options...
acerocknroll Posted January 4, 2016 Author Share Posted January 4, 2016 Will it make bending/hammering easier if I hit the area with a torch for a bit first? Link to comment Share on other sites More sharing options...
Strokermjcomanche Posted January 4, 2016 Share Posted January 4, 2016 Will it make bending/hammering easier if I hit the area with a torch for a bit first? No , that's pretty weak metal . Shouldn't have to use a torch . Link to comment Share on other sites More sharing options...
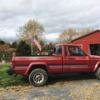
acerocknroll Posted January 10, 2016 Author Share Posted January 10, 2016 New bumper's on! Not perfect but it's close enough for now. The front header panel is pretty much toast from whatever collision it was in, gonna replace that eventually along with the headlight trim. Link to comment Share on other sites More sharing options...
Minuit Posted January 11, 2016 Share Posted January 11, 2016 :thumbsup: Link to comment Share on other sites More sharing options...
acerocknroll Posted January 11, 2016 Author Share Posted January 11, 2016 :thumbsup: Thanks to you and everyone for the advice so far! So I drove the MJ to work today (because my #&$* WK is having weird battery issues :fs2: ) - first impression: i LOVE driving this thing! It's been a while since I've had a manual but it's coming back to me pretty quick. City driving so basically second gear 24/7 lol but I got it up to 4th/60 mph for a short stretch of highway - no wobble so far. Suspension feels okay but certainly needs a bit of TLC, especially in the back. Maybe just shocks, not sure yet.. Another issue: smelled some burning oil when I got home, popped the hood and no visible smoke or leaks but opened the oil filler cap and a tiny bit of smoke was visible. Oil level checks okay if a bit on the high side. Color looks okay. Was planning on changing it this weekend but may do it earlier if I can. What else should I check? I was also planning on checking/changing the plugs with Champion coppers. Link to comment Share on other sites More sharing options...
acerocknroll Posted January 23, 2016 Author Share Posted January 23, 2016 Tested out the 4wd today! Man I love this truck so goddamn much Link to comment Share on other sites More sharing options...
vendedorpau18 Posted January 23, 2016 Share Posted January 23, 2016 Guapo el coche Link to comment Share on other sites More sharing options...
HOrnbrod Posted January 23, 2016 Share Posted January 23, 2016 Guapo el coche Guapo camión :thumbsup: Link to comment Share on other sites More sharing options...

Recommended Posts
Create an account or sign in to comment
You need to be a member in order to leave a comment
Create an account
Sign up for a new account in our community. It's easy!
Register a new accountSign in
Already have an account? Sign in here.
Sign In Now