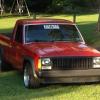
jeeptruck636 Posted October 27, 2015 Share Posted October 27, 2015 Hi Comanche Club, I am new to the club and I thought I would share my latest project. The purpose of this build is to build the best performing street only Comanche that I can. I have owned several Jeeps throughout the years, and have never been without a Jeep ever since I could drive. Most of which were lifted, but for this one I decided to go a different direction. For a little while I was looking at buying a sporty car, something turbo. But I just couldn't find the one for me, and all my wife kept telling me is that I wouldn't look right driving one of those cars. Then one day i came across the Grassroots Motorsports Jeep XJ-R and knew right then that I would be building another Jeep. So after a little more research I saw one of the Archer Racetrucks and I immediately started the search for a good Comanche to start the build. After almost a year of searching everyday on craigslist for the "right" one, I came across this... ...A 91 Comanche 2wd, shortbed, 4.0L, ax-15, 103K miles, almost no options. It's manual windows, no carpet, no intermittent wipers, no tilt, no passenger mirror, ect... pretty much no options except it has the 4.0L with a/c. It dosen't hurt either that it's already red. So after a few hours of the ad being up I was driving it home. The only things the truck needed was the parking brake fixed or replaced, the windshield washers didn't work, and the dash was cracked (which the previous owner already purchased). I just had to put it in, which is always fun. I brought the truck home on March 25, 2014 and I have done alot to this truck already, so I'm going to try to catch up. I hope everyone enjoys it as much as I have. Here's a horrible teaser pick from across the yard, of whats to come. Link to comment Share on other sites More sharing options...
Jackrabbit41 Posted October 27, 2015 Share Posted October 27, 2015 Looks good! Link to comment Share on other sites More sharing options...
neohic Posted October 27, 2015 Share Posted October 27, 2015 I see good things on the horizon. :popcorn: Link to comment Share on other sites More sharing options...
ComancheKid45 Posted October 27, 2015 Share Posted October 27, 2015 Awesome!......ive thought about "streeting" and MJ up but with where i live it just wouldnt be practical. Anxious to see this come together. Link to comment Share on other sites More sharing options...
jeeptruck636 Posted October 27, 2015 Author Share Posted October 27, 2015 After buying the Comanche I drove it for a few weeks and started to source local junkyards to gather parts for the build. I came across a MJ in the junkyard that had about 50k miles on it. :eek: The body was completely rotted out, but the interior was perfect. I pulled every trim piece out of it, the cab vents and the wiper switch. I haven't had any luck finding a parking brake assembly that worked, up until this one. It is perfect, looks like it has never been used, so out it came.When I went to pay for everything the lady at the counter must have been having a really good day, less than $30 later I was on my way. Another trip to another yard and I found a nice 96 XJ to take the brake booster and master cylinder off of, and the lower dash panel and gauge bezel to go with the 96 dash I was putting in. Dash swaps are always fun to do. After the dash was in I decided to go ahead and change over to the full gauges while I was at it. I couldn't find a odometer that was near mine, so I decided to keep it. While I was changing over the sensors to the ones for gauges, the temp sender broke off flush with the cylinder head. :rant: So I pulled the guts out of it, and grabbed the easy-outs. It fought me a little but it eventually came out. When I had it in my hand I noticed it was missing something, the bottom of the sensor broke off because the easy out was a bit too long and was now somewhere down in the cylinder head. :wall: I came up with the ingenious idea to duct tape a flexable straw to my little shop vac to suck the pieces out of the head. I doubted it would work, but eventually I was able to fish out the two broken pieces. I got bored and had a roll of carbon fiber vinyl wrap laying aound, so why not. The next post will have the completed dash along with a DIY short throw shifter. A real short throw shifter not cutting it shorter. Link to comment Share on other sites More sharing options...
jeeptruck636 Posted October 28, 2015 Author Share Posted October 28, 2015 The shifter always felt sloppy, so I looked around for a short throw replacement. I couldn't find too much except for a B&M which was more then I wanted to spend. Knowing that to make a shifters throw shorter you need to change the pivot point, I figured I could make my own. The lower seal was completely disintegrated, that's why it always felt sloppy. That is what the shifter pivots on. Taking the handle off was a pain, the best way I found was to hammer in small shims to push back the locking tabs, and hammer the handle off. The next step was to cut the end of the shifter off between the two balls, and I wasn't 100% sure what kind of metal the shifter was made of, so I didn't know if it would get hard when I welded it, and crack. So I drilled and reamed a hole to accept a .250 hardened dowel pin, to give it strength. Next was to figure out how much to lengthen the arm, I decided to go with .375 because it seemed good. :dunno: So a spacer was made, then the spacer and the small end of the shifter was drilled and reamed for the dowel as well. Next was to assemble everything and weld it together. I decided to TIG it together using no filler rod. All I wanted to do is to blend the metals together and not add any different metals to the mix (I only have stainless steel filler rods). New parts. Everything was bought through Quadratec p/n's are.. 83500520 - transmission shift cover boot. 4864226x - shifter cover seal. 83500519 - shift rod bushing. 5252043 - shifter retainer gasket X2. I forgot but I made a .375 thick aluminum spacer to compensate for the lengthened arm. Tip. To get the seal in easily put in in boiling water to soften it up, and it will go right in. All assembled. Time to find a suitable shifter knob... That seems good. (Yes I blurred it for the kids) Everthing installed and the shifter works great. People are always impressed with how it feels, it was a huge improvement over stock. This is honestly one of my favorite things I have done to the truck. (up to this point in time..more to come) If anyone is to attempt this, I'm pretty sure you wouldn't need the dowel pin. It was just a precaution. Also if I were to do it again, I would probally make the spacer .500, just to shorten it even more. Also a lathe isn't needed, I just have one at my disposal. Link to comment Share on other sites More sharing options...
gogmorgo Posted October 28, 2015 Share Posted October 28, 2015 :popcorn: I like where this is going. :rock on: Link to comment Share on other sites More sharing options...
Wiggilez Posted October 29, 2015 Share Posted October 29, 2015 just out of curiosity did you measure the before and after shift throws? Link to comment Share on other sites More sharing options...
jeeptruck636 Posted October 29, 2015 Author Share Posted October 29, 2015 I just measured it and it is 2" from neutral to any gear. Which is the diameter of the shift knob. I never measured the before because I took it off to replace the seals. Then after it was off I decided to make it a short throw. If anyone knows the stock throw that would be great. Link to comment Share on other sites More sharing options...
Wiggilez Posted October 31, 2015 Share Posted October 31, 2015 I just measured it and it is 2" from neutral to any gear. Which is the diameter of the shift knob. I never measured the before because I took it off to replace the seals. Then after it was off I decided to make it a short throw. If anyone knows the stock throw that would be great. cool, thanks. Link to comment Share on other sites More sharing options...
jeeptruck636 Posted November 11, 2015 Author Share Posted November 11, 2015 At some point I used 2" blocks to lower the rear. The next step was to find some tires for the rear. I wasn't sure what would really fit, so I decided to get some used tires to hold me over until I get the new rear axle sorted out. They are Kumho's and they're not the greatest but they'll work for a little while. The next tires will be something better and probably wider, like a 305. The rear tires now are 285/40/17. I decided to go with 17's because it's a lot easier to find tires in that rim diameter. And I will need a bigger wheel to clear the new brakes. Checking clearance. *I used the lug nut leveling technique to give me a hand. While I was at it, I decided to move the washer bottle to the inside of the fender to give room for the larger brake booster and master cylinder. As well as the Wilwood adjustable proportioning valve. Link to comment Share on other sites More sharing options...
Wiggilez Posted November 11, 2015 Share Posted November 11, 2015 I'm really liking your build, Link to comment Share on other sites More sharing options...
Comanchel0ver Posted November 17, 2015 Share Posted November 17, 2015 Is this you?? http://www.roadandtrack.com/car-culture/a27352/jeep-comanche-regular-car-reviews/ Link to comment Share on other sites More sharing options...
jeeptruck636 Posted November 18, 2015 Author Share Posted November 18, 2015 Is this you?? http://www.roadandtrack.com/car-culture/a27352/jeep-comanche-regular-car-reviews/ Yes that's me. It turned out pretty good, I think. Although there were some mistakes. The number one is that the Coors Racetruck Challenge only allowed for 4 cylinders. I'm sure Mr. Regular didn't know. Also in the video I said my tie rod was off a WJ. It's not. It's off a v8 ZJ. The same one I got the springs off of. Link to comment Share on other sites More sharing options...
Comanchel0ver Posted November 18, 2015 Share Posted November 18, 2015 Ya pretty good video really let's you see the suspension and front axle mods. I've been wanting to build a street comanche for a while. Link to comment Share on other sites More sharing options...
Fattyalx Posted November 19, 2015 Share Posted November 19, 2015 Regular car reviews did a review of your Manche? Link to comment Share on other sites More sharing options...
jeeptruck636 Posted November 19, 2015 Author Share Posted November 19, 2015 Ya pretty good video really let's you see the suspension and front axle mods. I've been wanting to build a street comanche for a while. Thanks. Go for it, that would be awesome. Regular car reviews did a review of your Manche? Yes sir. Link to comment Share on other sites More sharing options...
jeeptruck636 Posted November 23, 2015 Author Share Posted November 23, 2015 I decided to lower the front just buy cutting the factory 2wd springs. Just to drive it around for a little while like that. I lowered the front 2"-2.5" and realized I hit the no turning back point. Things were just getting too close for comfort. Either I raise it back up a little to drive it comfortably, and leave it like that. Or I start modifying the axle to allow me to go lower. So off to the junkyard I go to find another front axle. With the help of some friends we pulled a very clean 2wd axle out of a 96 XJ, and headed home. Link to comment Share on other sites More sharing options...
KJ1H Posted November 24, 2015 Share Posted November 24, 2015 Is this you?? http://www.roadandtrack.com/car-culture/a27352/jeep-comanche-regular-car-reviews/ Yes that's me. It turned out pretty good, I think. Although there were some mistakes. The number one is that the Coors Racetruck Challenge only allowed for 4 cylinders. I'm sure Mr. Regular didn't know. Also in the video I said my tie rod was off a WJ. It's not. It's off a v8 ZJ. The same one I got the springs off of. I thought that truck looked familiar! Nice ride! Link to comment Share on other sites More sharing options...
jeeptruck636 Posted November 28, 2015 Author Share Posted November 28, 2015 I thought that truck looked familiar! Nice ride! Thanks! Good luck with yours! Time to clearance the axle to go lower.. I have done some searching and found a few people who have done this. Mostly Pseudosport's XJ-R, Worlds Fastest Comanche's LSR-3, and Darren's George. I took some ideas from all of these, and made a few changes to suit my needs. I started with a piece of DOM tubing that is 2.5" diameter and .25" wall thickness. Which is the same as the factory axle, and cut 45 degree angles on both ends. Also I started to make the gussets for it. Here is the idea that we came up with. The next step is to make a quick frame to keep the upper control arm mounts the correct distance apart and at the right angle. Then cut them off. Made some root passes. Welded on the gussets and made some final passes. Link to comment Share on other sites More sharing options...
jeeptruck636 Posted December 1, 2015 Author Share Posted December 1, 2015 Wheel Time... Finding the right set of wheels for this build is the hardest part of the whole build. Everything else is just cutting and welding. But the wheels is what everyone will see. I had a few criteria when it came to the wheels. One, they had to be 17", because I need a 16" or larger to clear the brakes and it is getting hard to find tires in a 16" wheel anymore. Two, they had to be alloy, because most 17" steel wheels weigh around 40 lbs. a piece, whereas alloys are around 25 lbs. Three, the backspacing / offset had to be correct. Four, they had to be staggered (wider in rear than front). Five, they need to be affordable. Lastly, I would like for them to have a deep dish. After a long time of deciding I purchased a set of Deep Dish 03-04 Cobra wheels, in a machined finish. I am still not sure if I made the right decision on the wheels. They are a little flashy for me. Some people love them, other people hate them. I'm on the fence. I have been thinking of getting them powdered black. These are the rears, they are 17x10.5. The fronts are 17X9. Test fitting / checking clearance. Got the rear tires mounted. 285/40/17 Mounted them up. I had to pull the axle shafts out and cut around .010 off the hub to fit the Ford wheels. (I'm pretty sure it was somewhere around .010-.015 off. I can't remember). *Yes I know the 4.0 badge in in the wrong place. That was the previous owner. Give me opinions on the wheels. Like I said, I'm on the fence. Should I try black? Link to comment Share on other sites More sharing options...
coheed Posted December 1, 2015 Share Posted December 1, 2015 Personally I like the machined finish, doesn't seem too flashy to me. Now if they were chrome or polished they would be too loud for the truck. Machined aluminum has just the right amount of "flash" for me. But if you're not sold on it, how about getting the centers powered coated black and leave the lips machined? Edit: By the way, I think this build is awesome. I've always wanted a "mini truck" style Comanche. There's a guy local to me that has one that has 4" blocks on the rear, and matching lowering in the front (not sure how he accomplished this), and it looks so cool. Link to comment Share on other sites More sharing options...
neohic Posted December 1, 2015 Share Posted December 1, 2015 Black wheels are overrated and are overdone. I really dig the look of what you've got going on there. :thumbsup: Link to comment Share on other sites More sharing options...
jeeptruck636 Posted December 1, 2015 Author Share Posted December 1, 2015 I've been thinking of trying that plasti-dip stuff. Not as a permanent solution, but just to see what they would look like. Then I can peel it off and either leave them machined, or get them powdered. Also I could try what Coheed said that might be pretty cool. Link to comment Share on other sites More sharing options...
jeeptruck636 Posted December 1, 2015 Author Share Posted December 1, 2015 Edit: By the way, I think this build is awesome. I've always wanted a "mini truck" style Comanche. There's a guy local to me that has one that has 4" blocks on the rear, and matching lowering in the front (not sure how he accomplished this), and it looks so cool. Thanks a lot. I have seen some with nothing done to the front axle, but they have no suspension travel. Where mine is currently sitting I could get away with nothing done, but I like having a suspension. Where it sits now I have around 3" of up travel, and the only thing it will hit is the bumpstops. That leaves me plenty of room to go lower and still have enough travel. The red turbo LSX Comanche (I think he was from Maryland) is lowered to the bumpstops and he said it has a terrible ride. He has a really cool truck though, 500-600hp and runs 10's. Link to comment Share on other sites More sharing options...

Recommended Posts
Create an account or sign in to comment
You need to be a member in order to leave a comment
Create an account
Sign up for a new account in our community. It's easy!
Register a new accountSign in
Already have an account? Sign in here.
Sign In Now