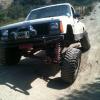
86FUBAR Posted July 16, 2007 Share Posted July 16, 2007 well figure its about time i post up my own dern project. as of right now the goal is to get it runing then fix all the little stuff. the list: .put on new large valve heads .hydro boost upgrade .OTK 1 ton steering .build/swap rubi 44 .rear shocks .build exo and partial front trugy it .and something els... hears a couple of pics of it so far, this is what i had to start with the timing chain almost fell off in my hand, their was about 5/8in of play so it was replaced , u can see the difference in length in this pic here's a couple of other pics of the truck and one of me snaping a photo u know ur throwing ur money away when u measure the piston to cylinder wall gap with a tape measure ,and on a 2.8 no less. Link to comment Share on other sites More sharing options...
DansGreyMj Posted July 17, 2007 Share Posted July 17, 2007 that thing is huge :eek: Link to comment Share on other sites More sharing options...
86FUBAR Posted July 17, 2007 Author Share Posted July 17, 2007 Ya its big i lifted it 9in to tuck 38-12.50-15 tsl or now maby an irock ,its runing on 33-12.50-15 tsl caus i didnt know how the 2.8 was gona like the new goodies i put on it (lift and stuff)but the little 2.8 did ok for about 100 miles, so ill be trying out a set of 38-14.50-15 thornbirds a budy gave me just to see. Link to comment Share on other sites More sharing options...
86FUBAR Posted July 29, 2007 Author Share Posted July 29, 2007 Well i finaly got it moving under its own power the other day and drove it around work to make sure it all works just gota button up a few things then go get it smoged .also got my new power steering pully as my buddy wile trying to help , droped my pump and bent the pully. then i decided to take a couple of wannabe shots , that and i havent flexed it out much yet i think i need to lengthn the front lines a bit, any body know of a longer front lines these are the RE 22'' lines. and my JCR OTK steering should be in on friday and hopefuly il get it on over the weekend Link to comment Share on other sites More sharing options...
RiCeMaN Posted July 29, 2007 Share Posted July 29, 2007 Great looking project, looks like shes gonna be able to stretch her legs nice on the trail. I always liked white on comanche's..hmm might have to think about white on my own project :) Link to comment Share on other sites More sharing options...
rockhardzj Posted July 29, 2007 Share Posted July 29, 2007 For the lines, how about lead the hard line to a lower point, about 6" back, and then drop a soft line to the upper arm of the y-link. Lead that to a hard line thats on the axle, over to the caliper. Just an Idea... Link to comment Share on other sites More sharing options...
86FUBAR Posted July 29, 2007 Author Share Posted July 29, 2007 I like ur idea rockhard , don't know why i didnt think of that . and its not white its beige sorry to dissapoint ya. Link to comment Share on other sites More sharing options...
ORCA Posted July 29, 2007 Share Posted July 29, 2007 Any more pictures of ur rear bumper? That thing looks nasty :cheers: Link to comment Share on other sites More sharing options...
86FUBAR Posted July 30, 2007 Author Share Posted July 30, 2007 The rear bumper is made of 2x4 1/4 wall , 2in recever and D rings and 1 1/2 pipe sliders that the rear portion of the EXO r gona conect to when i get around to building it. Link to comment Share on other sites More sharing options...
ORCA Posted July 30, 2007 Share Posted July 30, 2007 Awesome!! I really like the wrap around tubing. Have u thought about making afew and selling them? You know there is a small market for em :brows: Sign me up when you do!! Link to comment Share on other sites More sharing options...
86FUBAR Posted July 31, 2007 Author Share Posted July 31, 2007 Ya iv thought about it more and more but not enuf time lately but one day il wip up some bumpers . by the by i got the manche smogged today and it passed so as soon as i get the tags il be DD n it , at least for a little wile , no sense in tearn up the swampers when i can tear up my rubicon :banana: :evil: Link to comment Share on other sites More sharing options...
Twisty Posted July 31, 2007 Share Posted July 31, 2007 I remember seeing pics of your rear bumper before. I made sure to mimmic the wrap around skids on my bumper :brows: . Link to comment Share on other sites More sharing options...
BIGHEEP Posted July 31, 2007 Share Posted July 31, 2007 The rear bumper is made of 2x4 1/4 wall , 2in recever and D rings and 1 1/2 pipe sliders that the rear portion of the EXO r gona conect to when i get around to building it. Love the sliders connected to the rear bumper. Link to comment Share on other sites More sharing options...
ORCA Posted July 31, 2007 Share Posted July 31, 2007 Do you have any pictures of the bumper not mounted? Or underneath it? I really like the design of it man! :cheers: Link to comment Share on other sites More sharing options...
Tank4L Posted July 31, 2007 Share Posted July 31, 2007 I agree love tha bumper would really like one for my swb :brows: what would one have to pay for somethin like that? Link to comment Share on other sites More sharing options...
86FUBAR Posted July 31, 2007 Author Share Posted July 31, 2007 I don't have any pics of under the bumper but i will get some and none of it off the truck . the bumper is welded to the truck via some 2x2 1/4 angle steel and 1 1/2 flate bar on either side of the reciever . when i made i wanted some thing stout and a little diffrent than the norm at the time , i hate square tube and C-chanel bumpers with the ends in a 45 degree cut or no cut at all . to me thats nothn but a shovel hanging off the back. i know caus i ripped my smittybuilt off on a rock crushing the lower portion of the 1/4 panel on the passenger side and messing up my tailgate after that sheet metal got cut and i made the bumper. as for the cost I'm not sure . i paid nothn fer the steel (front or back bumpers) caus i built them at a budies work who is an iorn worker and his boss said i could build what ever i wanted Link to comment Share on other sites More sharing options...
86FUBAR Posted August 8, 2007 Author Share Posted August 8, 2007 WOOHOO i got my JCR OTK 1 TON steering in the other day so pics and an install will follow this friday cus i took the day off work to put it in. i might even get the rear shocks installed but we shal see , and as fer the rubi front axel itl have to wait being as i spent 700$ on a new mountian bike and so thats it so far. Link to comment Share on other sites More sharing options...
86FUBAR Posted August 13, 2007 Author Share Posted August 13, 2007 Well i got the steering done today and it came out realy good. first thing i did is disasemble all the stock junk and toss it , then i stripped the brakes hubs and axel shafts out which u don't have to do but since i was replacing the shafts and installing some axel seals i did reaming the knuckels was easy but i shoulda taken them out and did it in the drill press wich i finaly did after ruining the stock pitmanarm wich was no biggie caus i had the zj arm already but now i have a little bump steer from the 1 in drop in the arm. also i had to cut the square end off the reamer because it wouldnt alow the reamer sufficent depth in the drill chuck and tryn to finger out how to secure the dern arm to the drill seemed a bit difficult but i found an easy solution bolt it, worked perfict now all i need to do is get my work to buy a drill press that aint belt driven ;) once i got all that taken care of i test fit it then shot it with some primer and paint . then i went and cleaned out the houseing / installed the axel seals and new to me axels out of a 98tj that a friend gave to me and then reasembled the hubs and brakes. as fer the disco housing i popped the C-clips off the shift fork shaft and installed a bolt with an O-ring in its place by this time the paint was dry and the steering was ready to be installed and here it is all said and done, adjusted ,tightened and test drove it drove great , tracked strait and every thing the only thing i didnt think of is when i limited the steering at the stops on the axel to keep the steering outa the springs the steering box aint got a limit on it so it still wants to keep going so short of sending the box out to get internal stops put in i don't know what to do other that be careful . anybody know the side affects of this issue? Link to comment Share on other sites More sharing options...
86FUBAR Posted September 23, 2007 Author Share Posted September 23, 2007 Well i finaly got the E-brake working again . i had no luck finding anything longer so i decided to lower the bracket and move it back to compensate for the lift hight i lowered it down 3.5" and back 2" and it works perfect and i don't see it geting in the way of anything . Link to comment Share on other sites More sharing options...
offroader461 Posted September 27, 2007 Share Posted September 27, 2007 when you did your OTK kit did you have to address the trackbar...like relocate it up to keep the steering geometry the same??? Link to comment Share on other sites More sharing options...
Oizarod115 Posted September 27, 2007 Share Posted September 27, 2007 god i wish i had a lift. you're lucky as hell man. that looks awesome man, bad jeep ya got there. is that the thermomatic winch? puppy musta set you back some $ eh? Link to comment Share on other sites More sharing options...
86FUBAR Posted September 28, 2007 Author Share Posted September 28, 2007 when you did your OTK kit did you have to address the trackbar...like relocate it up to keep the steering geometry the same??? Well when the truck was at 4"and i added the ACOS and the zj pitman arm the track bar angle was all mesed up so i machined a steel slug that was 1 1/4 thick and welded it to the stock track bar mount (frame side) to even things out but when i lifted it to 9" and put the OTK steering on i was going to ream the stock pitman arm and put it back on and that would have put the steering /track bar angle perfict but i ruined the stock arm by trying to ream it manualy . i supose i could have cut the spacer that i welded on off but that would have really screwed with the angle but o well . the track bar on it is temporary anyhow , I'm going to build a new one and make the axel mount kinda like the one that rustys sells but only better. so on urs at 6" u might need to do the same with the track bar. as far as relocating it on urs i don't think u can do that or should for that mater . god i wish i had a lift. you're lucky as hell man. that looks awesome man, bad jeep ya got there. is that the thermomatic winch? puppy musta set you back some $ eh? ya the lift is a nice thing to have acces to whats even better is i can use the whole shop whenever i want day or night and nobody cares. when i put all of the new lift stuf on it (soa , longarms , tires etc ..) i did it during christmas break (we get a week off) so i was in there every day 10 hours plus , wrenching and it was great. and as fer the winch it is the 9.5ti and it cost me 1065.00 back when i had money befor the kid and car payment but the best dam money spent by far. Link to comment Share on other sites More sharing options...
Oizarod115 Posted September 29, 2007 Share Posted September 29, 2007 hell yeah man, those winches are badd. i can't wait i started school wednesday at gwinnett tech (like the second runner up in tech schools in the SE to NTI/UTI i only wish i could go there (luckyass :insert middle finger smiley here: )) we get to wrench on our trucks in the shop, luckily I'm in the toyota t-ten program and they just put in 10 new hydraulic lifts in, and then theres the floor lifts :brows: but i can only use them for day projects, can't be left there overnight :cry: Link to comment Share on other sites More sharing options...
86FUBAR Posted September 30, 2007 Author Share Posted September 30, 2007 i can't wait i started school wednesday at gwinnett tech (like the second runner up in tech schools in the SE to NTI/UTI i only wish i could go there (luckyass :insert middle finger smiley here: )) we get to wrench on our trucks in the shop, luckily I'm in the toyota t-ten program and they just put in 10 new hydraulic lifts in, and then theres the floor lifts :brows: but i can only use them for day projects, can't be left there overnight :cry: congradulations on the schooln ya i went to NTI and it was bada$$ but we could only work on our truck if we had already taken the class for what we were workin on like if u needed to do brakes u could only do them if u were in breaks class or already taken the class, but there were ways around that :roll: . outa courosity whats that school cost caus at the time NTI cost i think 26.xxx.xx or something and compaired to my brothers 3 years at the local JC and 4 at UC stanislaus it was a drop in the bucket (for my parents of course :yes: ) . Link to comment Share on other sites More sharing options...
86FUBAR Posted October 30, 2007 Author Share Posted October 30, 2007 Well i finaly got my MSD ignition installed , i havent gotn a chance to drive it yet but it sure idles better than ever and is very snappy i had to move a couple of things in order to mount it and would have done a cleaner install had i done it at work but o well and yes the tape is temporary. the only problem i have is the truck won't shut off when u turn the key off, no big deal but i have yet to find the proper wire needed to to install the diode to keep this from happening . has any els experenced this and figured it out id like to know Link to comment Share on other sites More sharing options...

Recommended Posts
Create an account or sign in to comment
You need to be a member in order to leave a comment
Create an account
Sign up for a new account in our community. It's easy!
Register a new accountSign in
Already have an account? Sign in here.
Sign In Now